calblacksmith Posted June 3, 2013 Report Share Posted June 3, 2013 Hello all. I will post an intro in the proper section but I just answered the thread where a member was injured on a bandsaw for lack of a push device. I have been in Aerospace for over 30 years and I have never heard of anyone hurt on a bandsaw while using one of these. This one is shop built and there is no reason it could not be made from wood, perhaps 1" plywood or MDF? Sometimes there are notches cut on the inside of the "V" for work that is smaller but nearly all the time just the V works well. As to pinching the blade, just ease up on the work pressure and let the saw do the work if that happens. Quote Link to comment Share on other sites More sharing options...
Bombarde16 Posted June 3, 2013 Report Share Posted June 3, 2013 Fascinating. Could you also post examples of what sort of metal workpiece this jig would be used to cradle? Quote Link to comment Share on other sites More sharing options...
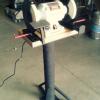
calblacksmith Posted June 3, 2013 Author Report Share Posted June 3, 2013 Sure, This is just some stock I picked up on the way to the saw. The pics show stock longer than the push V inside the V and much taller than the V We just call it a pusher. With the hands on the handles, you are always a long way from the blade. You always have full control of the stock. The items being cut may just as well be a blank for turning a bowl, some 2X2 or whatever you have. You can see by the outside or back side of the V there are marks from the blade, you can reverse the pusher and use the flat for small work or work that may flex too much for the inside. DANGER, the photos are only to show the pusher, NEVER run a band saw with the upper guide in this position, that is an accident waiting to happen!!!!!! Quote Link to comment Share on other sites More sharing options...
krtwood Posted June 3, 2013 Report Share Posted June 3, 2013 I can tell you that my band saw injury came from pushing taller stock down low like that. The stock started lifting up at the far end, and when I reached around and pushed it back down my attention was split and the cut completed before I was expecting it. I was using a regular push stick but still couldn't react fast enough and ended up with a shallow cut on the knuckle of my index finger. Quote Link to comment Share on other sites More sharing options...
Mike Frank Posted June 3, 2013 Report Share Posted June 3, 2013 hey what a great idea thanks for posting Quote Link to comment Share on other sites More sharing options...
calblacksmith Posted June 3, 2013 Author Report Share Posted June 3, 2013 I am not saying anyone did anything wrong, I was not there, but most times if the work lifts, there was too much force being used to feed the work. The saw force is straight down into the table, all we are trying to do when cutting is to guide the work through the saw, letting the saw do the work. All I can say is that in the more than 30 years in the industry, this IS the safe way to feed stock into a band saw, not just me but the whole tooling department of over 100 people. Perhaps we are all just lazy in Aerospace, and are not trying to "get the most" in speed from each cut. Aerospace DOES have a rep of not working as fast as "the real world" LOL! Sorry you were injured. Quote Link to comment Share on other sites More sharing options...
mikem Posted June 3, 2013 Report Share Posted June 3, 2013 First off, I don't think those in your field are lazy, you guys have some of the most challenging work out there. The picture examples show stock lower to the same level. For taller work pieces, such as bowl blanks, or smaller pieces being resawed, I am thinking that this design could be adapted for the taller work pieces. Your thoughts? Quote Link to comment Share on other sites More sharing options...
Tpt life Posted June 3, 2013 Report Share Posted June 3, 2013 Adaptation would be simple. A second V plate could be articulated up the two bolts shown with a potential third bolt needed at the point if the V. Quote Link to comment Share on other sites More sharing options...
mikem Posted June 3, 2013 Report Share Posted June 3, 2013 Seems like that would work well. Another thought I had would making a few out of wood at various heights as well. Calblacksmith, do you mind if I try making a couple like this and showing them here? Quote Link to comment Share on other sites More sharing options...
calblacksmith Posted June 4, 2013 Author Report Share Posted June 4, 2013 Gentlemen, You are both on the same track as myself. If you need it taller, make it taller by doubling up or more on the stock to make it from. PLEASE by all means improve all you can, safety is what we are trying to improve. The thing about the design is that both of your hands are some place OTHER than the location of the blade yet you still have the ability to control the work. In our shop, we tend to cut things that are not as tall as a lot of wood workers do, if the situation requires a taller push tool, make a taller push tool. We do not resaw stock at all, we purchase as close to finish size as possible then machine to print, this is different for sure than an operation such as resawing. I made a big MISTAKE by not stating some other basic safety precautions in the first two posts and it has bothered me all night. The photos were ONLY to show how the pusher works, the upper balde guide is not adjusted properly and is in a dangerous place if you were to actually cut the stock. First, the upper guide and post should be AS LOW AS POSSIBLE to the work for every cut. To run a band saw with the upper guide high above the work is the same as using a table saw with the blade as high as it can go, even though you are only cutting 4/4 stock, it is just a dangerious thing to do on a band saw, not to mention the fact that you will get more deflection in the blade. On a band saw, the blade guard is part of the upper guide assembly and by keeping the upper guide as low as possible, you are shielding as much of the blade as possible. Next, the bottom of the guide assembly acts to help prevent any lifting of the work, the most common way that the work can tilt if you are using a lot of force is for the top to roll back to you, the guide assembly being low to the work, helps to prevent the work from rolling backwards. My personal setting of the upper guide assembly only has about as much space as a playing card thickness. If a lot of force is need, chances are that the blade is dull, replace the blade, dull tools are dangerious be it a power tool or a pocket knife. Next, in the big picture, blades and work pieces are CHEEP, FINGERS ARE VERY EXPENSIVE, if something starts to happen that you do not like get your hands out of there! DO NOT TRY TO SAVE THE WORKPIECE, you can make another one if need but I have yet to know of someone who grew another finger. At most, you will break the blade and spoil your workpiece, both are expendable. With no pressure, a band saw stops cutting, if things start to go a direction you do not like, stop! Turn the machine off, take your work out and re-think your plan of action. There are places that a pusher like this will not work, such as against a fence for resawing, like I said above this is an operation we do not do. Faced with an operation such as that, I might be tempted to make a push stick with a notch in the side of a longer board, one that at the same time can put some inward pressure against the part of the work after the blade or as it approaches the blade and against the back of the stock too. Sort of like this with the handles at the X positions. You gentlemen who have done this will know better if this would work, this is just where I would start. ________ ] / ] /_____________------ ] ] ]__X_________________X__] On the lazy note, OH I wish what you said were true in the workplace! Two things work against us when the lay offs happen and due to the normal cycle of things, they happen several times in a career. One is that the "real world" DOES have a higher pressure work schedule, due to the nature of our work, a lot of the time, we just can not rush a process and that trickles down into other parts of the work as well, the attitude of it takes as long as it takes is not one that "other" industry may want to hear. The other thing is we are on the higher end of the pay scale so that any place that hires us while on lay off, knows that we will return to our higher pay, lower work pressure jobs just as soon as possible, leaving our non aerospace employer looking for another person to fill the job again. The hardest thing I have had to adjust to with wood working is the large tollerances in the work. My normal working tollerance is +/- 0.007" and I don't think twice about it, this is less than two sheets of writing paper and this is what we work to regardless if the project is 12" long or 50 feet long, "seven thou" is all you get. To work to this level of accuracy takes time, thus the view of us in "the real world" This is just the normal tollerance, yesterday, I inspected parts of tools that were plus or minus one-tenthousandth 0.0001". With normal conditions metal expands and contracts with temp, much like wood does with moisture. To work to this standard, the work needs to be in a temp controlled environment, just to be consistent. This work takes time so we are not as "productive" as a lot of the business in the "real world" LOL! Quote Link to comment Share on other sites More sharing options...
krtwood Posted June 4, 2013 Report Share Posted June 4, 2013 Oh I definitely did things wrong in that accident. Accidents are usually the result of a combination of things going wrong at the same time. My biggest mistake was when I realized things were going wrong I tried to keep going and correct for it rather than backing off. You don't need any kind of push stick when resawing. Once you get a few inches from the end of the cut you just switch to pulling the work through from the back. There's no risk of kickback on a band saw so you are allowed to put your hand back there. If I have a small part I need to cut I use a hand screw clamp. I like that better than this because the clamp is actually holding the work. You couldn't cut any kind of curve with that as it would just move in the pushing device. Quote Link to comment Share on other sites More sharing options...
calblacksmith Posted June 4, 2013 Author Report Share Posted June 4, 2013 While it is true that it looks like you are not able to cut a curved line, that is not the case. This is the tightest that this blade can cut and not bind. If one wants even more positive control, simply cut notches on both sides of the inside of the V. It is nice to know that when resawing, a stick isn't need, thanks! Post accident restrospect is easy but in the heat of the moment, it is much harder to act properly, again, I'm sorry you were injured. Quote Link to comment Share on other sites More sharing options...
jHop Posted June 5, 2013 Report Share Posted June 5, 2013 I'm beginning to think of a hinged guide on the bandsaw itself to go with this kind of tool. Especially useful for those cuts requiring a deeper throat... like resawing. I'm wondering if you can adjust the V pusher to accept another V-like appendage mounted perpendicular to the center point of the lower V, and attached to the band saw guides. In very much the same concept as those drawer or lid mount pieces. Like this one from Rockler... Quote Link to comment Share on other sites More sharing options...
calblacksmith Posted June 5, 2013 Author Report Share Posted June 5, 2013 I don't know how usefull it would be to attach it to the bandsaw but if you think it would improve an aspect then give it a try. It is a simple tool, easily made from shop scrap so having a couple different sizes should not be too tough to do. It is not my idea, industry has been using them for a long, long time, I am just telling you about them. I have no pattent on the idea or do I want to. If it proves to be helpful to someone, if it is a starting point for another tool, if it can save just one accident, that is all I am interested in. Quote Link to comment Share on other sites More sharing options...


Recommended Posts
Join the conversation
You can post now and register later. If you have an account, sign in now to post with your account.