bgreenb Posted March 31, 2015 Report Share Posted March 31, 2015 This build is phenomenal. I've really been enjoying it. I hope to do a guitar build someday (many years) down the line. Quote Link to comment Share on other sites More sharing options...
Brendon_t Posted April 1, 2015 Report Share Posted April 1, 2015 I am not a musician at all but I'm growing some serious respect for luthiers because of this thread. Keep it rocking. Quote Link to comment Share on other sites More sharing options...
Madkrafter Posted April 1, 2015 Author Report Share Posted April 1, 2015 Thanks everyone! I was joking with my roommate that my guitar build is being trumped by a bunch of Roubo builds I want to build one too some day! I will post some more tonight. Quote Link to comment Share on other sites More sharing options...
bgreenb Posted April 1, 2015 Report Share Posted April 1, 2015 Thanks everyone! I was joking with my roommate that my guitar build is being trumped by a bunch of Roubo builds I want to build one too some day! I will post some more tonight. Don't feel bad. The Roubo is the Holy Grail around here. I too hope to build one someday. Quote Link to comment Share on other sites More sharing options...
Madkrafter Posted April 2, 2015 Author Report Share Posted April 2, 2015 I got tied up with dovetails! I'm flying back to Chicago in May to visit family and signed up for a 1/2-day dovetail workshop with Jeff Miller. I've done one project with dovetails and that was my workbench drawers over 20 years ago (they're still holding ). I thought it would be fun to see how it's done right, seeing I want to build some furniture again. I spent the last two nights looking at dovetail saws, marking knives, marking gauges, layout tools... and I thought building guitars got expensive!!! ANYWAY.... Back to the guitar. With the back and soundboard done, it's time to button this baby up! As I said previously, the X-brace and upper face brace get notched into the kerf lining. The first thing to do is line up the top on the centerline and front to back and tape it in place to mark the locations. To make the cut, I use my Dremel plunge base with a "bridge" that goes across the body. I set my cut depth to 0.100", the same dimension that I took the braces to. When the notches are all cut, I then cut back the braces so they go into the kerf lining but stop at the side plate. When the kerf lining is cut and the braces are trimmed, it's time for a test fit... yippee ki yay! Lets clamp this baby up... First, freshen up the glue surfaces with a little sandpaper on a small block. These have been sitting for a few weeks and oxidizing, etc. Remember how freshly planed or sanded surface take glue better? This is not a place for a failed glue joint (well there's lots of places like that on an acoustic) Now... Lets clamp this baby up - with a little help from my friends. BTW: wooden cam clamps are typically used because of their light weight. Metal clamps would torque the guitar body. I only use metal clamps at the neck and tail block where there is support (and because I don't have any more cam clamps). And repeat steps 1-8 for the back... Remove the clamps, open the mold and release the body! Note that there's surprisingly little squeeze-out. The notches in the kerf lining take a lot of the glue in. It took me a minute to realize that. Quote Link to comment Share on other sites More sharing options...
Madkrafter Posted April 2, 2015 Author Report Share Posted April 2, 2015 Next thing to do is trim the excess. But how do you clamp this thing now? One word - Vacuum. This pricey little jig has a radiussed aluminum top to match the curves of the guitar. The vacuum pump holds it without anything getting in the way. Trim with a spiral flush cut bit and then a preliminary sanding of the sides with some 120 while it's held secure. I use auto body sanding blocks for sanding many of the curves. The variety of flexible backer blocks work great for the different areas. Now she's starting to look like something! 1 Quote Link to comment Share on other sites More sharing options...
wtnhighlander Posted April 2, 2015 Report Share Posted April 2, 2015 Wow! This is looking awesome. If it sounds like it looks, you will have done very well, my friend! Quote Link to comment Share on other sites More sharing options...
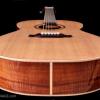
Brendon_t Posted April 2, 2015 Report Share Posted April 2, 2015 That tight grained front is spectacular. Also love the piano serial number tag on the face Quote Link to comment Share on other sites More sharing options...
Madkrafter Posted April 10, 2015 Author Report Share Posted April 10, 2015 Thought I would do a quick update on another guitar-related project that started before this acoustic build. It has been distracting me for almost two years. While thinking about getting back into guitar building, the one tool that I needed was a guitar buffer. Back in Phoenix, I would borrow "buffer time" from another builder - Phoenix Guitar Company. A number of us luthiers would hang out occasionally and show off our builds and exchange ideas. When I started thinking about building guitars again in Utah, I asked around if anybody had a buffer. I stopped by a guitar shop and was basically told by the guitar shop owner that nobody would share tools or knowledge ! At a cost of $650+ I just couldn't afford to buy one, especially since I wasn't actively building at the time. With time on my side, I decided to slowly build my own. That way I could spread out the cost. I modeled mine after the commercial version and started sourcing the parts. It all started with the shaft. I found them to be a little pricey at around $80 or so and questioned the reality of building my own. Then I found a Thomson polished linear shaft for $4!!! That started the ball rolling! Next was the pulley cover. I built a form and tried Kydex thermoplastic but couldn't bond it reliably. I then tried an old aluminum Neighborhood Watch sign that I got for $8 but the welding wasn't easy. Then I just picked up some 22 ga. and 16 ga. steel ($17) and welded that up with much better results. I had to buy the buffing wheels from my supplier of course. Two things remained: The buffing wheel steel flanges and threads on the ends of the shaft. I got a 1" x 36" shaft to match the commercial version and because the buffing wheels were made for a 1" shaft. What I found was that my supplier would not sell the flanges alone and, as it turns out, 1-1/4" is the standard for all other buffing wheels in the world (who knew). I had to order custom flanges which were a bit more than I wanted to spend ($155 - ouch) but I was too far into this thing already. The steel stand was made from scrap steel from work. Our fabricator had a bunch of scrap steel that was free for the taking. It's made up from 2-1/2" square, 2" square and 2" x 4" (1/4" wall) with 1/2" plate steel. After welding it all up, I realized that it weighs as much as me!!! It's one heavy stand! (but it was FREE) Now, I just have to get some threads cut on the shaft ends and it will be ready when this guitar is done! All in all, when I factor in the cost of the buffing wheels, polishing compound and wheel rake, I didn't save that much money. The pulleys and flanges were a major cost in the build. Shaft: $4 5/8" aluminum plate: $22 Pillow Block Stand-offs: Shop Oak-$Free Pillow Blocks: $17 Pulleys (Sheaves) & Belt: $55 Pulley cover steel: $17 Motor: $Free Heavy-As-Me Stand: $Free Switch & Wiring: Shop stock-$Free Steel Flanges: $155 Buffing wheels, compounds and rake: $178 But, I was able to spread the cost out and build something cool... Priceless! Quote Link to comment Share on other sites More sharing options...
Brendon_t Posted April 10, 2015 Report Share Posted April 10, 2015 How does a guitar buffer differ from any other type of buffing wheel besides the size of the buffing wheels themselves? Quote Link to comment Share on other sites More sharing options...
Madkrafter Posted April 10, 2015 Author Report Share Posted April 10, 2015 They are 14" buffing wheels and the biggest difference, I suppose, is the buffer speed. The pulleys are geared for 726 RPM (the motor is 1725 RPM). The slower speed is so that you don't burn through the finish. Quote Link to comment Share on other sites More sharing options...
Mike Frank Posted April 10, 2015 Report Share Posted April 10, 2015 interesting, thank you for taking the time Quote Link to comment Share on other sites More sharing options...
Brendon_t Posted April 10, 2015 Report Share Posted April 10, 2015 They are 14" buffing wheels and the biggest difference, I suppose, is the buffer speed. The pulleys are geared for 726 RPM (the motor is 1725 RPM). The slower speed is so that you don't burn through the finish. definitely makes sense. I'd hate to get that far with a build just to burn through while polishing Quote Link to comment Share on other sites More sharing options...
Llama Posted April 10, 2015 Report Share Posted April 10, 2015 This is fantastic! Quote Link to comment Share on other sites More sharing options...
Madkrafter Posted July 30, 2015 Author Report Share Posted July 30, 2015 I'm Back! Sorry for the delay. I've been so busy with other projects since my last post, I'm going to hijack my own post for a minute. So, what have I been doing lately... Before my Chicago trip where I took a dovetail class with Jeff Miller, I needed a way to transport my tools. In particular, my chisels. I recently got into leather work and had some extra that was going to be an iPad case for my Mom. Sorry Mom. I got to cutting, stitching and staining. I was working on it until late, the night before my flight but couldn't finish buffing out the edges. Still haven't. I took these photos at my Mom's after breaking the news that she was looking at what her iPad case became. After getting back from Chicago, I had to build a picture frame for one of my photos that I promised for a friend. She is a cancer survivor and a Woman of the Year candidate for the Leukemia and Lymphoma Society. She needed one more donation for her campaign. I'm happy to say that the winning bid for my framed print was $2,250 and possibly helped her WIN! The canvas was 30x40" and the total frame size is 40x50" At the same time, I get a call from another friend whose brother needed washer and dryer stands ASAP. He just bought a townhouse and was getting the washer and dryer delivered and needed them installed the night before. Going off of online specs and his measurements over the phone, I built these things hoping they would fit the space as well as the machines! They just squeaked in... but then I had to move the 220v electric up about a foot!! With those two projects done and barely delivered by their deadlines, I had some extra material in my way. When I bought the Melamine (technically Roseburg Duramine), I intentionally overbought because I wanted to build a cabinet under my table saw extension. I actually rebuilt my extension table, adding 6" making it 42". I then built the cabinet with drawers and router space. I'll show it here but also posted more here The new cabinet was great but it created a problem - when storing my longer clamps, they would extend under the extension table. Now I had to build a clamp rack! The Festool rack in the background above was on the opposite side by the garage back utility door. I moved it and had about 3' of space to work with. It sits over the foundation wall that bumped out about 3" using leftover melamine. I added some alder and notched baltic birch for the clamps. I may alter it a bit, but for now it works. And one last thing... I put a little paint and clearcoat on the buffer pulley cover. I'll just have to wait until the buffer is done to buff it out! Quote Link to comment Share on other sites More sharing options...
Brendon_t Posted July 30, 2015 Report Share Posted July 30, 2015 So you haven't been doing didley squat and still didn't bring us more guitar building pics?.. I'm disappointed Quote Link to comment Share on other sites More sharing options...
Strasberry Posted July 30, 2015 Report Share Posted July 30, 2015 Incredible thread! Looking forward to the finish! Quote Link to comment Share on other sites More sharing options...
Coop Posted July 30, 2015 Report Share Posted July 30, 2015 Another organized shop that makes me puke 1 Quote Link to comment Share on other sites More sharing options...
Madkrafter Posted July 30, 2015 Author Report Share Posted July 30, 2015 So you haven't been doing didley squat and still didn't bring us more guitar building pics?.. I'm disappointed Ha! I know, I feel so worthless! OK, I will show what I did manage to get done on the guitar... I ruined the neck! I had changed the oil in a vacuum pump and put the old oil in a tupperware container up on a shelf to get rid of later. I started working on the neck and got diverted by the other projects and "shelved" it - right next to the tupperware of oil. The lid was on it, there was no oil on the shelf, but it had off-gased right onto my new neck. Needless to say, I had to order more quarter sawn Honduran Mahogany last week Quote Link to comment Share on other sites More sharing options...
wtnhighlander Posted July 30, 2015 Report Share Posted July 30, 2015 Man, that is a bummer! I too, have noticed that those disposable tubs don't seal very well, or maybe they are somewhat porous. Quote Link to comment Share on other sites More sharing options...
..Kev Posted July 30, 2015 Report Share Posted July 30, 2015 Lesson learned there! I will keep that in mind for sure! Quote Link to comment Share on other sites More sharing options...
shaneymack Posted July 30, 2015 Report Share Posted July 30, 2015 Very nice projects! Will you be making your mom her ipad case? Cmon man, she gave you life!! Just teasing... Guitar looks fantastic, very nice work. Sorry about the neck, that sucks! Quote Link to comment Share on other sites More sharing options...
Madkrafter Posted July 30, 2015 Author Report Share Posted July 30, 2015 Very nice projects! Will you be making your mom her ipad case? Cmon man, she gave you life!! Just teasing... Guitar looks fantastic, very nice work. Sorry about the neck, that sucks! Thanks. Mom got an iPad case after all. Just not one of mine. Sent from my iPhone using Tapatalk Quote Link to comment Share on other sites More sharing options...
davewyo Posted July 31, 2015 Report Share Posted July 31, 2015 Amazing all you've accomplished. That's a real drag that the neck was ruined. It almost looks as though the oil wicked into the wood from contact with the edge of the container. On a related subject, is it generally alright to shelf an acoustic guitar build? When you get back to it is everything still "straight" or is wood movement an issue? Sure a guitar's body is well supported when fully constructed, but I would think the parts move about a bit. On top of the crafting of guitars (and leather work too), that's a great photo. The rock looks vaguely familiar. I'm going to hazard a wild guess and say Logan Canyon area. I'm pretty sure that's incorrect because the rock isn't granite, limestone, or conglomerate and I can't think of another place in the SLC-ish area with that kind of terrain. Looks like sandstone, perhaps down towards Zion NP...? Quote Link to comment Share on other sites More sharing options...
Madkrafter Posted August 1, 2015 Author Report Share Posted August 1, 2015 Hey Dave, Sorry, I didn't get a notice about your reply. I've been busy building a new photography website with Wordpress (totally new to me). Is it me or did things change around here? The format is different. Maybe I got carried away with my Wordpress tweaks and clicked something here???Amazing all you've accomplished. That's a real drag that the neck was ruined. It almost looks as though the oil wicked into the wood from contact with the edge of the container.On a related subject, is it generally alright to shelf an acoustic guitar build?When you get back to it is everything still "straight" or is wood movement an issue?Sure a guitar's body is well supported when fully constructed, but I would think the parts move about a bit. On top of the crafting of guitars (and leather work too), that's a great photo.The rock looks vaguely familiar. I'm going to hazard a wild guess and say Logan Canyon area.I'm pretty sure that's incorrect because the rock isn't granite, limestone, or conglomerate and I can't think of another place in the SLC-ish area with that kind of terrain.Looks like sandstone, perhaps down towards Zion NP...?Once the body is together, it's pretty stable as long as there are no large swings with humidity or temperature. I still have to do the binding around the guitar body and it does two things - protects the edges of the soft spruce top from bumps and dings, as well as sealing up the end grain. That said, it's been stable enough. I just met with a luthier friend and he said he has known guitar building projects to take years and all went well.The framed canvas is Provo Falls around Mirror Lake area. 1 Quote Link to comment Share on other sites More sharing options...


Recommended Posts
Join the conversation
You can post now and register later. If you have an account, sign in now to post with your account.