Popular Post Immortan D Posted October 4, 2015 Popular Post Report Share Posted October 4, 2015 Made a protective case for my Dozuki saw. I'm going to attach it to one side of my workbench, since I got used to this saw and I'm using it pretty often.After finish: 3 Quote Link to comment Share on other sites More sharing options...
Tpt life Posted October 4, 2015 Report Share Posted October 4, 2015 To each his own. I am not sure I would like the weight and bulk, but it certainly looks well executed. Nice job. 1 Quote Link to comment Share on other sites More sharing options...
Coop Posted October 4, 2015 Report Share Posted October 4, 2015 Daniel, that is cool and certainly original. Where did you get the ferrel, nut, hinge, swivel dilly? 1 Quote Link to comment Share on other sites More sharing options...
Immortan D Posted October 4, 2015 Author Report Share Posted October 4, 2015 (edited) Daniel, that is cool and certainly original. Where did you get the ferrel, nut, hinge, swivel dilly?That's just an old style brass hose connector. Tomorrow I'm going to build a knob, using the knurled ring of the adapter, which will be used to attach the case to my workbench, and at the same time, will secure the case closed. Edited October 4, 2015 by Daniel. 2 Quote Link to comment Share on other sites More sharing options...
wtnhighlander Posted October 4, 2015 Report Share Posted October 4, 2015 Gonna practice your quick-draw when its done? Pretty cool holster for your saw! 1 Quote Link to comment Share on other sites More sharing options...
Immortan D Posted October 4, 2015 Author Report Share Posted October 4, 2015 I built the knob and it's now fully functional, attached to my workbench. Quote Link to comment Share on other sites More sharing options...
Chet Posted October 4, 2015 Report Share Posted October 4, 2015 That pretty cool Daniel. Nice use of the plumbing parts, way to think outside the box. I like seeing non-woodworking parts adapted that way. 1 Quote Link to comment Share on other sites More sharing options...
Coop Posted October 5, 2015 Report Share Posted October 5, 2015 Damn, that is cool! I need to make one to fit a 9mm. Just kidding, we've already hashed that one ? 1 Quote Link to comment Share on other sites More sharing options...
..Kev Posted October 5, 2015 Report Share Posted October 5, 2015 Very cool! 1 Quote Link to comment Share on other sites More sharing options...
wtnhighlander Posted October 5, 2015 Report Share Posted October 5, 2015 Hey Daniel, care to add some details about the brass knob construction? Sounds pretty cool. Quote Link to comment Share on other sites More sharing options...
shaneymack Posted October 5, 2015 Report Share Posted October 5, 2015 Hey Daniel, really cool idea. Very well executed as well!! 1 Quote Link to comment Share on other sites More sharing options...
Immortan D Posted October 5, 2015 Author Report Share Posted October 5, 2015 Hey Daniel, care to add some details about the brass knob construction? Sounds pretty cool.Sure, no problem! Will take some extra pics and explain the contruction steps tomorrow. Quote Link to comment Share on other sites More sharing options...
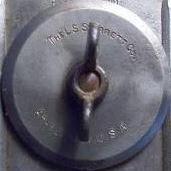
Immortan D Posted October 5, 2015 Author Report Share Posted October 5, 2015 (edited) The knob is essentially an anchor head bolt glued to the ring of a brass hose adapter.Materials:1) Anchor head bolt. I used a 5/16'' bolt, 3'' long. Black bolts look nicer, but I didn't have one of the desired length.2) Two part brass hose adapter (a). Only the ring is used for this project. If you can't find this adapter, you may try with a single piece adapter (b), removing the hose connector with a bandsaw or a hacksaw.(a)or (b)3) Two part Epoxy paste or marine epoxy. Epoxy putty may also work, but liquid epoxy I don't think so.4) Super glue, slow bonding, like Loctite gel.5) A washer. of the appropriate size.6) Optionally a nut, to act as a spacer. I used a 3/8 nut.Steps:Before starting you should cover the threads of the bolt and the outside of the ring with blue tape, otherwise the epoxy will make a mess (it happened to me...)1) Place the ring in the vise and glue the bolt from the inside, using super glue. Make the necessary adjustments to make sure it is square and let the glue dry.IMPORTANT: There is usually a silicon/rubber washer inside the adapter and it has to be removed before the glue up.2) Mix the epoxy paste and pour it into the ring.3) Place the washer with little pressure, to even the epoxy and force it into the threads.4) Wait until it dries and you're done!With optional spacer:I have yet to do some polishing. Edited October 5, 2015 by Daniel. Quote Link to comment Share on other sites More sharing options...
Janello Posted October 5, 2015 Report Share Posted October 5, 2015 Pretty ingenious way to make a knurled knob bolt. These are all items I have laying around by the dozens at work. Thanks for sharing! 1 Quote Link to comment Share on other sites More sharing options...
wtnhighlander Posted October 6, 2015 Report Share Posted October 6, 2015 Nice, Daniel! Thanks for the details. 1 Quote Link to comment Share on other sites More sharing options...
Coop Posted October 6, 2015 Report Share Posted October 6, 2015 Helluva a deal. Who'd a thunk it other than McIver! 1 Quote Link to comment Share on other sites More sharing options...
Immortan D Posted October 6, 2015 Author Report Share Posted October 6, 2015 Helluva a deal. Who'd a thunk it other than McIver! Quote Link to comment Share on other sites More sharing options...


Recommended Posts
Join the conversation
You can post now and register later. If you have an account, sign in now to post with your account.