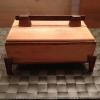
ottacat Posted October 13, 2015 Report Share Posted October 13, 2015 I came across this piece on the web and would love to make one. However, how would I make the curved joinery that creates and attaches the curved veneer panel sides to the curved cherry edging? I imagine it would involve making 1 or 2 MDF templates and use of a pattern bit but I really have no clear idea of what to do. Any help or suggestions would be most appreciated! Quote Link to comment Share on other sites More sharing options...
bgreenb Posted October 13, 2015 Report Share Posted October 13, 2015 (edited) I would make the long curved pieces wider at first, cut the miters while they're square, then cut the curves into them once the joinery is cut. There are probably less wasteful ways, but that's how I'd do it. Edit: I misunderstood. I thought you were talking about the miters. Yes, a template and flush bit is how I would do it. Edited October 13, 2015 by bgreenb Quote Link to comment Share on other sites More sharing options...
TerryMcK Posted October 13, 2015 Report Share Posted October 13, 2015 Yes MDF templates with a router will work. That's what I would do.Bandsaw and then a spokeshave will work too. I think the centre portion will be a stable substrate like mdf or ply with veneer attached. Quote Link to comment Share on other sites More sharing options...
Trip Posted October 13, 2015 Report Share Posted October 13, 2015 (edited) I don't 'know' how that piece was made, but I strongly 'suspect'... I've built a couple on the same lines...The frame is made first (splined miters), then rabbeted to accept the sandwich...The sandwich is glued in place and an inlay is used to hide the glue line (and any slop in execution)...The entire assembly is then attached to the aprons... Edited October 13, 2015 by hhh 1 Quote Link to comment Share on other sites More sharing options...
ChrisG-Canada Posted October 13, 2015 Report Share Posted October 13, 2015 I'm going to chime in with a related question. I haven't yet built a project that used a curved template and router copy bit - but considering one right now... What's the best way to create/shape the template? What I'm asking is how it the shape/profile best created? Would you just cut on bandsaw and then finalize the shape by sanding? Is there a better/more accurate way? The problem is that I'm a perfectionist so any defect in the shape will bother me - even if I'm the only one who can see it I'll know it's there!Looking for advice. Quote Link to comment Share on other sites More sharing options...
Trip Posted October 13, 2015 Report Share Posted October 13, 2015 Make a template out of MDF/BB/whatever...Fare the curve with whatever you've got...Use template to layout the curve on the stockBandsaw stock at line + 1/16"Double-stick-tape template to stock...Template route the project stock... Quote Link to comment Share on other sites More sharing options...
Andy Wright Posted October 13, 2015 Report Share Posted October 13, 2015 One thing to keep in mind is that the inside of the apron does not need to be curved. I would build it as a square table with mortise and tenons and extra material on the outside of the aprons, then cut the curves after the joinery has been completed.As far as the curves, you can do it with anything from a jigsaw to a band saw to a set of templates. My personal preference would be a template and router. However, because you can't see both sides at once it is probably not that important to have a "perfect match" I'm going to chime in with a related question. I haven't yet built a project that used a curved template and router copy bit - but considering one right now... What's the best way to create/shape the template? What I'm asking is how it the shape/profile best created? Would you just cut on bandsaw and then finalize the shape by sanding? Is there a better/more accurate way? The problem is that I'm a perfectionist so any defect in the shape will bother me - even if I'm the only one who can see it I'll know it's there!Looking for advice.MDF is what I use for all of my templates. Cut it with a bandsaw then sand/file it down the line. MDF is good because you can shape it very quickly 1 Quote Link to comment Share on other sites More sharing options...
ottacat Posted October 13, 2015 Author Report Share Posted October 13, 2015 Thanks all for your input and ideas!My thinking so far is to first make the outer frame. I do want it curved on both sides. Once the frame is made I can make it a bit oversized and then route a rabbet on the inside (will require some chisel work obviously on the corners). I would then make the inside panel from my veneered up panel.This brings to mind the question of how do I make the frame with curved sides and yet nice even mitres? I can see once the frame is made that I can trace it onto MDF and then make a template for the veneered panel. I agree that the inlay helps cover any irregularities in the cuts.I'm at work ATM but later I'll try googling to see if I can find a mirror project that has curved sides as this would essentially be what I'm going for with the frame. Quote Link to comment Share on other sites More sharing options...
Trip Posted October 13, 2015 Report Share Posted October 13, 2015 (edited) ==>this brings to mind the question of how do I make the frame with curved sides and yet nice even mitres?Miter first, cut curves after... For those that follow ---General project guideline: If possible, cut all joinery while the stock is still rectilinear, then fashion/fare the curves... Edited October 13, 2015 by hhh 2 Quote Link to comment Share on other sites More sharing options...
Janello Posted October 13, 2015 Report Share Posted October 13, 2015 I'm going to chime in with a related question. I haven't yet built a project that used a curved template and router copy bit - but considering one right now... What's the best way to create/shape the template? What I'm asking is how it the shape/profile best created? Would you just cut on bandsaw and then finalize the shape by sanding? Is there a better/more accurate way? The problem is that I'm a perfectionist so any defect in the shape will bother me - even if I'm the only one who can see it I'll know it's there!Looking for advice.check out CMT flexible template on amazon. Quote Link to comment Share on other sites More sharing options...
Trip Posted October 13, 2015 Report Share Posted October 13, 2015 http://www.leevalley.com/us/wood/page.aspx?p=51161&cat=1,42936,42958&ap=1http://www.leevalley.com/US/wood/page.aspx?p=44631&cat=1,42936,50298http://www.sterlingtoolworks.com/sample-page/roubo-curves/ Quote Link to comment Share on other sites More sharing options...
Tpt life Posted October 13, 2015 Report Share Posted October 13, 2015 No need to cut the joinery while square as long as you leave some square stock at the ends to register against an appropriately long fence. This is just a caveat to get one out of a pickle and not necessarily a recommended process. Appropriate hold downs etc must be planned for. Quote Link to comment Share on other sites More sharing options...
Guest Posted October 13, 2015 Report Share Posted October 13, 2015 One thing to keep in mind is that the inside of the apron does not need to be curved. I would build it as a square table with mortise and tenons and extra material on the outside of the aprons, then cut the curves after the joinery has been completed.As far as the curves, you can do it with anything from a jigsaw to a band saw to a set of templates. My personal preference would be a template and router. However, because you can't see both sides at once it is probably not that important to have a "perfect match" MDF is what I use for all of my templates. Cut it with a bandsaw then sand/file it down the line. MDF is good because you can shape it very quicklyYes, I cut on bandsaw and finish my shape by hand. When drawing the initial pattern for my templates, I typically only draw one half of the shape. I trace that pattern, then flip it over end for end to do the other half. This ensures symmetry. In fact, for your table you could divide the top into 4 identical sections and just make a pattern for one of the 4 sections. Kind of hard to explain, but think of a 4 way book match. Quote Link to comment Share on other sites More sharing options...
Andy Wright Posted October 13, 2015 Report Share Posted October 13, 2015 I would make two curved templates (one for long side of the frame and one for the short side). I would make the templates a couple of inches too long (no miters), and mark the centerline on each template. You can then use those templates to make the center, then make the four sides (cut inside curve on each side first, then miter it around the center using the outside of each side as reference for the miter, then cut the outside curve on each side)Once all of the pieces are a tight fit together with butt joints, I would use splines to hold it all together Quote Link to comment Share on other sites More sharing options...
RichardA Posted October 13, 2015 Report Share Posted October 13, 2015 Yes, I cut on bandsaw and finish my shape by hand. When drawing the initial pattern for my templates, I typically only draw one half of the shape. I trace that pattern, then flip it over end for end to do the other half. This ensures symmetry. In fact, for your table you could divide the top into 4 identical sections and just make a pattern for one of the 4 sections. Kind of hard to explain, but think of a 4 way book match. Look closely, and you'll see the top is a 4 way book match! 1 Quote Link to comment Share on other sites More sharing options...
ottacat Posted October 17, 2015 Author Report Share Posted October 17, 2015 So my thinking so far is to make two templates. The first one would be for the centre veneered section. The second template would be for the curved side rails and would have two sides - an inner and an outer. Both would have their centres clearly marked. Now the curve that is the outside of the first template would be exactly the same curve as the inside of the second template. To achieve this I'm thinking of making the first template and then using it to make the second template. This would be done by having a flush trim bit ride the first template and cutting directly through a second piece of MDF to make the inner curve of the second template. This is a bit easier to visualize thank describe so I'm hoping I'm clear enough. I would then mark and layout the outside curve (I would have all the necessary reference points) and then bandsaw / jigsaw it out and smooth it with sandpaper.I would then first make my frame. The straight sides could be cut out and mitred (the dimensions would be known). Then I would use the second template to make the curved long pieces. Many have suggested splines for the mitres but I have a Domino and I would use it to hold the mitres together. I've done this with other mitred frames with great success.Now I need to figure out my dimensions, pick up some 1/4" MDF and start looking for sizes - length, width, frame width, frame overhang and then laying these out on the MDF and then trying out different curves to find one that is pleasing.After all the work of making the template I'll still likely make a prototype out of poplar and lay it on my veneer to ensure I'm truly happy with the dimensions and balance of the piece. If I'm not happy I'm prepared to make a revised template - I plan on looking at that coffee table a long time. Quote Link to comment Share on other sites More sharing options...
Trip Posted October 17, 2015 Report Share Posted October 17, 2015 It's a plan...Let me suggest a simplification... How about a single template for all three curves? Just a thought... Quote Link to comment Share on other sites More sharing options...
ottacat Posted October 18, 2015 Author Report Share Posted October 18, 2015 It's a plan...Let me suggest a simplification... How about a single template for all three curves? Just a thought...It may be possible but my concern is that they shape of the curve on the outside curve will be different than the curve on the inside and thus not make a correct template for the veneered centre. That outside curve needs to start at two fixed reference points (the outsides of the mitres) and have a constant width of the width of the sides. Maybe it would work but I'm not enough of a math / geometry whiz to know in advance. Quote Link to comment Share on other sites More sharing options...
wdwerker Posted October 18, 2015 Report Share Posted October 18, 2015 When making curved templates I trace the template onto a 1/4 sheet of MDF then flip it end for end and retrace it. This shows you how asymmetric it is and guides you to refine the shape. Quote Link to comment Share on other sites More sharing options...
Trip Posted October 18, 2015 Report Share Posted October 18, 2015 (edited) ==>outside curve will be different than the curve on the insideYou can use one template -- I've done it a bunch times - it works... It's a small table, so make yourself a drawing bow. The curves will all have the same radius.... The purpose of the inlay is there to hide the glue line and any slop in execution... I can usually get away with 1/8", worst case was 1/4". Using a drawing bow helps a lot with keeping the seams tight. Edited October 18, 2015 by hhh Quote Link to comment Share on other sites More sharing options...
ottacat Posted October 26, 2015 Author Report Share Posted October 26, 2015 This weekend I picked up my 1/4" MDF template material and started work on the full sized drawing that will become the template. I realized that of course the inside and outside curves will have different arcs. I based the inside curve on a middle 2" rise (over about 46" length). I decided on 2 1/4" width of the outside rail so the outside curve has a 2 1/4" rise over the same 46" length and thus is a different curve.What surprised me was that the mitred corners will NOT be even 45° but rather something like 47° on the side and 43° the ends. I will only know the exact angle when I actually build the template and read the angle from the template. Quote Link to comment Share on other sites More sharing options...


Recommended Posts
Join the conversation
You can post now and register later. If you have an account, sign in now to post with your account.