Dave H Posted August 10, 2011 Report Share Posted August 10, 2011 I've been thinking of building a drum sander I've been looking for an inexpensive electric motor, and haven't had much luck. So this plan keep knawing away in my mind, and last night I had an aha moment. My new plan is I have a grizzly lathe Go462 variable speed 40" bed, 8" off the bed to the center of spur drive 2 horse motor, my idea and it may be crazy is put the drum between centers and build a removeable adjustable table that afixs to the bed. Of course you would have to advance the pieces through manually. My question would this be to hard on the lathe and burn out the motor? Because as far as I'm concerned thats the only possible down side. Quote Link to comment Share on other sites More sharing options...
rmac Posted August 10, 2011 Report Share Posted August 10, 2011 That's an interesting idea! I'm not sure if it would hurt your lathe or not. My gut feel is that it would probably be okay. There's also a plan floating around for a drum sander that sits on top of your table saw is powered by a belt from the table saw. It was published in Shop Notes issue #86. That might be another option if you don't want to dedicate a motor to the sander. -- Russ Quote Link to comment Share on other sites More sharing options...
TimV Posted August 10, 2011 Report Share Posted August 10, 2011 I've seen something like that before. Unfortunately, I can't remember if it was on Youtube or Lumberjocks. Do a search and something might come up. Quote Link to comment Share on other sites More sharing options...
Dave H Posted August 10, 2011 Author Report Share Posted August 10, 2011 I've done a little research and Tim is right this has been done, but than what hasn't been tried to save a buck. I haven't been able to find plans, or info on the pro's n con's, and the effect it might have on my lathe (that I love). Thanks for the comments. Dave Quote Link to comment Share on other sites More sharing options...
dwacker Posted August 10, 2011 Report Share Posted August 10, 2011 Here is one for you. http://www.stwt.org/drumsander.pdf I think getting a consistent feed rate is going to be an issue. I think if I were going to experiment Id just turn a drum and use velcro paper like on the grizzly sanders. Build just a flat thick mdf platten to sit on the lathe bed with a sled like used in a planer and feed by hand. Might be worth a shot but I still think feed rate may be a problem. I had an issue with my Powematic double drum motor that was causing the feed rate to go up and down and it really messed up the sanding job. Don Quote Link to comment Share on other sites More sharing options...
nateswoodworks Posted August 10, 2011 Report Share Posted August 10, 2011 Done before or not it is a cool idea. As to how well it will work that is the big question. I have a jet drum sander and I love it, but years before I bought it I tried making one using my old Ryolbi P.O.S. planer, since I didn't have a conveyor for the stock to feed through consistantly on burm marks were an issue. Just something to keep in mind. Nate Quote Link to comment Share on other sites More sharing options...
Rgraham888 Posted August 10, 2011 Report Share Posted August 10, 2011 I thought maybe putting a couple of rollers in next to the sanding drum and then using gear reduction to power them might work, but I think the rollers might get clogged with sawdust and slip. I've been thinking about using an old treadmill motor to power a drum sander and conveyor. The treadmill motors have standard speed control electronics and you can pick up old ones cheap. Quote Link to comment Share on other sites More sharing options...
Dave H Posted August 11, 2011 Author Report Share Posted August 11, 2011 Well I've made up my mind to proceed with this build, I will be advanceing the material through the drum sander manually for now if I get alot of burning I will rethink that at a later date. Now my idea for the drum is cut 5" circles and glue the discs together to form a 18" drum I'm wanting a hook and loop system my question is what is the best glue to use for this application, and say I use contact cement it seems like i would only get one take at being perfect, because any bubbles or voids would telegraph through to to the material being sanded. Also I already have lots of 3/4 ply scraps would this make for a stable drum, the reson I ask is most everyone who has built one and put it on the net uses MDF it seems to me plywood would also be stable, and as an added bonus moisture wouldn't make it plump just wondering is it just the lesser price of MDF that makes it attractive for this app, or is MDF more stable. Quote Link to comment Share on other sites More sharing options...
Dave H Posted August 12, 2011 Author Report Share Posted August 12, 2011 Well as it turns out I decided to go with the ply for the discs, drilled a 1/4" hole in each plywood square centered, drilled a 1/4" hole from the edge of my cross cut sled half the diamiter of my finished disc which is 2 3/4" turned a 1/4" dowel on my lathe and cut all my discs on the table saw it worked slick. I think I'm going to glue them up in batches since there are 19 of them tomorrow I'll get me a length of 1/4" all thread for alighnment purposes. This is starting to get interesting. Quote Link to comment Share on other sites More sharing options...
dwacker Posted August 12, 2011 Report Share Posted August 12, 2011 I would think the plywood varies in thickness more than mdf. I guess when its all glued up you can glue up a piece of rough sandpaper to a jointed board and sand it true on the lathe. You also may want to dedicate a face place to the drum. If you went without the velcro you can just put a screw with washer in both ends of the paper wrap. Remember to feed it from the back of the lathe. Don Quote Link to comment Share on other sites More sharing options...
Dave H Posted August 15, 2011 Author Report Share Posted August 15, 2011 It's been a long weekend I went to two seperate weddings, and I wasn't able to get the shop time I wanted. But I was able to glue up my drum unit for the lathe powered thickness sander. this was the method I used to cut all my ply discs(1/4" pivot point on my crosscut sled it worked slick) Here are the blanks, and the finished discs And this is the finished drum unit for my sander I used a 1/4" steel rod through all the center holes for alighnment purposes. the largest disc section will attach to my face plate and the small end of the drum unit will hook to the live center. Next on to the adjustable table, and dust collection. Quote Link to comment Share on other sites More sharing options...
Dave H Posted August 15, 2011 Author Report Share Posted August 15, 2011 Also I found the velcro mat thanks to Autumn over at LJ's. She built a real sweet thickness sander powered by it's own motor. The velcro matt has some super sticky self adhesive backing, and according to Autumn you don't want to mess up because it dosen't want to un stick to easy, and dosen't restick worth a damn. Going to order some tomorrow. Quote Link to comment Share on other sites More sharing options...
Dave H Posted August 23, 2011 Author Report Share Posted August 23, 2011 I have been able to work on my thickness sander again, and have built a sturdy base that bites onto my lathe rails. It mounts as easy as 6 wing nuts, and can hold my wieght and not deflect that I can tell. Quote Link to comment Share on other sites More sharing options...
TimV Posted August 23, 2011 Report Share Posted August 23, 2011 Good progress. Keep it going, I'm anxious to see it finished. Quote Link to comment Share on other sites More sharing options...
rmac Posted August 23, 2011 Report Share Posted August 23, 2011 Yeah! What TimV said. -- Russ Quote Link to comment Share on other sites More sharing options...
rmac Posted August 28, 2011 Report Share Posted August 28, 2011 This just in from our LumberJocks pals: http://lumberjocks.com/projects/52816 -- Russ Quote Link to comment Share on other sites More sharing options...
Dave H Posted August 28, 2011 Author Report Share Posted August 28, 2011 Thanks for the link Russ I was reading your post on LJ's I think maybe he must have mounted a board on the face plate and then turned a tennon to the inside diamiter of the pvc, thats how I would approach the problem. It's to late any way I've completed my lathe powered thickness sander this mouning. Last night I glued a 4" belt sanding-belt to some 3/4" particle board 50 grit on one end 80 grit on the other end. Trued up my drum my depth adjuster works real smooth. I put on the sticky backed velcro mat on the drum used a piece of poster board to find the circumfrence of the drum wacked that angle off the end of the mat and applied it to the drum only exposeing a couple inches of sticky at a time When I got to the end I just cut it off a little longer than I needed, and than just trimmed the other end with the utility knife. Same trick for the looped paper Works like a charm no burning issues, the dust collection shceme worked out great also no noticable dust in the air, and I gave it a pretty good work out trueing up the drum. I'll post some pic later today, and maybe a video. Dave Quote Link to comment Share on other sites More sharing options...
rmac Posted August 28, 2011 Report Share Posted August 28, 2011 I've completed my lathe powered thickness sander this mouning. Cool! Looking forward to the pix and/or video. -- Russ Quote Link to comment Share on other sites More sharing options...
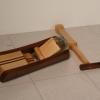
Dave H Posted August 28, 2011 Author Report Share Posted August 28, 2011 Alright I've completed my lathe powered thickness sander, and here ar the pics and a link to a video of it in opperation. The dust collection system is pictured above, on the sides panels I've embeded rare earth magnets into them to attach the air fow restrictor plates that I made out of an old sawsall case(finally something from the moutain of crap in the garage pays off). By the way the dust colection works beautiful, beyond my expectations. The Adjustable table is made of MDF 1 1/2 thick covered in formica that was left over from my kitchen, and is attached to the removable table with a piano hinge, there is an adjustment knob in the front to raise and lower the table max heighth is 3" to oops your sanding the table. The drum has hook and loop system for the sanding paper(and the velcro mat and the looped paper was my biggest expence) and here is the link to the vidio 2 Quote Link to comment Share on other sites More sharing options...
rmac Posted August 29, 2011 Report Share Posted August 29, 2011 Pretty spiffy. And painted Grizzly green to boot! Nice job. -- Russ Quote Link to comment Share on other sites More sharing options...
kep1019 Posted August 30, 2011 Report Share Posted August 30, 2011 That is a very impressive project, I have a couple questions for you if you have the time to respond. 1. Are you getting consistant results without a constant feed rate (uniform thinckness)? 2. What speed are you running the drum at? 3. what HP lathe are you using? My reasons for asking are that I have a drum sander kit from the wood working shows, like a sand flea, but it does not produce a uniform thickness. I'm thinking if yours does give that then I could flip my setup around to copy yours and have a more usable tool. Thanks, Keith Quote Link to comment Share on other sites More sharing options...
Dave H Posted August 30, 2011 Author Report Share Posted August 30, 2011 Hi Keith Yesterday was only second day I was useing the sander but as far as I can tell it's very consistant, when I reach my final thickness dimension I run the piece through two or three times and it appears to be very flat and smooth. I think my style sander is only as flat as the ajustable table is flat because that's the surface that I trued the drum to. I have a 2 horse motor on my gizzly lathe running at 1700 RPM, I can run as fast as 2000 RPM but it sounds scarry that fast. Yeah I've always wondered about those Sand Flea's it always seemed to me they could cause inconsistancys becase the infeed and out feed is on same plane. Is that your problem with the Sand Flea? Dave Quote Link to comment Share on other sites More sharing options...
kep1019 Posted August 30, 2011 Report Share Posted August 30, 2011 Dave, Thanks for the quick reply, The way my version on thesand flea works the plane of the table and drum are fine. The issues I have are with feed rate over the sanding drum go a little faster or slower creates a dip, or a slope. Smooth enough but definitely cannot get flat consistantly. I think I will try rebuilding mine to have the drum above the table and see if it works like yours, better than sitting in the corner like it is now. Keith Quote Link to comment Share on other sites More sharing options...
petersb Posted September 11, 2011 Report Share Posted September 11, 2011 Nice job! Now I want one! Quote Link to comment Share on other sites More sharing options...
Dave H Posted September 11, 2011 Author Report Share Posted September 11, 2011 Thanks Bett yeah a homemade thickness sander would go nicely with your homemade spindle sander, I liked your shop tour video, and your CrookedNail Blog. Quote Link to comment Share on other sites More sharing options...


Recommended Posts
Join the conversation
You can post now and register later. If you have an account, sign in now to post with your account.