atratinus
-
Posts
55 -
Joined
-
Last visited
atratinus's Achievements
Apprentice Poster (1/3)
3
Reputation
-
Very nice work! Better than the original one ffrom Woodsmith, I think. I have been meaning to make this project, please share how you finished the maple. Thanks! Ryan
-
Because Ferrari buyers have small --'s and too much money. Far more work gets done with a Ford Focus.
-
Addendum: with regard to demoing the original, try a flatbar and hammer. Get just under the front (tongue side) of the board and try to pry it up and forward gently, in order to preserve the bottom of the groove. Don't use a Skilsaw to reclaim, as you will lose the tongue and groove on the majority of butt joints.
-
Reclaimed rarely comes out cheap (depending on labor charges, of course.) The wood has already found its home, and generally doesn't take well to a new one. Prefin is a bit better, as it hasn't been sanded flat against its subfloor, but still. My two cents (worth exactly that) are: forget floated or glue-down, it can only be nailed. I wouldn't bother trying to plane each board (unless it's a very small install). Use a proper belt sander (or drum, but I don't get good results with those) to sand it flat and take the finish off. 36 or 40 will probably do it, with some work, but the previous posters are correct that prefin finish is a harsh mistress. All said, new walnut would be a far easier task, in my opinion. Good luck, Ryan
-
Thanks everyone, especially bubba, for pushing me toward what I think I really wanted to do anyway. (After all, I hate refinishing floors that have wax products on them, why would I do it to my own table?) And thanks for the advice on the satin, I knew about the stirring frequently, but I'll put the brushing technique to use.
-
Nice thread and very nice work. Beyond my ability to comment on it intelligently, but though I'm late to the party here, I'd love to know how you made those up swept breadboard ends. Thanks, Ryan
-
I concur with Mr. Shaffer; I live in an apartment and can only work in my covered carport. I have a closet-size storage area which is already half-full of tools and miscellaneous. I am in the market for a compact table saw (probably a Bosch) precisely because it can be stored in a small space and rolled out when needed. I have built a wall treatment/entertainment console and a dining table top with borrowed Dewalt 745, which despite a great deal of abuse cuts within 1/64 of straight. These projects are far from perfect but are nice looking and functional, and I have learned a great deal: case construction, face frames, drawers, cabinet doors and hinges, etc. With a (good) contractor saw, you get functional pieces and, more importantly, *into the craft.* The limitations of the tools you choose will quickly become apparent, I think, and what better way to educate yourself while producing furniture? I've learned an invaluable amount from these forums (and of course from Marc and his videos), but I've always done so with a view to what I can accomplish with my limited resources. I say go for the contractor saw and see where you can get with it. If nothing else, you will be set to build a new deck, bookshelves, do some flooring, etc. Good luck, Ryan
-
Hi all, I have my dining table top finished with two coats of Waterlox and it looks great, but I would like a more matte/satin finish. After some research, I have come up with three possibilities: 1. Use Waterlox satin for the final coat. (Duh.) Drawback: price of anything with 'Waterlox' on it. 2. Finishing with a couple more coats of Waterlox original, then rubbing it off with #0000 steel wool. Drawback: possible unevenness in the final sheen. 3. Apply paste wax with steel wool. I wouldn't mind learning this technique as I've never done it before. But from what I've read this process isn't as easy as it looks, is less repairable, and I thought wax was responsible for the white rings from glasses. Thoughts? Thanks, Ryan
-
Thanks for the comments, everyone. With regard to wood movement, I'm not particularly worried. Seattle's weather doesn't much vary (goes from 100% humidity (raining) to about 90% (not raining)). The amount of movement (gapping) that Kiki describes suggests some serious variability or possibly a subfloor failure of some kind. I haven't seen any gapping like that in this area without major water damage. All of that said, I anticipated some minor movement of the flooring and so did not glue the finger joints on the "skirt" boards. If they gap slightly, it should be somewhat obscured by the rounding over. I hope. Vinny, I can tell you're well above my pay grade with regard to design, but follow. I was going for a 'beefy' look, and a three-ring joint would have looked too delicate, I think. I would appreciate your (and others') further thoughts on leg and apron dimensions. I intend to use 2x2 leg blanks from Woodcraft but I wonder if these would look too slender. And I had planned on a 4 1/2-inch wide apron; I understand that this might limit leg room, but a strategic cloud lift detail might help. I just worry that a narrower apron would be structurally weak. Thanks again for all of your help, Ryan
-
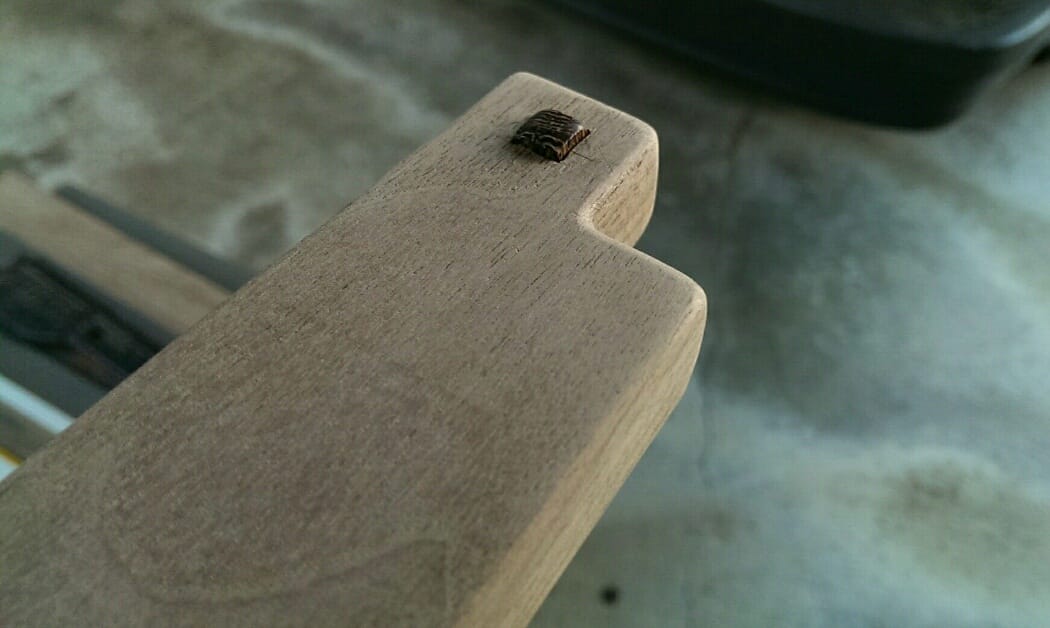
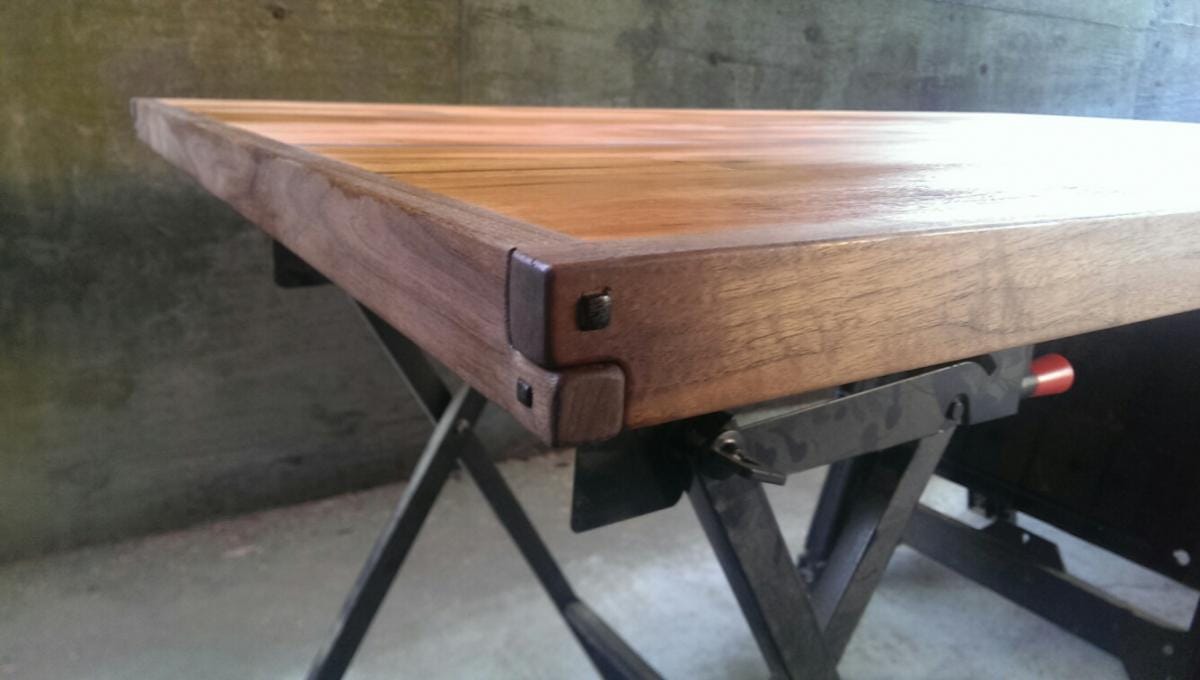
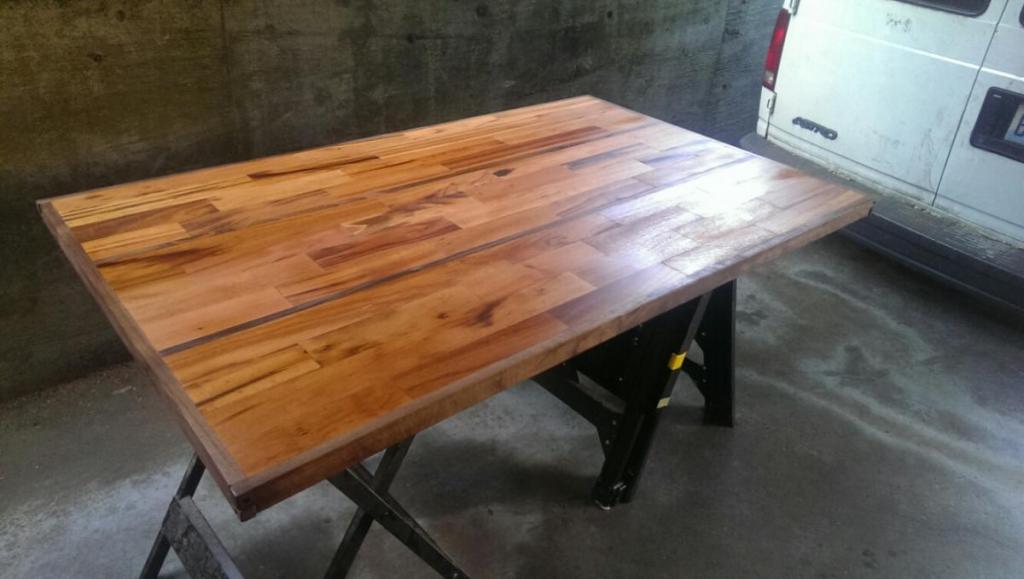
I all, I don't have enough documentation of this project to post in the 'Journals' forum, but I wanted to show the progress I've made thus far on our new dining table. It's not fine woodworking by any means, but I'm proud of the piece, especially considering it was built with standard contractor's tools (with one exception, noted below). I'm a hardwood flooring contractor, so the top is solid tigerwood shorts (sometimes called koa, I think) nailed down to a 3/4-inch birch plywood base. I used 1x walnut to hide the plywood and flooring edges, and then decided to try to emulate a few G&G details: softened 'finger joints' and wenge plugs cut from a leftover piece of feature strip. The flooring was nailed on the tongue with 15-gauge, and made flat with my flooring edger (the only specialty tool involved here). Finish is currently two coats of Waterlox original, soon to be followed by a coat of satin. The base will be made next weekend, hopefully. I will add to this post at that time, but would appreciate any comments, especially regarding topcoating with Waterlox satin and proud finger joints, aand any ideas for the legs and aprons, which are going to be African mahogany but are otherwise still unsettled. (I don't need comments on the dark four-board stagger, as I am still kicking myself for that. Ugh.) Thanks, Ryan


-
Wow, nice, thanks, Vinny. Those photos certainly seal the the deal for the straight bit. If you (or anyone else--not to drag out this thread unnecessarily) could offer your thoughts on the proportions generally employed with this detail, I would very much appreciate it. My table will have 2" square legs at 30" length; I'm thinking an indent 1 3/8" wide, around 5 1/2" long, and 1 3/4" from the bottom of the leg. Thanks, Ryan
-
Vinny, I knew that Marc had incorporated the detail in that build, but I haven't purchased it. I have found other instructions/videos online, all of which use a straight bit; I assume Marc used one as well. WoodButcher (nice handle), that bit is precisely what I was looking for. Now, though, I may just stick with the straight bit everyone else seems to have used, since I can't think of any other use I might have for a dish bit. Thanks again everyone, Ryan
-
Thanks for help, everyone. I knew someone here would have Peart's book handy! To clarify, my concern was with soften the inside corner of the indent, that is, where the "floor" of the indent meets the "walls." But if G&G didn't bother, I certainly won't. Thanks again. Ryan
-
I would like to create these details on the dining table I am building. I have studied and feel comfortable making an angled jig and using my palm router to create them, but my issue is this: most articles I've read recommend a straight cutting bit; how then do I soften the interior of the indent? I can't see G&G leaving the indent sharp, so I had originally thought I should use a cove bit or the like. I hope this is all clear, and thanks for any suggestions. Ryan
-
Thanks, Byrdie, for the confirmation. Your table sounds quite similar to what I have in mind, actually. I'm just new to furniture building, so I thought I should ask.