woodbutcher Posted January 12, 2021 Report Share Posted January 12, 2021 Hey everybody, Im edge glueing a few boards together for table top, cherry, and in two separate glue-ups, a thin line of glue is visible at the joint. Im quite confident that the joint was done properly, I fussed over each for quite a while with my 5 1/2. I use Titebond 3 and parallel clamps every 6 inches or so. This has been something I have seen in the past, but it was just a one-off thing that didnt happen again. Now its happened twice. Any advice on why this may have happened would be much appreciated. Quote Link to comment Share on other sites More sharing options...
Chet Posted January 12, 2021 Report Share Posted January 12, 2021 The first thing that pops to mind is your glue. TB3 is a darker glue and cherry a some what lighter wood especially fresh from the milling process and the glue line is going to be more visible. I know 3 gives more open time and it may note be the problem but it might be a place to start your investigation. 1 Quote Link to comment Share on other sites More sharing options...
Chestnut Posted January 12, 2021 Report Share Posted January 12, 2021 TB III isn't helping. I'm not sure your jointing method. With a hand plane I'd joint the boards so each edge is getting jointed at the same time. There is a slight trick to it, but doing it this way ensures that you get a flat joint every time. The only other technique is to make sure that you are indeed jointing a strait line. Quote Link to comment Share on other sites More sharing options...
BonPacific Posted January 12, 2021 Report Share Posted January 12, 2021 A picture would be helpful, so we can tell if you're seeing more glue or if the glue is just more visible (TB3 being so much darker than TB2). Quote Link to comment Share on other sites More sharing options...
woodbutcher Posted January 13, 2021 Author Report Share Posted January 13, 2021 Thanks for the responses guys. Ill snap a pic and post in here as soon as I can. TB3 has been my go-to, but it is a good theory that it could be responsible. Ill pick up some TB2 for my next project. 18 hours ago, Chestnut said: TB III isn't helping. I'm not sure your jointing method. With a hand plane I'd joint the boards so each edge is getting jointed at the same time. There is a slight trick to it, but doing it this way ensures that you get a flat joint every time. The only other technique is to make sure that you are indeed jointing a strait line. Chestnut - I clamp each board together in a bookmatched orientation in my vise, and plane a hairline spring joint on the edges. Im getting better at it but i only in the last year or two been using this method. So I dont guarantee that its perfect, but I have some level of confidence that it is an adequate joint. 1 Quote Link to comment Share on other sites More sharing options...
BillyJack Posted January 13, 2021 Report Share Posted January 13, 2021 Picture? Quote Link to comment Share on other sites More sharing options...
gee-dub Posted January 13, 2021 Report Share Posted January 13, 2021 I agree that TB-III could be a bad choice. I use a lot of darker woods and it is really the only glue I have purchased for many years. I have a maple cutting board blank with a bad joint. I re-sawed that section and re-glued. The point being that you can see the dark glue at the fix and see the other joints as an example of TB-III on a light wood. This may not be the best example as I am not trying to hide the joints with the figure. However, with a good figure match I would think these joints would be fairly unnoticed. Are your joints more prominent than these? As stated, a pic would help. Quote Link to comment Share on other sites More sharing options...
BillyJack Posted January 13, 2021 Report Share Posted January 13, 2021 Even in the restaurant furniture industry we don't usd TB3 unless it's exterior. TB2 is fine for most tables, etc. The finish on top,is the important protection... Quote Link to comment Share on other sites More sharing options...
Woodenskye Posted January 13, 2021 Report Share Posted January 13, 2021 Others have spoke about the glue, but my question is your clamping strategy. You mention parallel clamps every 6 inches, but are you just putting clamps under the panel or alternating bottom and top? Also if your really clamping really tight it could be an issue as well. 1 Quote Link to comment Share on other sites More sharing options...
curlyoak Posted January 14, 2021 Report Share Posted January 14, 2021 It might be the sanding. Need to start coarse enough. Use fine paper too quick you may leave glue behind. I belt sand my glue ups on a 45 degrees to the grain. It flattens better that way. Then I run the belt with the grain. Then RO. I use 100 belt then 100, 150, 220 and sometimes finer with RO. The question here is extra challenging as there is no picture. If a good answer is desired provide a good picture. Quote Link to comment Share on other sites More sharing options...
Popular Post Coop Posted January 14, 2021 Popular Post Report Share Posted January 14, 2021 9 hours ago, woodbutcher said: Chestnut - I clamp each board together in a bookmatched orientation in my vise, and plane a hairline spring joint on the edges. Just my opinion and most often it’s not well agreed on but I think a spring joint is highly overrated. I see no reason to intentionally create a void in the middle of two boards you hope to become one. The purpose of a jointer or good rip cuts on the ts is to get as smooth of an edge as possible to joint to a similarly cut board. Does your problematic visible glue line run the length of the joint? 5 Quote Link to comment Share on other sites More sharing options...
BillyJack Posted January 14, 2021 Report Share Posted January 14, 2021 Good saw joints or jointing sitting over night can become unstraight but the clamps can quickly take care if that Quote Link to comment Share on other sites More sharing options...
BonPacific Posted January 14, 2021 Report Share Posted January 14, 2021 1 hour ago, Coop said: Just my opinion and most often it’s not well agreed on but I think a spring joint is highly overrated. I see no reason to intentionally create a void in the middle of two boards you hope to become one. The purpose of a jointer or good rip cuts on the ts is to get as smooth of an edge as possible to joint to a similarly cut board. Does your problematic visible glue line run the length of the joint? I think a spring joint can be a great trick if you don't have enough clamps. Otherwise I agree it's just adding extra stress or a void. 2 Quote Link to comment Share on other sites More sharing options...
woodbutcher Posted January 15, 2021 Author Report Share Posted January 15, 2021 Sorry Ive been so absent from this thread everyone, I really appreciate the responses. I had a setback with the panel glueups, they took a bit of a bump when I was working the edges and they let go. I am absolutely going to try TB2 and just joint the edges with my jointer. My jointer joints an edge that is a little high in the middle, so im not sure what to do about that. But ill deal with that when I get back on this project. This panel glue up project really has me scratching my head, I have struggled with it from basically the start. Ive done plenty of these in the past with out any problems. On 1/13/2021 at 10:52 AM, Woodenskye said: Others have spoke about the glue, but my question is your clamping strategy. You mention parallel clamps every 6 inches, but are you just putting clamps under the panel or alternating bottom and top? Also if your really clamping really tight it could be an issue as well. I do alternate my clamps top and bottom. And i had thought about possibly over-tightening them, so on the second panel I made certain I was tightening the clamps enough to close the joint, and not much more. Didnt change the outcome. On 1/13/2021 at 5:56 PM, Coop said: Just my opinion and most often it’s not well agreed on but I think a spring joint is highly overrated. I see no reason to intentionally create a void in the middle of two boards you hope to become one. The purpose of a jointer or good rip cuts on the ts is to get as smooth of an edge as possible to joint to a similarly cut board. Does your problematic visible glue line run the length of the joint? yes, It does run the full length. I guess at this point I do not rule out that I may have over done the spring joint. I didnt think so at first, but at this point, anything is possible. Quote Link to comment Share on other sites More sharing options...
Chet Posted January 15, 2021 Report Share Posted January 15, 2021 1 hour ago, woodbutcher said: My jointer joints an edge that is a little high in the middle, This sound like your outfield table is lower at the far end then it at the blade end. There should be a section in your manual as to how to adjust this. Quote Link to comment Share on other sites More sharing options...
woodbutcher Posted January 15, 2021 Author Report Share Posted January 15, 2021 14 minutes ago, Chet said: This sound like your outfield table is lower at the far end then it at the blade end. There should be a section in your manual as to how to adjust this. Thank you Chet. Its a dovetail way jointer bed, I understand that it can be a real hassle to adjust. Ive heard guys have used feeler gauges to shim them, pop cans cut up, have you ever had to adjust one? Quote Link to comment Share on other sites More sharing options...
RichardA Posted January 15, 2021 Report Share Posted January 15, 2021 Since it's an edge joint, and not a face joint. Try shifting your jointer fence inward a couple of inches. And make sure after you do that to square it up again. Quote Link to comment Share on other sites More sharing options...
Chet Posted January 15, 2021 Report Share Posted January 15, 2021 2 hours ago, woodbutcher said: Thank you Chet. Its a dovetail way jointer bed, I understand that it can be a real hassle to adjust. Ive heard guys have used feeler gauges to shim them, pop cans cut up, have you ever had to adjust one? Yes, I had to do my old 6 inch jointer years back. I didn't find it a hassle, it can be time consuming and I think that is were people get frustrated. You just need to plan on spending some time. I think if you are somewhat prepared its not that bad. I had some shims ready to go, more then I needed but this made it easier because I didn't have to stop to cut more. Quote Link to comment Share on other sites More sharing options...
BillyJack Posted January 15, 2021 Report Share Posted January 15, 2021 What's overtightening on panel glueups? Quote Link to comment Share on other sites More sharing options...
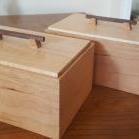
woodbutcher Posted January 17, 2021 Author Report Share Posted January 17, 2021 So my frustration level rises. I have been attempting to get a glue-up ready edge off my power jointer (Jet 6-inch helical head model, nice jointer, bought it used.) I had mentioned earlier in the post that my jointer leaves a bump in the middle of the board, leaving a gap at either end. Well, one thing lead to another, and saturday found me tearing apart the jointer, cleaning the dovetail ways, lubing them, then using a dial indicator and jig i made dialing in the outfeed table with shims in the ways. I have the far end of the outfeed table to within a couple thou of the near end of the table. There is a big dip in the middle of the table, .005-.006" id say, but it comes back to where it started. I am fairly certain that I have the outfeed table as level with the infeed side as I will be able to get it, given the irregularity with the low spot in the middle. I put the jointer back together and this now leads me to where im going with this post. I have spent a good bit of time getting the height of the outfeed table just right. It started high, I was still seeing a bump in the middle of the boards, but no snipe near the end which is the sign the table is low. Wasnt getting that. I lowered the table a quarter turn of the handle at a time, still seeing a bump in the middle, no snipe. Finally got snipe, still has a bump in the middle. Raise the table back up until the snipe quit, still have the bump. I have tried varying my technique, shifting pressure to the outfeed table as soon as the board reaches it, ive tried dropping the board onto the knives in the middle of the board a couple times to remove the bump, then full pass to level it out, no good. I took some pictures of the edge im trying to straighten out so you can see what im dealing with. First end Middle, as you can see, its closed up. Far end, back open. Feeling quite dejected at this point. Glue-ups are woodworking 101, Ive been doing this for 4 years now, and have never struggled this much with edge glue-ups. Thanks everyone, and thanks for all the advice provided to me in this post so far. I really appreciate it. 1 Quote Link to comment Share on other sites More sharing options...
Chestnut Posted January 17, 2021 Report Share Posted January 17, 2021 Trying bringing your outfeed all the way up. On my HH if i set a board on the cuttign eget it moves the board maybe 1/4" it's barley touching. From my research a belly means the outfeed is too low. Quote Link to comment Share on other sites More sharing options...
curlyoak Posted January 17, 2021 Report Share Posted January 17, 2021 Are you testing the jointer with a board longer than the jointer? if so cut a stick the length of the jointer and run that. If you have a longer piece than the jointer you could keep making it worse. Sometimes you need to start in the middle or at an end a short pass or 2. Or it could just follow the bow. A short piece test could be revealing. Quote Link to comment Share on other sites More sharing options...
Coop Posted January 17, 2021 Report Share Posted January 17, 2021 Early on, I found that trying to take the “hump” out of a board, the hump is only accented by incorrect feed. I always plane the board on the other edge, taking the high part of the ends off first. Take a scrap board that is relatively smooth and run it thru and see if it leaves a hump. Quote Link to comment Share on other sites More sharing options...
wtnhighlander Posted January 18, 2021 Report Share Posted January 18, 2021 Did you previously mention running the 2 boards "bookmatched" together across the jointer? That will cause the error along the length to be doubled. A board will "belly" in the middle when the infeed is not co-planer to the outfeed. Specifically if the end of the table nearest the cutter is lower that the other end. Or any infeed support you might be using for ling boards. Quote Link to comment Share on other sites More sharing options...
woodbutcher Posted January 18, 2021 Author Report Share Posted January 18, 2021 32 minutes ago, wtnhighlander said: Did you previously mention running the 2 boards "bookmatched" together across the jointer? That will cause the error along the length to be doubled. A board will "belly" in the middle when the infeed is not co-planer to the outfeed. Specifically if the end of the table nearest the cutter is lower that the other end. Or any infeed support you might be using for ling boards. Yes I had been running both boards across the jointer bookmatched together, but now that im chasing this jointer around, I have been using a single piece of scrap, around 16" long. Same thing, leaves a bump in the middle. 2 hours ago, Coop said: Early on, I found that trying to take the “hump” out of a board, the hump is only accented by incorrect feed. I always plane the board on the other edge, taking the high part of the ends off first. Take a scrap board that is relatively smooth and run it thru and see if it leaves a hump. Yes I have been considering that i may have started with a piece with a bump, and when jointing it it just follows the curve. So I took the piece and intentionally made a hollow in the middle with a hand plane, so that only the ends are touching the jointer bed, but no change, comes out the other end with a bump. 4 hours ago, Chestnut said: Trying bringing your outfeed all the way up. On my HH if i set a board on the cuttign eget it moves the board maybe 1/4" it's barley touching. From my research a belly means the outfeed is too low. This afternoon I took a scrap piece of cherry, a cutoff, and jointed a face, then raised the table up well high. I ran the piece through dozens and dozens of times, lowering the table until i started getting that bit of snipe at the trailing end that means the table is now too low. I begin raising the table back up until the snipe disappears, but still get the bump in the middle. And when I say I raise, or lower the table, I mean im turning the wheel on the table a minute on the clock at a time. I mean its just enough to say i turned it and nothing more. Ive probably spent two hours at least this weekend just doing this, checking the piece each time, and have not once got a straight edge off this thing. Would it do me any good at this point to reach out to Jet? I bought this jointer used a couple three years ago now, would they be any help to me? Quote Link to comment Share on other sites More sharing options...


Recommended Posts
Join the conversation
You can post now and register later. If you have an account, sign in now to post with your account.