craftedbyethan
-
Posts
10 -
Joined
-
Last visited
craftedbyethan's Achievements
Apprentice Poster (1/3)
1
Reputation
-
 Hello Readers! Recently I had asked readers to suggest a few new projects to me for my blog. I did recieve two ideas and I will briefly describe them below, but if you would like to suggest more please do so by commenting below! 1. From Mike on LumberJocks.com. Mike suggested a Maloof Rocking Chair. I think this is an amazing idea that would be a great undertaking. In honor of Sam Maloof who shares my birthday (January 24th, 1916 – May 21, 2009) I will undertake this project. Please read about Samuel Maloof here: http://www.sam-maloof.com/legacy.htm 2. From my wife… at home. My wife suggested a potty training toilet for our baby girl for when she gets older. We will be using a plastic bowl insert for the recieving pot. Other projects my wife has suggested are; sanding and refinishing some chairs, storing my tools somewhere else, the laundry, taking out the garbage, taking my shoes off inside, the dishes and etc…
 -
Hello Readers! Well everyone goes through a learning period when figuring out what can and can’t be done, and how you should and should not go about things. Here are a couple of my latest “woops” and “oh…” moments as a beginner at woodworking. 1. The wooden vice. I thought this would be a great idea and it seemed to work well in pre-applied testing. Unfortunately the threads are too few, and the wood I used for the fastening was too weak and broke when too tight. I am not saying that the wooden vice is impossible, but it would take much more time to get to work right for the application (Crib Wooden Mobile). I am going to take a safer and simpler approach for now. 2. The entertainment center. This is a simple case of working a bit too fast, with wild ideas running freely through my head. The walls did not come out exactly the way I wanted them too so this project is going to need some more work now as a result. I am not saying it won’t get done, only that I want to now take extra time to work this build into an exceptional piece. Something that worked well! The bar and ornaments to the mobile came out great! I hand sanded the wood down this past week and this should be a finished product by mid week… Even without the wooden vice. So my week was not a total loss, especially since I have been volunteering all week at a children’s camp.
-
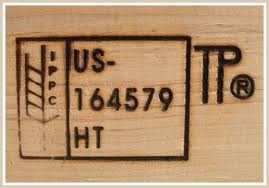
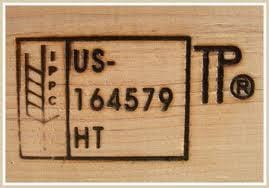
Hello Readers! Working with pallets can be fun, it can be gratifying, and it can keep you busy… These are all good things, but there is a dark side to the madness that is; Pallet Craft! Difficulty #1 – Many pallets are decayed or built with cheap wood. It is unfortunate, but many pallets cannot be repaired for use, at least not by me. If this is not bad enough, some pallets are beyond decay, and are not fit for my use and many other uses. I would suggest inspecting the pallets you get before you attempt even picking them up. Difficulty #2 – The second issue is good for pallet manufacturers and shippers, but bad for me. The nails used in pallet assembly are made to stay, removing them is difficult to do, unless of course you own a metal cutting saw… which I do not. Difficulty #3 – Many pallets are chemically treated. Now this can be a Debby downer for any pallet reclaimer, so to fix this issue, you must first, look for heat treated pallets which is a standard for many pallet manufacturers. These are regarded to be safer for use (you can tell usually because they will have the letters “HT” branded on them). If you are unsure of the origin of the pallets, use precautions when using them to insure safety and use a respirator mask to prevent breathing in the dust. Pallet crafting is fun, and enjoyable and I want anyone that wants to do so to also enjoy it as well. Don’t let the difficulties get in the way, and only good things can come from it.
-
Hello all! This was a gift that I made for my fiance the year before our wedding. This breadbox was my first wood working creation that I built with my own two hands, so please excuse the crudeness of the door! It is all purchased wood that I picked up from a hardware store where I went to school. On each side I carved my wife’s (fiance then) favorite flower (Calla Lily) and burned it with a butane lighter before staining it. I hope you all enjoy it as much as I enjoyed building it!
-
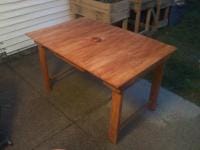
Patio Table
-
-
Hello All, This is part of my series Pallet Craft on my blog. It is pooring out once again, and because I have nowhere else to work on my projects except for my mobile work station (outdoors), I decided to blog about why I do what I do. Woodworking in general came to me as something foriegn that I had never really given a lot of thought of doing (I mean common, I was a tech student), I thought of it as something only the “pros” really get into. Then it happened, I met the woman that would be my wife and I wanted to build things for her as gifts. Next thing I knew I fell into the woodworking hobby and I absolutely love it! A year and a half later I am now working on my own series called Pallet Craft. Working with Pallets have many pros and cons as with anything else in the world these days. Some of the pros include its cheap (or even free), its gratifying and very simplistic; cons include its cheap, some wood is of a lot less quality, it takes a lot of extra time and propper planning, breaking down pallets can be very tedious and some pallets are chemical treated to kill off pests. Now the latter was a major concern for me when I started working with the pallets, but I did some of my own investigation and I discovered I can avoid issues by: Using heat treated pallets, taking pallets that don’t have a lot of age to them and not collecting them from chemical plants or foodmarts. The combination of the last two points is important in trying to calculate the lifespan and use of the pallets. But all of these reasons are not the reason I pallet craft. I use pallets because nearly 500 million NEW pallets are built every year in the U.S. alone, while many many, many pallets end up in stockpiles for waste and decay or for burning or in landfills. To put a number on this, in 1995 alone, 68,000 tons of pallet wood was thrown out and wasted in Minnesota. This is not only wasteful, but its ecologically unstable and harmful to the earth. Therefore my motto on my blog is “Recycling what we waste to make what we want!” So why do I do it? To make a difference, to build, to recycle, to Pallet Craft!
-
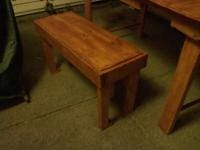
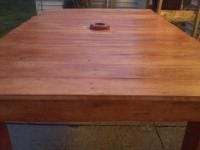
Hello All, Recently I have set up a great deal with a local store to get their used pallets for free and all I have to do is pick em up. So I decided to start a blog about my work, but I wanted to bring each project by itself as well. So as you see from the gallery I have built a rustic patio table and bench set with pallet wood. At first it was a little bit daunting deciding how I wanted to build the table and how it would look because I did not want a typical picnic table design. So after a few drawings I went for the design you see below. I started it out with retrieving the wood and making sure I didn’t destroy the pieces in the process. I picked out each piece that I used for this project from like pallets that had similar dimensions and wood type. THIS IS WHERE A PLANER & JOINER WOULD HAVE BEEN GREAT! But alas I don’t have either one yet. So I made do with my hand saw, skill saw (7,1/4), BD Hand Sander, Drill and Titebond III glue (I may consider using liquid nails in a future project). After I sanded and glued the top together (using straps as a makeshift clamp… don’t have those yet either) I put together the top base and legs. I have to say it took alot of sanding to get it down to an acceptable flatness before I could weather proof and stain, but I am very happy with the top as it retains a rustic feel to it. And after some testing the water beads up very nicely. The benches were much easier to assemble and look great. I wanted to inlay the seat boards but leave a rounded lip just above the line for the side boards. In the end with much more practice I can see alot of great, quality projects with pallet wood. Check out my blog.
-
Hello Everyone! So I have been blogging at my site: Pallet Craft and I realized I haven’t talked about my name sign in ASL. I am not deaf nor do I have any deaf children, but my wife wanted to learn it with my baby daughter, so I decided to go ahead and give it a go. It is fun, so we have to pick name signs. Since I am really into wood working I decided I was going to use my first initial “E” and the sign for “carpenter” which is actually a compound of two signs “Carpentry" & "Agent“. Personally I think its really cool to communicate with your hands and I invite you all to learn to sign “Carpenter”. First: start out by making a fist with your dominant hand and planing it accross your flat second hand as shown: Second: Perform the same move again moving your hand back to the beginning completing the word carpentry: Third: now sign for agent my taking both hands parallel to eachother and drop them down: Finished: Personnaly I sign this with my first initial “E” taking place of the fist: I hope you all enjoyed this little side story and I hope to showcase more work soon!