Ted Friesen
-
Posts
12 -
Joined
-
Last visited
Ted Friesen's Achievements
Apprentice Poster (1/3)
1
Reputation
-
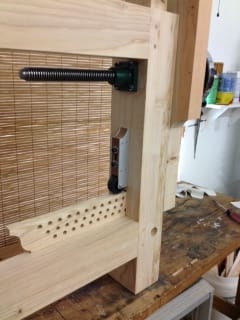
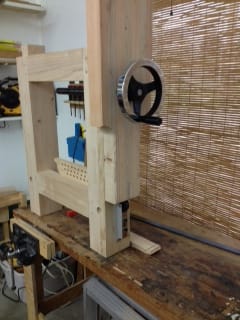
Ian, Thanks for the pictures and ideas. I too couldn't afford the Bench Crafted vises and made my own. Without your metal working machines and skills, I went at the wagon vise a little differently. I used a 1" left-hand thread acme screw and a couple of LH nuts from McMaster Carr. I made the dog block carrier from a piece of 4" X 3" X ¼" angle. Drilled a clearance hole for the screw and welded on the nuts (well I got a neighbour to do the welding). Yes I know that I didn't have to use two nuts, but my motto is "some is good, more is better and too much is just enough". Also, not having a metal lathe, I got another friend to turn the end of the screw to fit the 4" hand wheel I found online, which perfectly matches the 8" hand wheel from Grizzly that I'm using for the leg vise. Oh, I also had to cut a square hole through the other arm of the angle to allow the dog to pass through. Also had to make a flange to hold the screw to the end block, but that was just a piece of 1½" flat bar cut at an angle. Made an attractive diamond shape with rounded ends after a bit of work with a file. I used a brass washer between the flange and the screw shoulder and a nylon washer between the flange and the hand wheel. So far the only metal work I've done has been accomplished with a drill press and some files. The leg vise was a lot easier: I just used a vise screw from Lee Valley. Removed the stick handle and attached the Grizzly hand wheel. I did change up the leg vise by adding the Ancora Yacht Service chain kit. Very smooth and I don't have to bend over so much, which doesn't come as easily anymore.
-
I also added the chain kit and am happy that I did. Of course that was after drilling all those holes in the parallel guide.
-
Thanks for the replies, Eric and Barron. I'm using a 1/2" Timber Wolf 3 TPI replacement blade. Don't recall the tooth configuration. But, it's encouraging to know that you are able to get a smoother cut. There's hope for me yet. Yesterday I scoured the internet for more help and found Michael Fortune's article in FWW #173 about setting up a bandsaw. So,this morning it's out to the shop to follow his instructions then off to Grizzly for a new blade. Again, guys, thanks for taking the time to reply. Ted
-
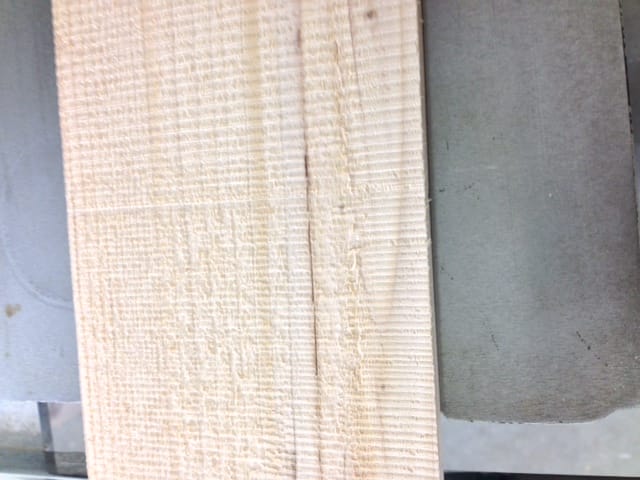
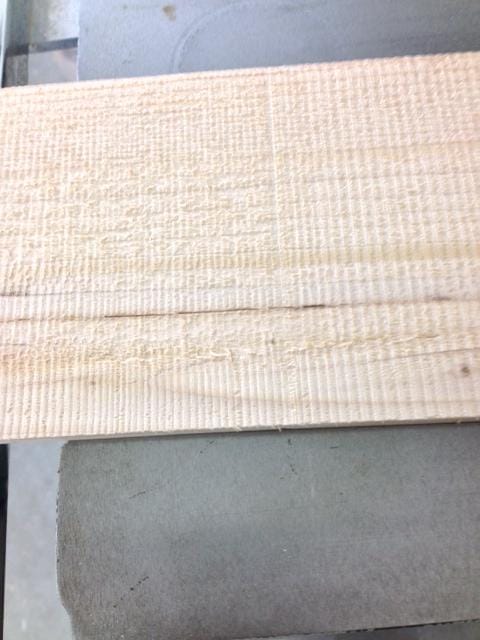
Thanks Barron, Would you mind looking at this picture to give you an idea of what I was meaning as the rough surface of the bandsaw cut. This just looks too rough for the walls of the dovetails straight from the bandsaw. Do I have to resign myself to doing quite a bit of clean up with a chisel or could I expect better bandsaw results with a different blade or technique? For instance are there different blades that would cut smoother but at the expense of slower cutting? If so what blade features should I be looking for? Please bare in mind that I'm new to this woodworking stuff and just need to know if I have to change my technique, my equipment or my expectations. Thanks for replying. Ted
-
Following Christopher Schwarz's advice in his book, I looked for the cheapest, most readily available wood in my area. In the Pacific Northwest that's Fir. So that's what I'm using and judging by the other comments here, I think it will be fine. One advantage is that it is soft enough so that my projects will probably dent the bench instead of the other way around. that also makes it a very workable wood. Because I'm building my bench based on Chris' book as well as Jameel's plans and Marc's videos, I bought 12' 2X12s. After milling I'm able to get a finished thickness of 1 3/8" which just means on extra lamination per side. At Woodworking in America in Pasedena last year, Roy Underhill worked on a bench made by a local woodworker. Made of VG Fir it was a work of art. I'm sorry I don't remember the name of the owner--do remember his fabulous mustache though. Ted
-

Using guide bushings to rout square dog holes
Ted Friesen replied to TomRash's topic in The Wood Whisperer Guild
I did exactly (well almost) what Jameel did with the template and guide bushings. In the video, Marc had cautioned about cutting through the top of the template and separating the two sides, so I added a stop to the top so that couldn't happen and I clamped a small block to the bottom to avoid tear out on the right side. With the plunge router I came to within 1/8" to the final depth. I then finished with a bit with a top guide bearing set to the right depth. (Never knew why some guys needed more than one router and now here's me--a newbie--with three) After glue up all but two of the dog holes fit the dogs perfectly. There may have been some sawdust under the router base that kept it from cutting to full depth, but that was easily, if tediously, remedied with a file. Ted -
How did you attach the UHMW glide to the leg? Ted
-
I've gotten to the point of making the dovetails and after watching the video a few times, I'm not sure how to proceed and need some advice from those of you that have done this already. Here's my problem...my bandsaw doesn't give me anyway near the surface that Marc gets from his, at least as far as I can see in the video. Would you mind sharing what blade you are using and if you ended up having to do much in the way of cleanup to the dovetails after sawing. Ted
-
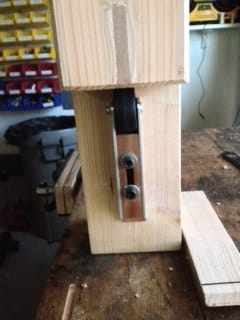
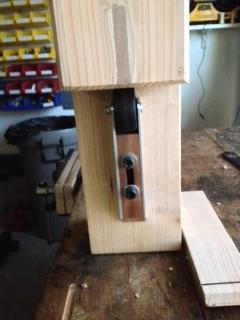
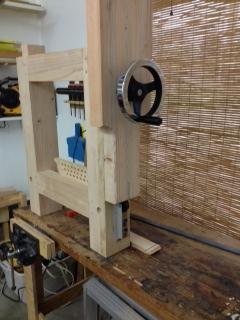
I too lusted after the Bench Crafted hardware, but my budget simply wouldn't stretch that far, so I constructed my leg vise using a vise screw from Lee Valley, a hand wheel from Grizzly ( a local machine shop put them together) and built the brackets using anodized aluminum angle and flat bar, filling with some scrap wood. The bracket wheels are from some Harbour Freight castors. This is only my second woodworking project, so any defects you may find are really learning experiences. I've been dreading laminating the top because of the shear size and weight, but now that the legs are mostly done, I guess I'll have to tackle the top. I've already ordered some materials to make my own wagon vise hardware. Here's hoping it works out as well as the leg vise. Ted

-
Thanks for the reply Eric. I appreciate the advice, unfortunately it's way too late to tell me to stick to the plans. Like the Pirates of the Caribbean, I thought of the plans as more of a guideline. Ted
-
The answer may be obvious to you seasoned woodworkers, but why cut a dado in the lower stretchers and rails to install a ledger to support the lower shelf. Would it not be less work and perhaps even stronger to cut a rabbit in the stretchers and rails instead? Ted
-
Stephen, If you are dealing with PJ white in Vancouver, then you are fairly close to Reimer Hardwoods in Abbotsford. They have a huge ware house with a good selection. Ted