lwllms
-
Posts
56 -
Joined
-
Last visited
lwllms's Achievements
Apprentice Poster (1/3)
9
Reputation
-
It's a Stanley #70 box scraper for recycling wooden boxes.
-
Hi Derek, I'm aware of the claims of many knife makers about diamonds being absorbed by steel. It's a myth. It's true that carbon can flow in solid steel but the steel has to be at or above critical temperature for that to happen. One can also cause diamonds to change to graphite but it requires high temperatures and an inert atmosphere. Diamonds are pure carbon and they either have a diamond's crystalline structure or they don't. Synthetic diamonds often have traces of impurities but they can't be part graphite. Being pure carbon, diamonds burn like coal and have an ignition point of about 1330° F. The critical temperature of high carbon steels is around 1450° F. Before the carbon from a diamond could possibly be absorbed by the steel, the diamond would burn up. Diamonds are as good at conducting heat as they are hard, you're not going to insulate them. I don't remember the exact temperature at which diamonds can convert to graphite but it's above the ignition point. Fortunately we have a normal amount of oxygen in our shop's air so it's irrelevant to me. The only thing produced when pure carbon burns is carbon-dioxide so it probably appears to knife makers that the diamonds disappear when high speed grinding with diamonds. It's the system of mounting diamonds and their ignition temperature that makes them unsuitable for grinding steel, especially high speed grinding. Our diamond grinder runs at 480 rpm and the diamond wheel is lubricated with WD-40 which has a lower ignition point than the diamonds. The diamonds on my wheel went away because the nickel matrix that held them in place went away. CBN requires the same mounting systems as diamonds. Most of the CBN wheel sites I've seen say the wheels are intended for carbide or high speed steel turning tools. Given high speed steel's spark pattern when grinding I would guess it generates a fine granular swarf when ground. When I turn aluminum on the metal lathe I sharpen high speed tool bits on our diamond grinder and haven't noticed wear of the electroplating. I keep checking it though. BTW, our thin wheels with convex faces facilitate grinding concave curved profiles in molding plane irons. I also don't care to put as wheel as heavy as yours on one of our grinders, the weren't designed for it. One of the things one runs into when grinding as much as we do is the need to keep an eye on the temperature of a grinder's motor. When a grinder motor gets so hot we can't keep a hand on it we shut it down and work on other stuff for a while. One other thing. I hope no one looks at my earlier post and starts looking at a Palmgren grinder to buy. They are a decent grinder if modified but dangerous if not. The inside and outside wheel mounting flanges aren't the same diameter and are different enough I wouldn't use one of these without turning new outside flanges for it. This is a violation of every set of grinder safety rules I know of. If you don't have a way to get some new 2 3/8" flanges made, don't buy this grinder.
-
There are probably people who grind more plane irons than we do in our shop but not many. We make the irons for all the planes we produce and always have. We've recently made some changes in our grinding set-up and let me show you what we have and explain why. First here are our grinders: A Jet belt/6"grinder combination, a Palmgren 6" high speed grinder, a Baldor 6" high speed grinder, and a Jet square wheel grinder. All but the Baldor have modified or shop-made tool rests. Grinding is a rough shaping operation so we use coarse wheels. All wheels are chosen for their width and, where we have a choice, their coarseness. The grinding wheels increase in width from left to right and are 1/8", 3/16", 1/4", 1/2" and 3/4". The 1/2" and 3/4" wheels are 24 grit grey wheels, just standard ones. We've tried the white wheels and the new blue "cool" wheels but think they're a waste of money. 24 grit wheels grind cooler and faster. It hard to beat a well dressed coarse wheel for grinding cool or grinding quickly. The only wheel with a flat or square dressed face is the 3/4" and the rest are dressed with a curved face. The diameter arc is about equal to the width of the wheel and these are used for molding planes. Here are some of the new old stock gumming wheels we recently bought. These 3/16" and 1'4" wheels are new old stock saw gumming wheels. I really like them but wish they were more flat. They're out of flat enough that dressing and balancing them takes a bit of effort. The 1/8" wheel is a chain saw sharpening wheel that's coarse enough to remove metal quickly and with minimum heat. Above is the 1/8" wheel and below is a two piece tool rest made for the square wheel grinder. One can tilt the platen of the grinder to grind bevels but dust collection is difficult when doing this. We use both the square rest and the shop-made one. Change over is just a matter of loosening a single cap screw, changing rests and tightening the cap screw again. There was a question about diamond stones and there have been issues with some Cubic Boron Nitride (CBN) grinding wheels reported lately. I wasn't surprised by the problems people reported with their electro-plated CBN grinding wheels. We have an oscillating diamond grinder in our metal shop and I learned an expensive lesson with it. I put a new wheel on it and wore all the nickel plating and diamonds off the wheel in about an hour's steady use grinding O-1 tool steel. The wheels run $160 or so. I was sure the wheel was flawed and called a the manufacturer's tech department. The tech rep explained the soft nickel matrix is designed to wear away slowly and expose fresh abrasive when grinding materials that generate a powdered swarf. This would include things like carbides, glass, stone, or ceramics. Steel generates a swarf made up of very small shavings. These shavings come off very close to the wheel, close enough they have enough beam strength to cut into the matrix and actually cut it away which releases the diamonds. We do use diamond stones but only to dress our oil stones, we don't use them on tool steel. Our diamond grinder that operates just rotating or with rotation and a side-to-side oscillation. Below is one of the brazed carbide tool bits we grind for use in our metal shop. This one has been sharpened a few times and the way the steel body has been kept ground back to avoid diamond wheel wear is visible. For refining molding plane irons we use flex shaft grinders and have multiple hand pieces to make changing points easier and faster. Another grinding process is lapping freshly heat treated irons flat. The irons do distort slightly in heat treating. We use a Lap-Sharp lapping machine for this. I wouldn't recommend trying to sharpen a tool on it though. This has a relatively slow rpm, is used with a rust resisting coolant, and a foot control. It saves a lot of wear-and-tear on our hands. Below is my honing area. There are only two of us in the shop and Don has his own honing area. We both do pretty much the same thing though. It's just that it's not uncommon for both of us to be honing tools at the same time. Our oil stones are frequently dressed with coarse diamond stones. I hope this may answer some questions. I've been doing this for 19 years and have learned a few things.
-
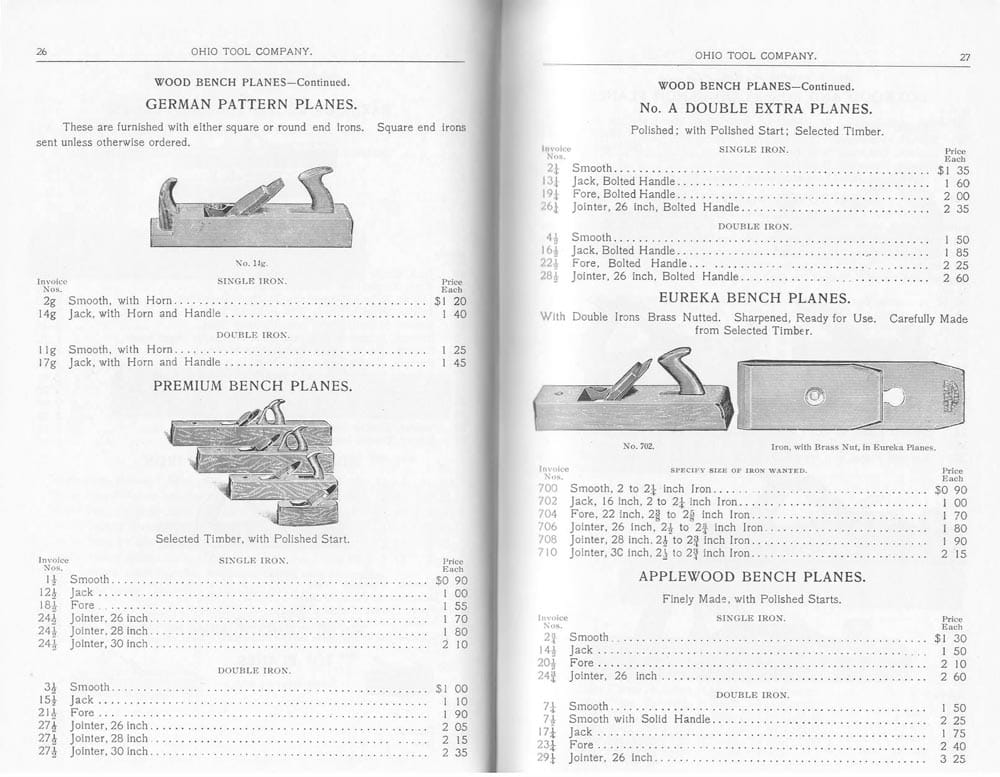
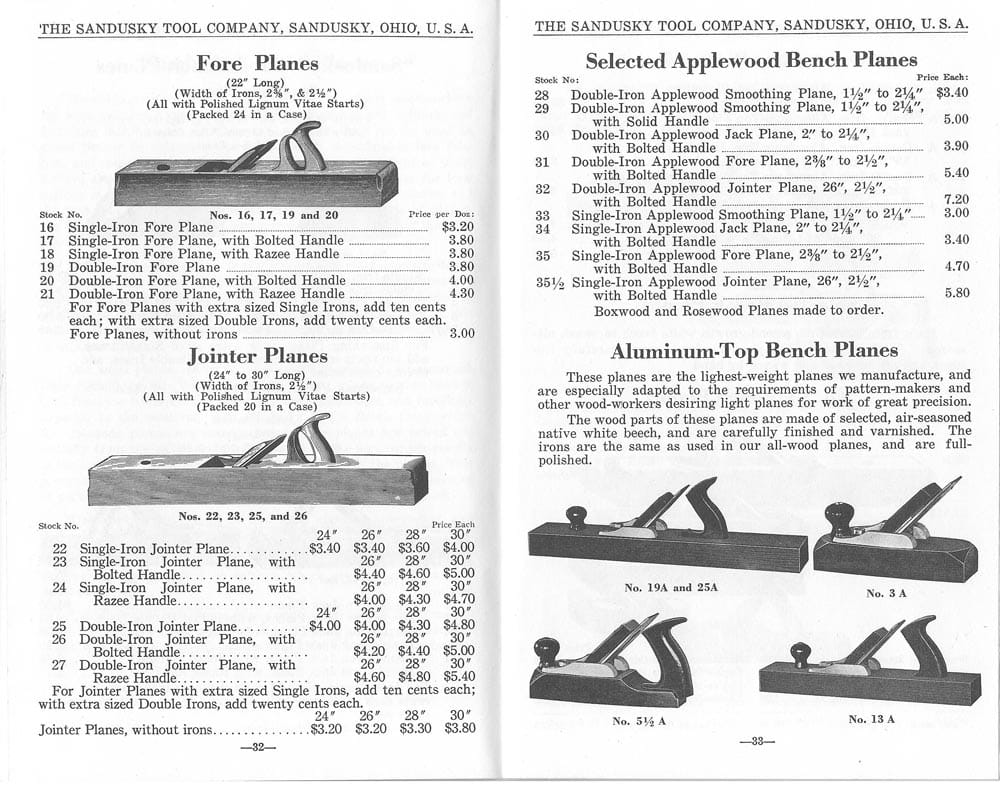
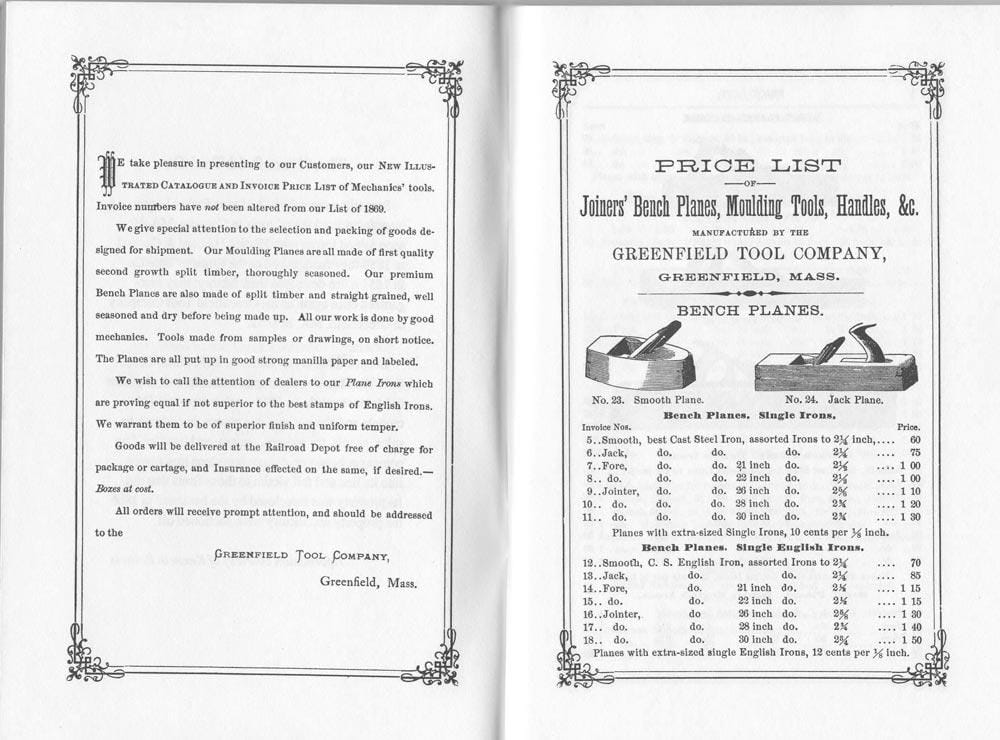
There seems to be a lot of speculation here but no supporting evidence. The reality is single iron wooden bench planes continued to be commercially produced well into the 20th Century. Just one example of this is found in the 1872 Greenfield Tool Company catalog. Even the premium planes as well as the boxwood or rosewood ones were available in single iron. Offering more are the 1910 Ohio Tool catalog or the1925 Sandusky catalog which was the last wooden plane catalog published in the US. See the images. I've got a lot more evidence; more evidence than my tremors will allow me to type. I also wonder how much experience people actually have with traditional wooden planes bedded at traditional bed angles. I think actual facts or experience would change the tone of this thread.


-
Plane Sole...Smooth, Corrugated or Doesn't Matter?
lwllms replied to neoOberon's topic in Hand Tools
If you have to lap the sole, corrugations matter. However, corrugations concentrate sole wear to the area just behind the corrugations. If the plane is used much, a corrugated sole will need lapping sooner. Not that this matters much because the leading edge of the mouth of a cast iron plane sole wears faster than other areas. -
Just to offer a different opinion. If you're raising a wire edge or burr, you've got the bevel down pat. But the bevel is the easy part of honing and getting an relatively precise angle is pretty easy in a more traditional honing approach. In traditional honing it only takes a couple passes on the honed bevel. The harder part is a truly flat face and a flat sharpening medium. Honing guides cause people to focus on the bevel and ignore the back. Dulling wear happens on both the surfaces that make up an edge and removing the wear on the flat face is easy if you make sure and keep everything flat at each sharpening. This way you're actually doing the prep work for subsequent sharpening each time you sharpen. Sand paper sharpening is notorious for dubbing or slight rounding of the surfaces that make up an edge. The paper backing has enough give that it rolls slightly ahead of the tool and causes the dubbing. Film backed abrasives are better but you'll get some dubbing with them too. Steve Elliot has a page on this web showing the wear progression on a plane iron. He's got some images there that are pretty clear but I've added information to one showing how it relates to honing: If you're going to remove the wear from the flat face by working only on the bevel, as you would with a honing guide, you'll have to hone everything away up to the blue line. If you hone the flat face to remove that wear, i.e. honing the flat face to the brown line, you only have to hone to the brown line on the flat face and the orange line on the bevel. You only have to remove a few microns of steel with this traditional honing method. You remove even less on the bevel if you have a ground bevel at an angle about 5° less than the honed bevel. It's very fast and effecient and takes less time than just the tinkering set-up of a honing guide. Honing is a gateway skill to hand tool woodworking but I strongly believe grinding is a gateway skill to effective grinding. There's no real substitute to learning to grind. I'm not going to save you any money with this but I can give you links to all you'll need and the cost will be about $250. I have no relationship with any of the dealers involved other than using their products. These will last you a life-time and nothing else will be required other than a very occasional resupply of oil. Don't feel bad about having trouble with sharpening, the overwhelming majority of woodworkers can't effectively sharpen. We frequently get planes back from customers for tuning and the issues almost invariably go back to poor sharpening technique. Some of those customers have been well-known, successful woodworkers. We've taught quite a few workshops at various woodworking schools and these always require the ability to sharpen. We've helped a lot of people with their sharpening and I don't recall a single sharpening problem that originated on the bevel, it's always problems with dealing with the flat face. We have a to a video where I show traditional honing but also using a diamond stone to maintain a fresh abrasive surface on the stones that are truly flat: I advise you not to spend money on a honing guide. At best they can only help you with the easy tools and are a sure-fire method to slow your honing. I think it's far better to just learn traditional honing which will even work on more difficult profiled tools like gouges and molding planes.
-
You'd be far better off with a book by someone who understands trade practice and has actually done this stuff. The best I know of is Charles Hayward and his Cabinet Making for Beginners would be a good place to start. Get an early edition, one before it was "updated" somewhere after 1955. If you read and understand what's in this little 200 page book you'll know more about hand tool techniques than any of the "gurus" I saw mentioned in this thread. Here's a first edition on eBay for about $15 plus postage from the UK: http://www.ebay.com/itm/Cabinet-Making-for-Beginners-Charles-H-Hayward-1947-1st-Ed-HB-Book-/221400063754
-
Check the tool box for the depth stop, fence and parts for that # 278. If they're there you're very lucky. Even without the additional parts you'll find the #278 is more than worth the effort of tuning up. In my years working as a finish carpenter, my #278 became one of my most frequently used planes.
-
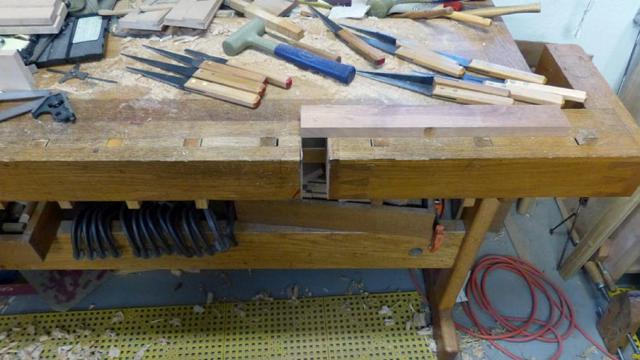
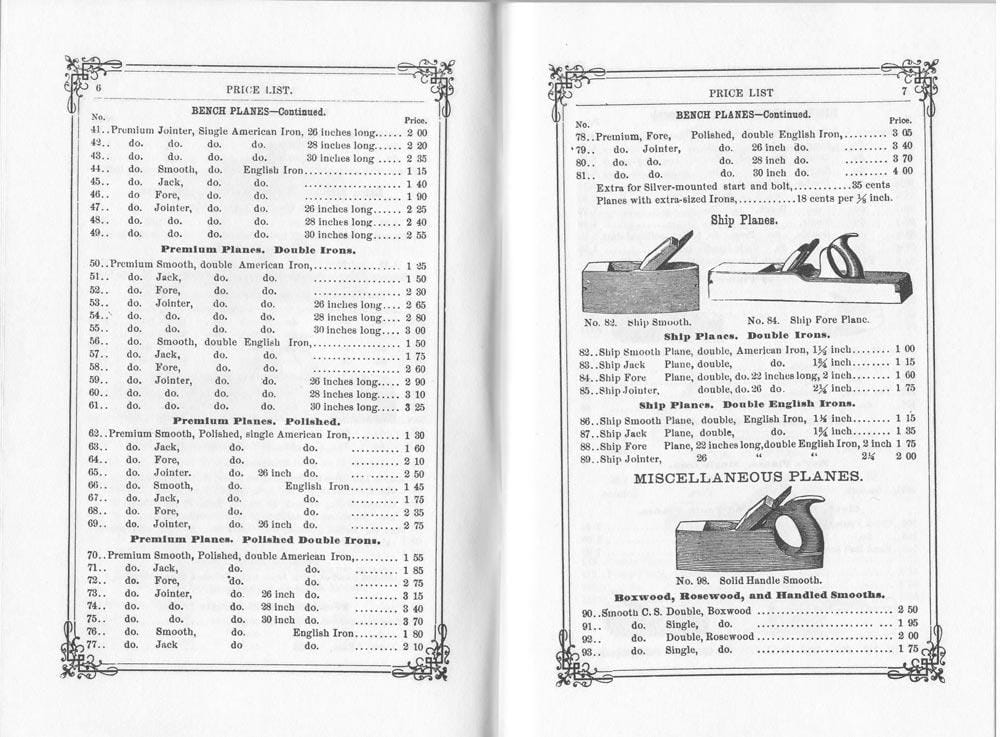
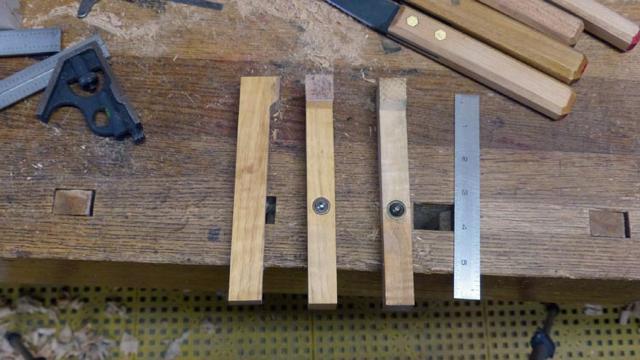
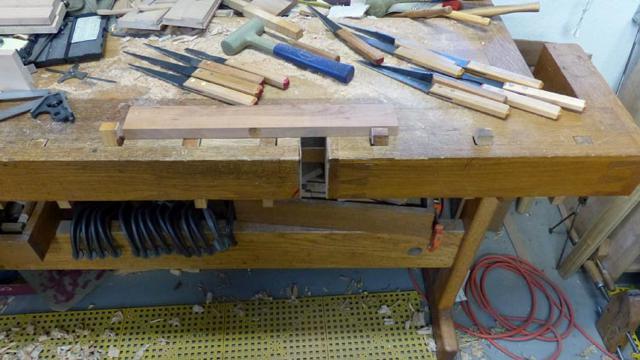
Chris, The first step in thicknessing is to "get out the stock" or reduce the pieces to rough dimension. This would include getting ends somewhat square. "Thicknessing" is what stock preparation was traditionally called because the goal was to produce straight, true stock of a predetermined and uniform thickness. Anyone who does this knows the "uniform predetermined thickness" is the difficult part. I don't care if you're working by hand or machine; if you want straight, true stock and actual control of finish thickness; you'll reduce stock to rough dimensioned parts before stock preparation. Planing hole boards eliminates a lot of control. I have no idea why one would be working with saw mill ends of stock. I can tell you that my partner, Don, makes the totes for our bench planes which don't have rectangular surfaces and he holds them with square dogs for final thicknessing. He would have to make dedicated dogs for this if he was working with round dogs. I work with two sets of dogs. One set has textured faces and the other has leather faces. Both have their uses. The elongated portion at the top of the dog hole that accepts the head of the dog shouldn't have a flat shelf at the bottom. Saw dust and other debris will gather there and prevent the dog from being recessed to below the bench surface. I angle the bottom of the head to match the angled shelf of the dog hole. All one needs to do to clear debris is to remove and reinsert the dog. You can see the angled bottom heads of the dogs in the photos. The other thing about dogs is that there's differential spacing between the dogs in the vise vs. the dogs in the bench. If one does this right it limits how much the vise has to be moved in use to accommodate different stock lengths. I've taken three photos using a piece of scrap to illustrate this. To use the first dog in the vise, I'd have to open the vise 1 1/4", the same stock would fit using the second dog without moving the vise much at all, and to use the third vise dog I'd have to close the vise 1 1/4". So I never have to spend much time turning the vise handle for different lengths of stock. Six turns of the handle will handle any length as long as it fits on on the bench top. It's especially easy if there's always a dog in each hole.

-
Both ends of the bench are in the photo. I think you're close to understanding why round dogs were a good choice for this bench.
-
Here's the only bench I ever saw where round dogs make sense It's a photo that was posted on a woodworking forum recently:

-
Just clamp a holding fixture in the tail vise. Back in my days doing finish carpentry I used to plane the edges of 8' stock with no problem. Excuse the mess, I work on that bench six days a week. The tail vise is so versatile I do most of my work with it. One thing that many, including most commercial bench makers, don't understand is that differential spacing of dog holes in the vise vs. in the bench top works much like a quick release vise. Just use different dogs for different lengths of stock. It works on the same principle as a vernier scale. I don't have to turn the vise handle more than six turns to change stock and hold any size up to 7'. The one valid criticism of "Scandinavian" style benches is that the tail vise sags over time because of the cantilever. It's an easy fix to just move the legs back under the vise and eliminate the cantilever as I did on the second bench I made. In years of teaching at various schools I've worked on a lot of different benches. I always felt horribly handicapped when I didn't have a good tail vise to work on. I wasted a lot of time trying to figure out work-arounds when working on benches not equipped with good tail vises or when things like double screw vises were used on the tail or shoulder.
-
I'd be hesitant to rely on dry honing for the reason you suggest. Dry or wet, the same amount of swarf from abraded steel, fractured abrasive, or scale will be generated. These particles when dry offer more resistance to moving than the same particles suspended in oil. The dry particles would be more prone to abrading the surface not in contact with the stone. Since we're using soil as an example, look at hilly areas like in Southern California. The soil on the hills resist movement and is stable when dry, add liquid through heavy rains and the soil starts moving downhill causing mud slides. Traditional trade practices evolved over centuries. I have confidence the author of your book is a bright guy but is he smarter than generations of professional woodworkers who developed dependable and repeatable techniques and sequences to accomplish frequently repeated tasks?
-
It's not a video but one of Steve Elliot's web pages. The page is about the progression of wear profiles during use. A cutting edge wears on both faces as it dulls and understanding the wear greatly helps understanding what needs to be done to get a sharp edge. The link is here. A lot of people don't seem to see what I see in the wear profile image so I've added information in this image. The image assumes sharpening at 200 lineal feet. The blue line is where one would have to remove metal to if one was to work only on the bevel as is done when using a honing guide. The red line is the center line between the bevel and the flat face and comparing that to the green line shows which surface is wearing faster. Comparing this shows how loss of clearance, the second image in this post, increases wear on the bevel. The orange and brown lines represent the few microns of metal that has to be honed away by honing both surfaces. If you do want a video, here's one of working both surfaces:
-
I really wish someone out there actually made the kind of chisels I've been looking for. These were just standard hardware store tools for generations and they were made in Sheffield when several trades were working at their peak. I'd buy from ebay but those chisels were refined to the point one can't lap out any pitting on their backs without changing the width of the chisel. I believe if people understood the kind of chisels that used to be readily available, there'd be some pressure on chisel makers to produce something worth buying. I'd be willing to pay a pretty good price for the chisels I want but I'm sure I'll end up making them myself.