Hugh Howard
-
Posts
34 -
Joined
-
Last visited
Recent Profile Visitors
1,175 profile views


Hugh Howard's Achievements
Apprentice Poster (1/3)
23
Reputation
-
Really nice work!
-
I have the same saw you have (and have had it about 2 years I think) and have never broken a blade. I use Timberwolfs mostly and a woodslicer, so I would think my blades would be more likely to break, but I am not sure. I dont' get into the shop as much as I'd like so it doesn't have a ton of hours on it, but a decent number. I have trusted the saw's tension gauge and it seems ght to me, but never checked it against anything more than the finger pressure test. Sorry to hear about the broken blades and I hope someone can figure out what is going on! I certainly have toyed with the idea of a carbide blade like yours. I do take the tension off the blade when not in use, but have read that you don't really need to do that if you aren't over tensioning the blade. I figure it can't hurt so I do it anyway.
-
Looks great, thanks for sharing!
-
Felder Hammer A31 41 APPALLING SERVICE FROM FELDER
Hugh Howard replied to Michael Nosek's topic in Power Tools
I just wanted to post that I have been very happy with the support from Hammer-Felder in the US. I have the A3-31 and had an issue several years out of warranty (not a major issue or one they were responsible for) and called and they tried to help me on the phone, but it required lifting the machine, which I couldn't do by myself at the time. They called again and again to make sure I could fix it even though they weren't getting a cent for it and I was dropping the ball due to work getting in the way. In the end we got the issue fixed and the machine running like new. I feel bad for the OP, and understand that he had a bad experience, but at least in the US I was a little worried about customer service because I'd seen a post like this from years ago and wavered on buying the machine, but couldn't be happier with the support I've gotten. (I also when I first bought it had them deliver the machine, move it into my house, set it up all for what struck me as a reasonable fee. Then a month or two later for free they skyped with me for 30 minutes to show me how to reduce snipe so it wasn't just one good experience, but several). -
Not Chestnut, but I actually bought the same saw at about the same time or perhaps just before and I love it. I had a cheap Delta before it and so this feels like a super luxury saw to me and now I try to use it any chance I get instead of avoiding it like I did the Delta. I haven't taxed it close to its full potential so far (but I haven't, for example, tried to resaw a 10" wide board so I can't speak to how it would do if I really tried to push it -- I think it would be fine, but I don't know). One thing I would never want to give up now is the foot brake. It doesn't mean your projects look any better than a saw without one, but it is so nice to be able to stop the blade and not have to wait - both a time saver and it feels like a nice safety feature. I doubt I'll ever want more power or more resaw capacity, but there have been one or two times when I thought having 18" or 24" and a bigger table/ more distance available to the left of the blade would be nice, but not many and not enough that I'd change my purchase. I still smile every time I walk into the shop and see it. I'll only ever have one saw, but for my use patterns I'd take this and a second, cheaper 14" saw any day before a single 18" saw since then I could have one for curves and one for resaw and not have to switch blades. Oh, also on the mobility stand. I like it, but you have to be careful to push or pull on the bottom half of the saw. I always worry about tipping it over if I grab it up high and push or pull. Not a big deal, but something to note.
-
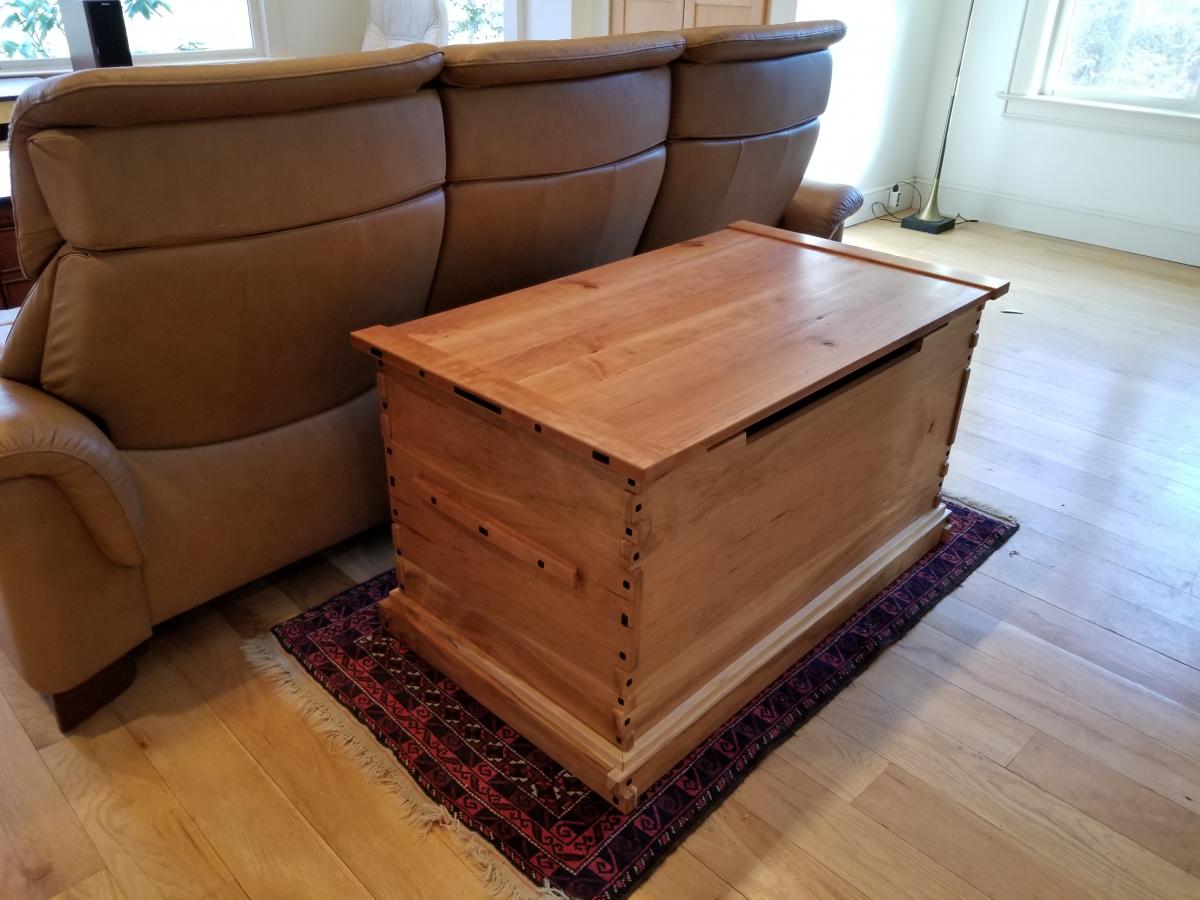
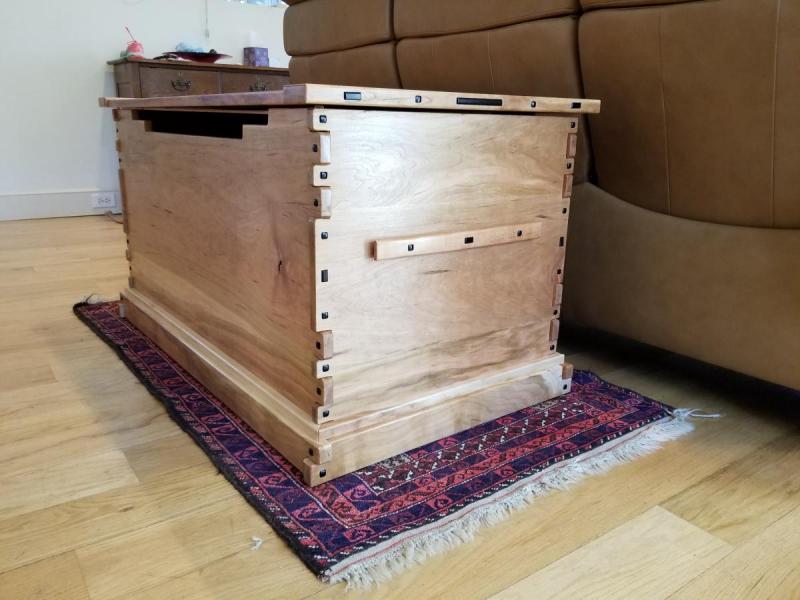
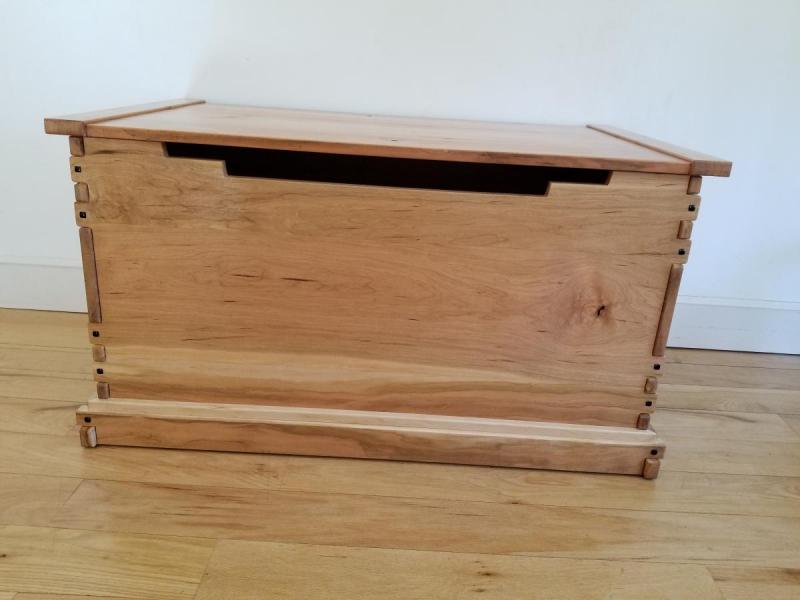
No worries Richard, I wasn't offended - always just interested in the nuances of woodworking. The project is close to complete. The finish is on, the top is mounted. Rubbing out in a few weeks is all that is left. I'll try to get some good pictures up soon. In the mean time here are a few quick snaps...I couldn't quite get the chatoyance of the quartersawn handles or the lid in the pictures but tried in the handle shot below.


-
Interesting. I confess I've never seen a G&G piece in person and my exposure is through the Guild build and Google so it makes sense that it might feel a little different. As I mentioned in the first post I don't mind failing to fit precisely under the category as long as the piece at the end is pleasing. I thought about joking in that post that I was going to build a Bluee and Bluee blanket chest. As I've come along I've tried to add more and more curves into my work - partially for the fun of it and the added challenge, but perhaps to avoid being too crisp?
-
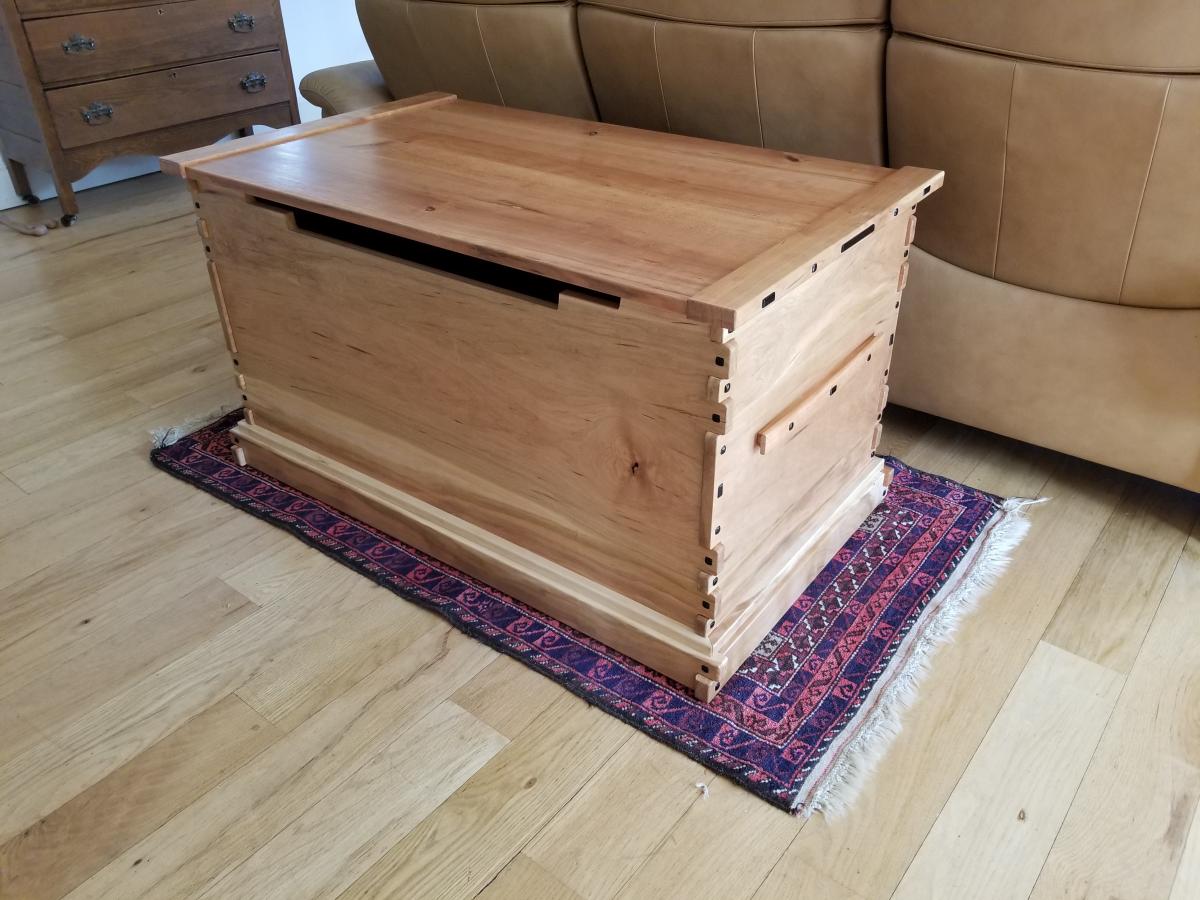
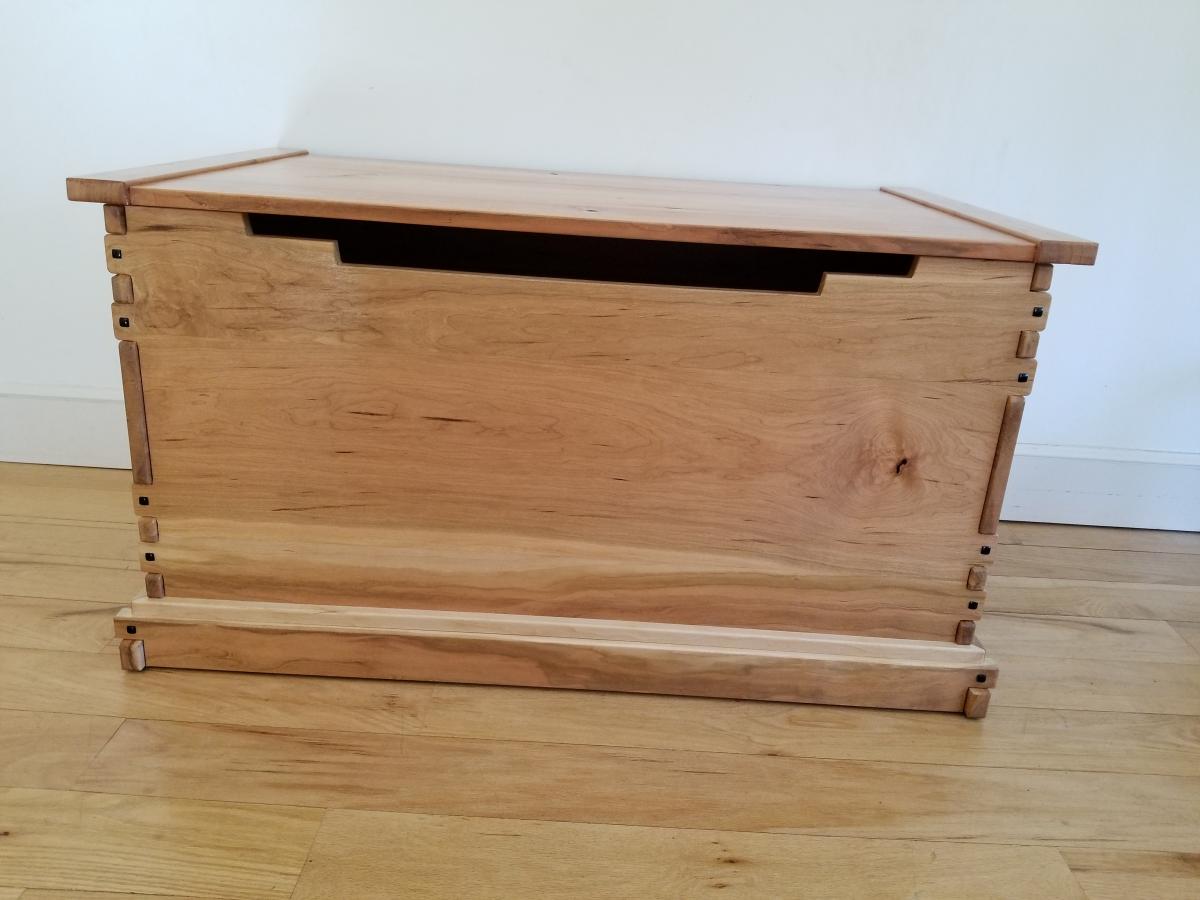
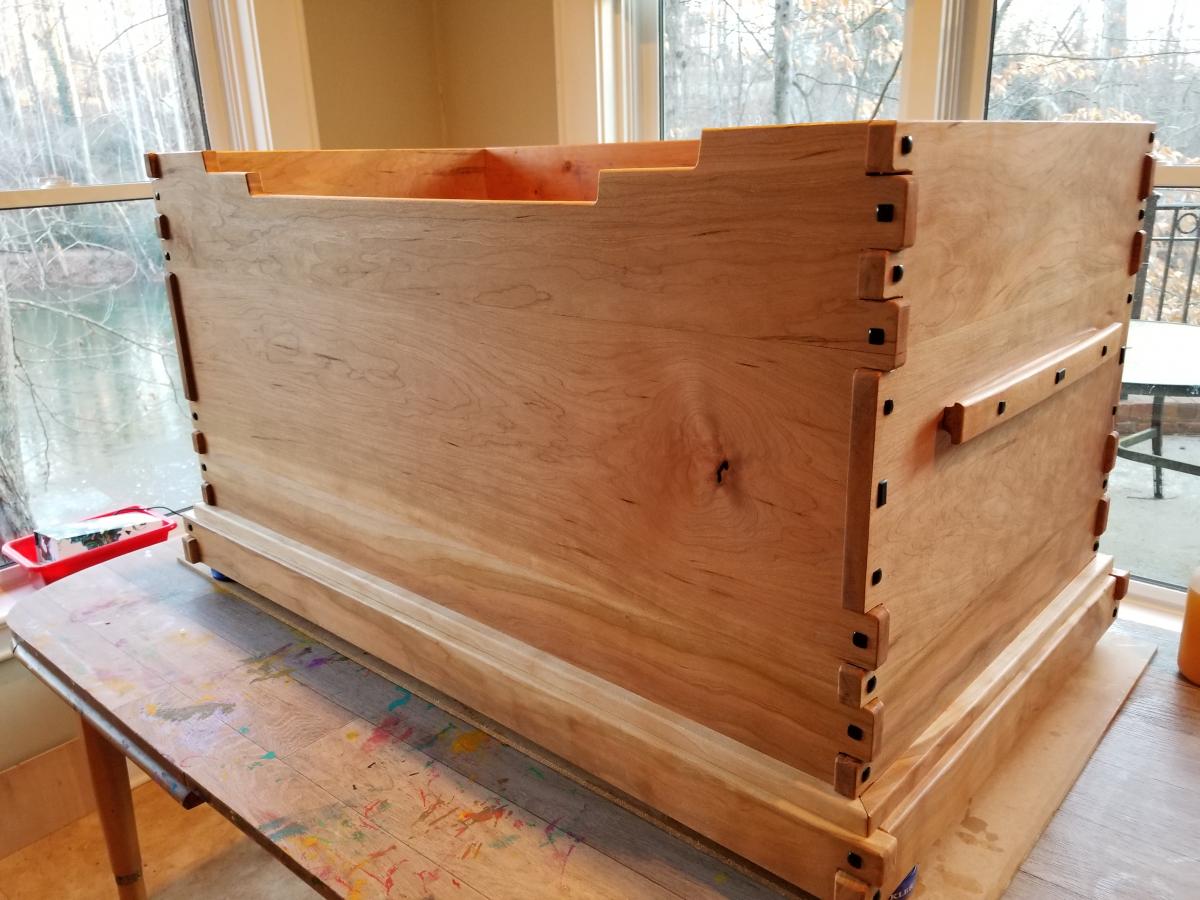
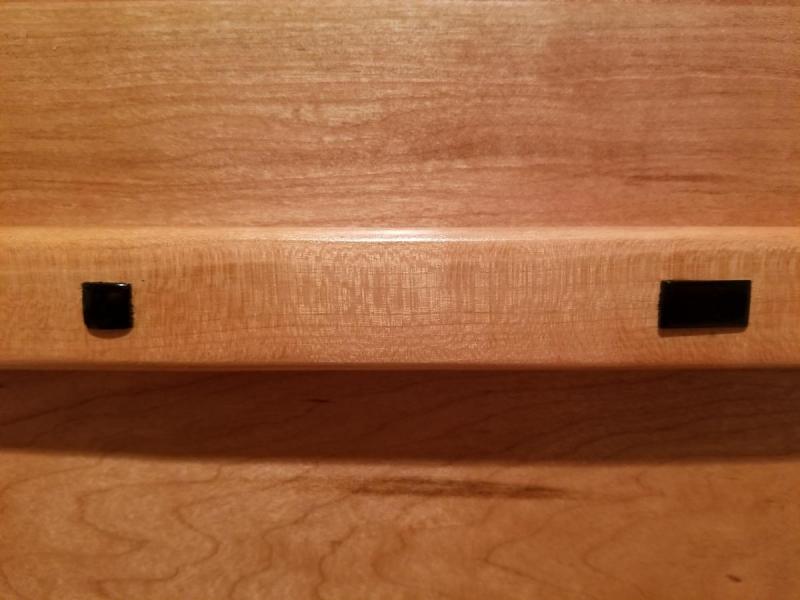
I forgot to mention a couple design choices where I left the standard build (some of which I asked you for advice on above). I wanted a much deeper chest and I wanted it to align with our windowsill so my chest is roughly 2 inches taller than the guild one. I also found that for the 3 boards that wrap around to make the front and sides (my boards weren't long enough to wrap around and allow the back to be from the same boards, but the back looks fine and is out of sight anyway) I could get about 21" out of the three boards and still make them look fairly good together, so I put a dado directly into the case side for the bottom to rest in and got 19 3/4" usable depth inside the chest. Then the base was cut to fit around the case. The deck is a faux deck - just a thin strip of molding that looks like a deck, but is not - it is above the floor of the chest. I don't do miters very often in my work, but had built my own poor man's version of the super chute shooting board and used it for the first time in this project and it worked like a charm (to my eyes). I couldn't resist playing with the spacing of the fingers and was surprised when my mallet was too big to drive in the ebony on the sides (the hammer had 1" diameter). I was even more surprised not to find an option on amazon or in my local woodworking store that was under 1". I was worried a metal head would damage the plugs so I took 2 sided mounting tape and cut/attached a soft wood head on my regular hammer. Just to be even safer (?) I added duct tape to protect the plugs more. It worked okay, but the mounting tape failed and had to be replaced once. In retrospect I liked my solution for a single use, but If I were going to do this a lot I'd try to find a better solution. I'm sure there is a more standard, known solution out there. I had already ordered the Rockler hinges when I found out about the cool ones above and ended up deciding I did like their look so my current plan is to use them. Knowing that I put the inverted cloud lift on the top (in part because we might store wet swim gear in it) I might have made the lid have less overhang as I really like the look of the cloud lift and it is hidden a bit by the overhang. I'm thrilled with the advice above to keep the finish clear. I'm happy with the look it is going towards. I also have gone with only shellac on the inside because I know people often say at least for drawers that other finishes on the inside can leave an off smell for a long time and I'm already partial to shellac as a finish, but I wondered what others do.
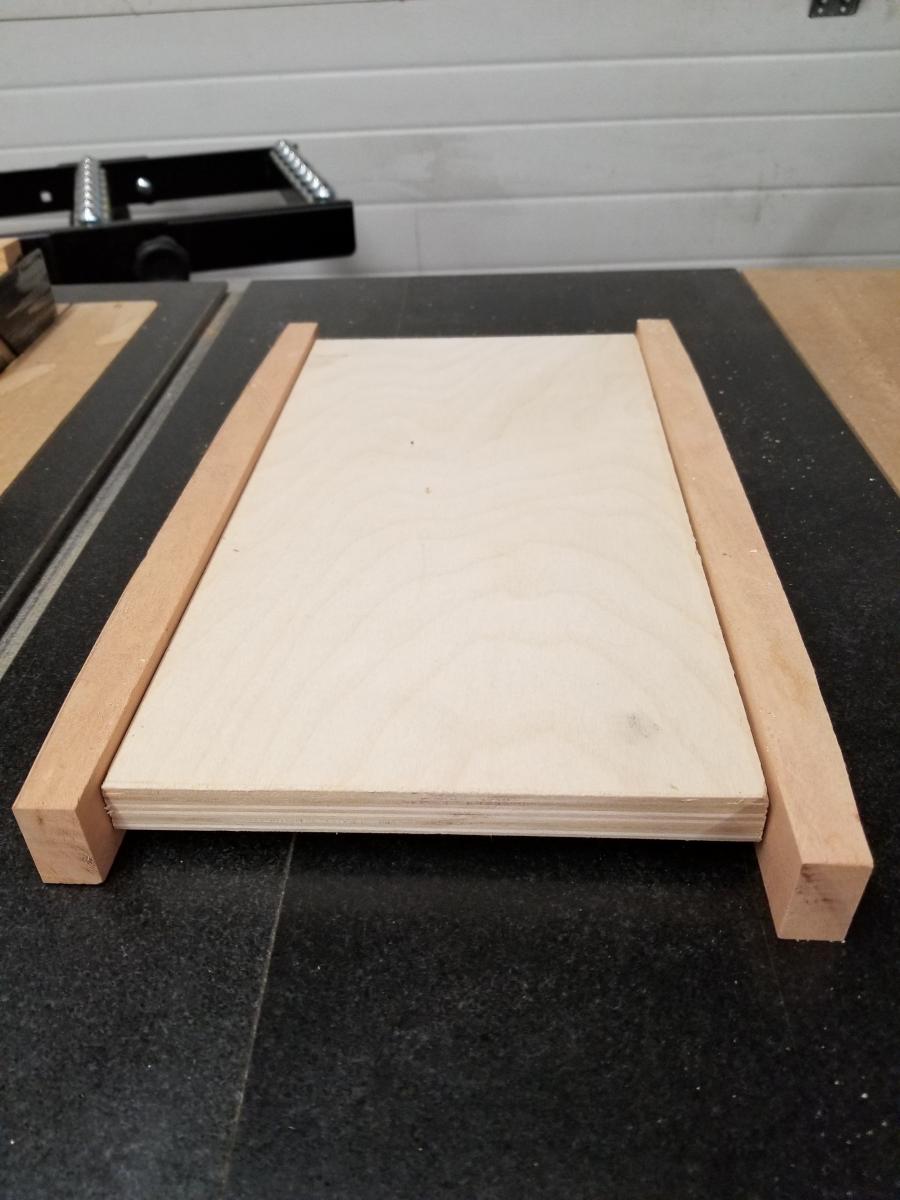
-
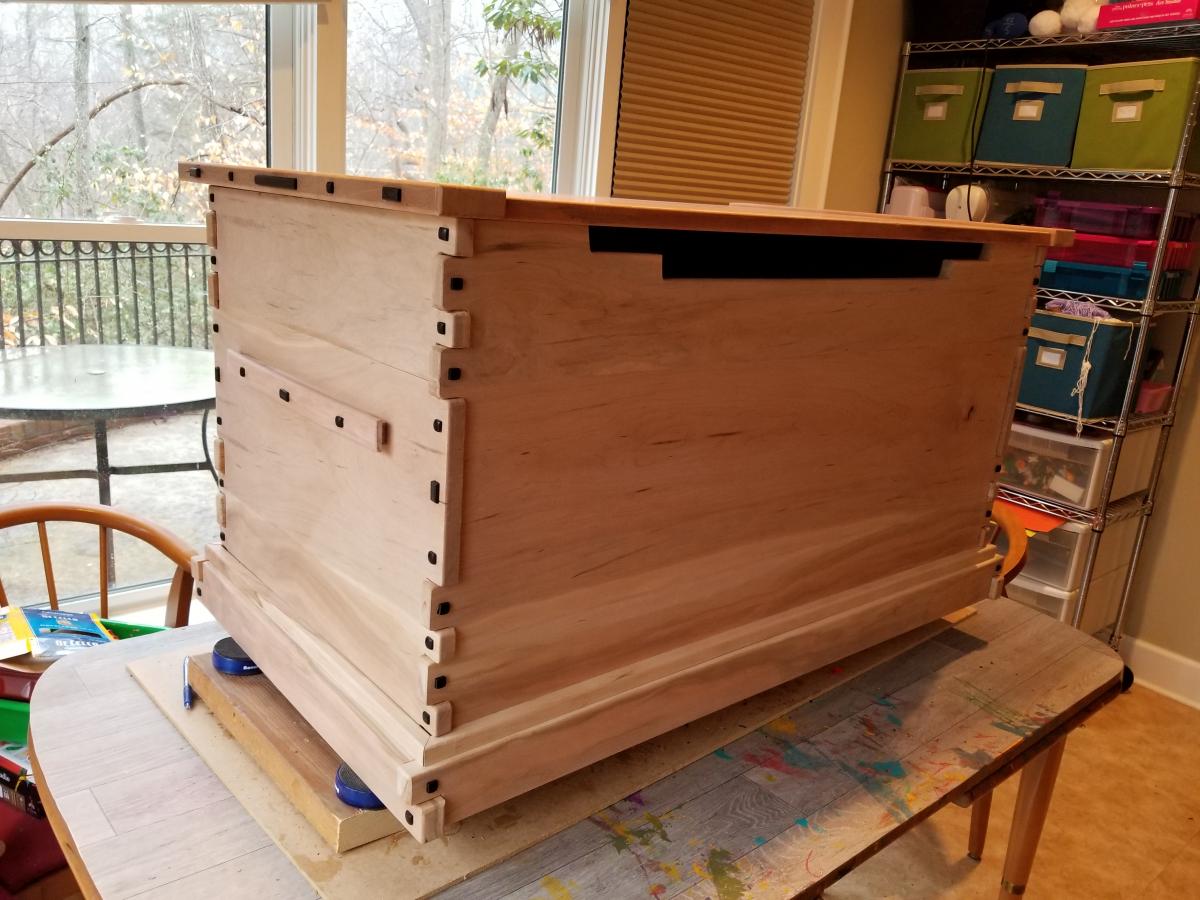
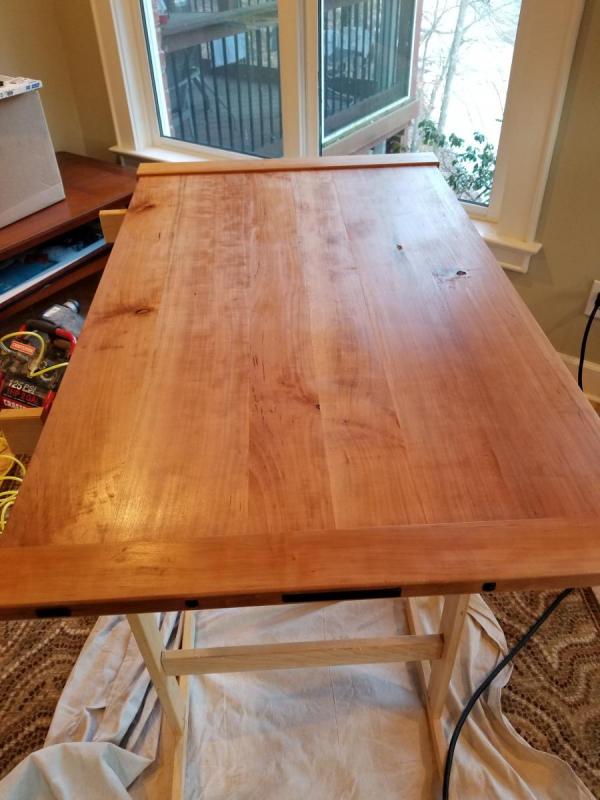
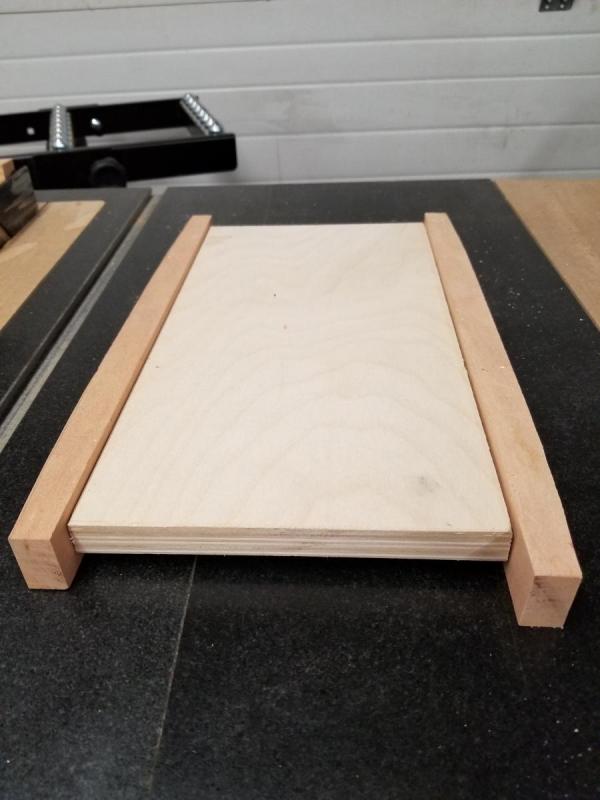
After all this time I'm finally getting close to completion. It has been a fun build and I've been fairly happy with most of the choices I've made along the way. Here are some shots. The one with the top resting on the box has no finish on it yet. The other two show it with one wash coat of shellac and one coat of Arm-R-Seal. More thin coats to come, of course. I also show my jig looking for a solution for routing the inside of the handles that for me fixed the issue Marc mentions in his video. I pre-drilled the three screw holes and then attached a sheet of plywood with screws to the two handles. I put small off-cuts under it so the ply is centered and although it looks like there is only a slight lip, it is more than it looks and the router bit never really touched the plywood. The screws were carefully centered, so even if it had hit the plywood, it would not have hit the screws. I used longer screws (2") than I used to attach the handles to the case for extra holding power. I made sure it was a strong connection so the router wouldn't risk separating the parts and used a push block resting against the handle near the bit and my hand for the side 8 inches from the bit. It felt super safe. I didn't have a good way to video it though since I don't have a tripod. My one mistake was I tried to do it in 2-3 passes at first and because I wasn't using the featherboard I did mess up my first handle a bit and had to make a new one. Then on my second try, raising the bit a tiny bit at a time made it a breeze. I did all 4 edges at each height flipping the jig for 4 quick passes. In spite of taking 5-6 incremental increases in height the whole process (once I'd replaced the damaged handle) probably only took 3-4 minutes.


-
Hammer A3 (-26 -31 -41) Combo Machine Review
Hugh Howard replied to -MattK-'s topic in Product Reviews
Oh no, Mick, now based on your post I'm out another $100. (Or at least I'm toying with the idea of ordering those parts.) The sales do seem to come and go fairly often. I watched it for a few years before taking the plunge a couple years back and back then they'd alternate between on sale for a bit and not on sale. I also tried to negotiate down the price when it was on sale, but didn't get any more off beyond the sale price. I'd expected a wait of a few months and was very pleasantly surprised when they were ready earlier than promised (about 2 weeks). -
Hammer A3 (-26 -31 -41) Combo Machine Review
Hugh Howard replied to -MattK-'s topic in Product Reviews
Matt Great Video. I have the A3-31 and love it. A few comments. First, I think the only thing that I would add to your video is that when you want to joint super thick boards I think you would be better off flipping the blade guard out of the way by going to the lever where it attaches to the table all the way to the left on the machine and loosening that and swinging it 180 degrees so it then is totally out of the way and below the table - it snaps back into place once it is under the table out of the way. That way you have an unobstructed path. Mine is about 2 years old and I'm pretty sure yours should be able to do this. That said, you only would need to do this when you are using over 12/4 stock so I've only had to do it a few times ever since the blade guard is fine under 3" or so. In that sense I think the guard isn't as bad as it looked in the video, because that one issue is easily avoidable, but I still think I'd rather have a pork chop so I didn't ever have to take my hands off the wood as I passed over the cutter (but I've never had a pork chop so I may be wrong). I also had the Felder tech come to my house. We have a small bridge on our street that Jet/Powermatic etc refused to deliver across so I was going to have to hire someone to deliver my machine no matter what, but Hammer was willing to deliver it and set it up in my shop for a reasonable price even though I am 6 hours from them. (I think it was just under $400 including delivery and about 4-5 hours of labor here.) I agree change over was something I worried about. If it was bad, it would make it a pain to use the machine, and make me wish I had space for separates but it is quick enough that I don't bat an eye and the read out is so accurate that I can get back right where I left off on planing. I've had a couple minor issues that required phone calls, but tech support has been fantastic even though I am not under warranty. The first time I wanted to decrease snipe and they did a skype with me showing what I should adjust to take care of it. The second was an alignment issue that I needed to fix and that they helped me take care of. More sophisticated users might not have even needed tech support, but I was thrilled with the service I got (and by the end the machine was running like new or better). I got two of the smaller extension tables that do not have legs. I usually keep one on the outfeed side of the jointer and one on the outfeed of the planer, but can always put both on the jointer when doing long boards. They are nice and fit in my 1 car garage shop, but do have a little flex so it isn't exactly like having a super long jointer (I think yours with the leg probably fixes that issue, but does need extra space). That said, thanks to the extensions I've never had a project where I wished I had a longer jointer. I figure if I can make it through the Roubo, which I did, I'm unlikely to do a longer project than that. Many times I've used over 10" width jointing, so given the choice I'd rather have the wider bed than say an 8" jointer with longer beds (but again I never had a long bed jointer so I can't miss what I've never had). The thing that I would change if I could do it magically and at no cost is make it even wider as I do sometimes want to plane or joint something wider than 12" (and, of course, Matt's a3-41 does give that extra width). In tune with the comments about the feed rollers above, I was given 2 bits of advice for making the parts last as long as possible by tech support. The first was to turn the feed rollers off when not in use. The second was when starting the machine they said to hold the on button for a couple seconds as it results in less wear on one of the components (I think they said the start capacitor, but I could be making that up - perhaps it was a flux capcitor). All in all great review and I agree with your take. Thanks for posting this! -
I should have called them yesterday. Today they are "picked" and they say I'll have to pay for return shipping. They can't be very heavy so I don't expect that will be too much, so I think I'm going to return them. Eric. is one JB-280 (the bigger Brusso lid stay) the right thing to order for a chest of this size? (The write up for the lid stays says "The two sizes featured below are excellent for humidor, jewelry box, and other keepsake projects," but then has a picture of a blanket chest so it isn't clear just based on the website). Happy 4th everyone. Hugh
-
Wow, Eric. That is a nice chest with some nice hardware. I ordered the Rockler stuff this morning before posting (which seemed quite nice until I saw your Brusso option) and have been trying to cancel the order all afternoon, but when I pull up my order on their website it is listed as "processing" and when I click on my order number I get "order not found." Thanks to everyone for the confirmation that I can just go with Cherry straight up. That is always my natural inclination. Going down to .75" or at most 7/8 seems right, too, even though I hate to waste all that wood. On the bright side perhaps it will give me the incentive to surface the wood a bit before cutting it down which might help as I am a little torn with them in the rough state about which boards should be used in front and which in the back for the best results and once they are cut there is no turning back. Interesting idea about stippling the accent pieces. I've never done stippling before, but I always like trying something new. I always assumed I'd try it on a box first, but then again I guess this is a box - just a big box...
-
Hi all, I had a few ideas on changes to the beautiful guild G&G blanket chest. I am going to build a chest to contain a bunch of my kids swim gear and I need a little more space than the current configuration. Here are changes I was thinking of making, let me know if any of them seem especially egregious to you or if they seem okay. I have no loyalty to historical accuracy and in fact much prefer changing things up to make them my own as long as they aren't problematic structurally (not a matter of opinion) or aesthetically (somewhat a matter of opinion, of course). This got a little long so I don't expect anyone to comment on everything, but would love any input and wisdom you guys have on any of this. 1) Local wood. I like to use locally sourced wood when I can. We have a great guy in town that uses trees that came down on their own - a little like having our own local version of Matt Cremona and so I try to buy wood from him whenever I can, but we don't have local Mahogany. He did have some nice cherry. I've seen some of the builds in walnut, which looked nice, and normally I can get great walnut here, but my wood guy was out of it so cherry it is. Obviously this makes it Bluee and Bluee or something other than Greene and Greene, but I'm fine with that as long as there is no reason why cherry just can't be combined with ebony plugs or finger joints, but I don't see a reason why that wouldn't work. The lid will be quartersawn but the rest will not be. 2) No dye or stain? The project colors the wood. I'm a big fan of wood with clear finishes and my wife doesn't tend to like dark wood. Is the reason for the dye just trying to be historically accurate? The room already has maple and walnut and a little cherry all treated with shellac or arm-r-seal and I'd probably stick with that. Is this idea crazy? 3) No drawer because I want to capture most of that space as detailed below (although I hate giving up such a cool feature). 4) My chest will be about 2 inches taller so it will line up with a low windowsill. I still want as much depth as possible. I've seen the alternative method included in the build, but even want another inch past that, so here is my idea (I can draw a bad sketch if necessary) cut the groove for the plywood bottom into the base instead of the case, about 1.25" below the top of the base so forgetting the chest and the deck there would be a drop of .5" from the top of the base to the plywood bottom. The case would then nestle down into the base and sit directly on the bottom. The deck would then just be an optical illusion in terms of function made from something like a .5x.5 strip of wood that would get glued onto the case just above the base (the base is coming from 5/4 stock, so I'll keep it as big as possible and will probably be 1" wide allowing it to stick out another .5" beyond the faux deck.) To attach the case, I'd probably use a little glue to the base. I think wood movement with the base shouldn't be any issue since grain there is going in the same direction as the case and the faux deck. Shouldn't I be able to get away with minimal attachment since gravity will hold it together except when it is being moved, which will almost never happen and to a much lesser extent from when it is open a bit. I'm almost tempted to leave the unit in two pieces and just have the case slide into the base, but that is probably a bad idea. 5) I'd like to add a cut out under the lid in the front that might be viewed as an upside down cloud lift to give an easier way to grab the lid to open it and to let air in and out. (Swim gear will be stored in the chest so it can't be very air tight). Is there any reason this would stylistically clash or is there any other issue I'm not seeing? 6) I'm still playing with the box joint proportions I want. I really like Marc's and I also really like the smaller ones others have posted in the gallery. Since my chest will be 2" taller than the guild one I wonder if I the box joints in the project would scale up or if it would look better with at least a couple more fingers (it certainly looks just about perfect in the guild design). With dovetails I always go symmetrical, but irregular and could try something like that here. Marc in some sense has 3 fingers on each edge and if I went with more I might go for 5, but echo his pattern of getting bigger as they move to the center. 7) My wood is 5/4 because the dealer didn't have 4/4 (and his prices are great so getting 4/4 somewhere else would have probably cost more). Would the chest look better or worse with 1" sides instead of 3/4"? It would certainly make the Rockler torsion hinges a little harder to apply but the large box joints would be even larger which I could see going either way. I hate planing away so much wood, but I don't want it to be too chunky looking either if 3/4" would look more refined.
-
Krenov Style Display Stand Build
Hugh Howard replied to Hugh Howard's topic in The Wood Whisperer Guild
Ok, if you guys are going to be like that I'm never posting on here again. Just kidding, of course. I appreciate the correction - I'm going to have to search and figure out what the difference between the two is (edit: alas because I was trying to be funny, I wanted to have this be two posts - one that said I'd never post again and then another 10 seconds later where I posted again, but they were automatically merged) As for finish, I just went with Shellac. 2 coats brushed and then about 3 rubbed on and then finally rubbed out with 0000.