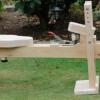
Popular Post ..Kev Posted December 26, 2017 Popular Post Report Share Posted December 26, 2017 I received this as a Christmas gift and was asked to do a review on it.. I had a look at costs and they're around 50 bucks on Amazon. I was also able to buy 2500 replacement pins for about 13 bucks. The pins come in 2 versions. Stiff for use on hardwoods and Flexi for use on softer material. The tool is made of metal (not a bunch of plastic) and feels good in the hand. Loading the pins is straight forward and easy to do. I built a frame out of Bubinga and Cherry to test drive the new toy/tool. Being hardwood, I used the stiff pins. Here's the set up before driving any pins. And, the tool in use.. This is how far they drove into the cherry/bubinga. And the finished product. All told, this took me less than a minute to do. The tool worked as advertised and should be a real time saver with the amount of frames I have to do. I should have bought one long ago! I would recommend this to others! Hope this helps others considering a pin driver. 5 Quote Link to comment Share on other sites More sharing options...
Chestnut Posted December 26, 2017 Report Share Posted December 26, 2017 Do you think it'd be easier to pull the pins and shoot new once to replace the contents in the frame or would it be fairly easy to bend them up and then back? Quote Link to comment Share on other sites More sharing options...
wdwerker Posted December 26, 2017 Report Share Posted December 26, 2017 I have swapped out pictures that were installed with that kind of pins by bending them. But if I had the gun handy I might have pulled at least 2 sides. If the mat fits snugly it's hard to bend the pins far enough. I've got a diamond shaped point driver. They are used to put glazing in window frames but not as good as one like Kev just got. Quote Link to comment Share on other sites More sharing options...
Tom King Posted December 26, 2017 Report Share Posted December 26, 2017 Mine are antique Red Devils that shoot the little diamond shaped points for window sash. They aren't made any more, but you can still buy points for them. That kind looks better for picture frames, but the smaller ones work on cabinet, and furniture doors with glass, as well as window panes. You need the small points for divided lights, so the points get hidden, and protected, by the glazing. These look great for picture frames, because the little diamonds are too small way too many times. 1 Quote Link to comment Share on other sites More sharing options...
..Kev Posted December 26, 2017 Author Report Share Posted December 26, 2017 57 minutes ago, Chestnut said: Do you think it'd be easier to pull the pins and shoot new once to replace the contents in the frame or would it be fairly easy to bend them up and then back? The pins are bendable but, considering cost and ease of use, I’d probably just shoot new. Quote Link to comment Share on other sites More sharing options...
Chestnut Posted December 26, 2017 Report Share Posted December 26, 2017 1 minute ago, TIODS said: The pins are bendable but, considering cost and ease of use, I’d probably just shoot new. I missed that the poitns were so inexpensive. using 10 per frame would allow something like 250 frames/content changes. That $13 is worth the convience cost. How much rabbet is needed to drive these things? I always feel like i run out of rabbet space with picture frames. After the glass the matting and the backer. Quote Link to comment Share on other sites More sharing options...
..Kev Posted December 26, 2017 Author Report Share Posted December 26, 2017 44 minutes ago, Chestnut said: I missed that the poitns were so inexpensive. using 10 per frame would allow something like 250 frames/content changes. That $13 is worth the convience cost. How much rabbet is needed to drive these things? I always feel like i run out of rabbet space with picture frames. After the glass the matting and the backer. So, ultimately that depends on the thickness of the material going in the frame. The pins shoot directly on top of the material. I left about 1/8" on that frame. 1 Quote Link to comment Share on other sites More sharing options...
Coop Posted December 26, 2017 Report Share Posted December 26, 2017 Kev, Neat review. Can you post a pic of the front of the frame por favor? 1 Quote Link to comment Share on other sites More sharing options...
..Kev Posted December 27, 2017 Author Report Share Posted December 27, 2017 Per your request.. Pic is my dad's graduation picture.. 2 Quote Link to comment Share on other sites More sharing options...
Coop Posted December 27, 2017 Report Share Posted December 27, 2017 Really neat job there bud! Your dad had that look that all of us had at that stage of our lives, relieved to be out of school but anxious about what awaited him! 1 Quote Link to comment Share on other sites More sharing options...
Coop Posted December 27, 2017 Report Share Posted December 27, 2017 Kev, did you glue up all three pieces before mitering them? Quote Link to comment Share on other sites More sharing options...
..Kev Posted December 27, 2017 Author Report Share Posted December 27, 2017 20 minutes ago, K Cooper said: Kev, did you glue up all three pieces before mitering them? Yes. All the decorative stuff is done in one long strip and then the frame is cut. This is an older video but, it does a good job of showing the process and the use of the miter sled that I built.. 1 Quote Link to comment Share on other sites More sharing options...


Recommended Posts
Join the conversation
You can post now and register later. If you have an account, sign in now to post with your account.