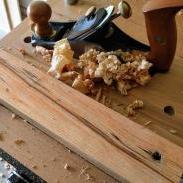
Coyote Jim Posted April 18, 2018 Report Share Posted April 18, 2018 I was kicking around different ideas for what I wanted to build next and then my wife asked me if I could make one of these some time. I told her I did not know how to make stuffed animals. She rolled her eyes and shook her head. But...I'm a dad, I make dad jokes. It's what we dads do. Anyway, my daughter's stuffed animal collection has gotten a bit out of hand. Her room is a zoo. Well since I was not sure what my next project was going to be it was no problem to put this at the top of the list. Just like all my projects so far, this is pretty much just an excuse to try some new techniques and to learn more woodworking (I still have a LOT to learn). So the swing/shelf in the picture is not really impressive. Looks like some regular construction lumber screwed to each other and some ropes tying it all together. Looks like something you could hack together in an afternoon (and that middle cross piece is crooked, but that may just be the green monkey pulling it down. Damn monkeys!) I want to pretend I am a real woodworking and make this like a real woodworker would make it so I will be using hard wood instead of construction lumber, and some real woodworking joints. This project will be my first ever half lap joint, and I will be using my new Dado stack for the first time. I drew up some plans. I am not so good at drawing so this was the best I could do. Of these 3 drawings I like the style of the top one the most. The other too just look a bit too "pirate ship-like" for my taste. If I am going to be doing something that is pirate-like it will involve rum. Lots and lots of rum. I have a project picked out. I have hand drawn plans. I have confidence build from ignorance. Now I need some wood. Earlier in the year I had gone hunting for pallets that were not made out of pine and I stumbled on a bunch of these pallets and crates that look to be a mixed bag of some kind of oak and birch. It is all rough sawn and ranges from 4/4 to 5/4. I was sore for over a week after tearing those damn pallets apart. That crap is hard work. In my last project I did all my milling using hand tools. Including all the rip cuts. For that project, where I only needed like 2 boards, it was quite enjoyable, but this time I just wanted to get started so hand tool milling was out. I still don't have a jointer so I made a planer sled and used my planer to get the faces flat and parallel. It was the first time I have tried using a planer sled to flatten rough sawn boards. It went pretty well, I give myself a 7 out of 10. Then the table saw to get the edges cleaned up. So here we have the wood all milled to thickness and width. I made all these boards just a bit long so I can flush it all up later. The darker wood in the back is oak, I think. You see, it smells exactly like oak and it has the same open grain as oak but I do not know what kind of oak is that dark. When it comes to red oak I usually think of that pinkish look, this is pretty brown. Those brown boards will be used for the wide part of the shelves. The lighter colored long boards is the sapwood of the dark colored oak, they will be the cross pieces. The short pieces are birch. The birch will be the narrow part of the shelves. Now that the boards are milled up nice, time to cut some half lap joints. I am using this Dado set, it comes reccomended from Steve Ramsey. I don't like it. The issue I had is that the interior cutters (or whatever they are called) would not fit no the arbor of my saw. The out side blades (or whatever they are called) fit on problem, but the hole in the interior cutters was just too small. I ran some sandpaper on the hole and that let them fit on the arbor but I just think it was strange. The real problem though, is that the teeth of the outside blades stick up higher than the interior cutters, so you get a really bumpy Dado that needs cleaned up after. So, sorry Steve, this one is a bust. I had to get my miter gauge set to a perfect 90 degrees of my blade but the gauge is kind of a pain to adjust. I ended up just using some tape on one end to get that last few thousandths dialed in to being square. The tape method actually worked like a charm. I practiced doing the half lap joints on some scrap that was the same thickness as the work pieces to get the height of the Dado blade right. The Dado blade made for a bumpy surface so I cleaned it up with a block plane and a shoulder plane. Here is the test fit. Now to glue the test pieces up. I did not know the proper way to clamp up a half lap joint so after consulting the experts here on this site I ended up with this mass of clamps. It seamed to work pretty well too. I just need to flush up the ends that I left long. I flushed the sticking out ends with a smoothing plane and DAMN!! Look how tight that is! I had no idea I was capable of this!! It's nearly flawless. And it's square too. I know what you're saying: "Easy there killer, it's just a simple half lap joint, don't get all high on your horse, it's not like you did hand cut sunrise dovetails or anything." And you're right, this is a simple joint, but it was my first one, and my first time using a Dado. So just let me have this one ok? While I had these test pieces done, one out of the sapwood and one out of the darker oak, I also put some finish on them so I could see what this was going to look like. This picture taken in poor lighting is the wood with boiled linseed oil on one of the sides (left) of each joint and danish oil on the other (right). Then dark furniture wax on top of that. The dark wax really settled into the open grain of the oak and makes it stand out so much. There seemed to be not much difference between the BLO side and the Danish Oil side, the BLO side was a tiny bit darker and richer. Well that does it for now. I need to get a couple more pictures before I can post the rest. Hope you enjoyed the write-up so far. And if anyone knows what kind of oak is that dark please let me know. It's downright gorgeous. Quote Link to comment Share on other sites More sharing options...
wdwerker Posted April 18, 2018 Report Share Posted April 18, 2018 Somebody else built that swing recently. I'm too tired to search for the post. Quote Link to comment Share on other sites More sharing options...
Coyote Jim Posted April 18, 2018 Author Report Share Posted April 18, 2018 10 minutes ago, wdwerker said: Somebody else built that swing recently. I'm too tired to search for the post. It was probably a post by me talking ABOUT building the swing. If you can't tell by how long winded my journal posts are, I like to hear myself talk....er write....er.....whatever. Quote Link to comment Share on other sites More sharing options...
wdwerker Posted April 18, 2018 Report Share Posted April 18, 2018 Tired = 3 margaritas.... Quote Link to comment Share on other sites More sharing options...
Chestnut Posted April 19, 2018 Report Share Posted April 19, 2018 I'm just going to drop this here. http://www.wood-database.com/wood-articles/distinguishing-red-oak-from-white-oak/ Also good work on the half laps. It's not really the easiest thing to do in the world but now that you have that figured out bridle joints and mortise and tenon joints are going to be easy for you to pick up. 1 Quote Link to comment Share on other sites More sharing options...
Coyote Jim Posted April 19, 2018 Author Report Share Posted April 19, 2018 2 hours ago, Chestnut said: I'm just going to drop this here. http://www.wood-database.com/wood-articles/distinguishing-red-oak-from-white-oak/ Thank you for that. I know this kind of thing should be well know but, have I mention that I am super new at woodworking? They did not even have a "Shop Class" at the high school I went too. I still have no idea what a spoke shave does. I don't even use a crosscut sled. Please don't judge. Quote Link to comment Share on other sites More sharing options...
Catco Posted April 20, 2018 Report Share Posted April 20, 2018 On 4/19/2018 at 11:06 AM, Coyote Jim said: Thank you for that. I know this kind of thing should be well know but, have I mention that I am super new at woodworking? They did not even have a "Shop Class" at the high school I went too. I still have no idea what a spoke shave does. I don't even use a crosscut sled. Please don't judge. Spokeshaves can be made from flat-bottom, concave, or convex soles, depending on the type of job to be performed. Spokeshaves can include one or more sharpened notches along which the wooden shaft is pulled in order to shave it down to the proper diameter. Historically, spokeshave blades were made of metal, whilst the body and handles were wood. An early design consisted of a metal blade with a pair of tangs to which the wooden handles were attached, as with a drawknife. Unlike a drawknife, but like a plane, spokeshaves typically have a sole plate that fixes the angle of the blade relative to the surface being worked. By the twentieth century metal handles and detachable blades had become the most common. Credit goes to wikipedia 1 Quote Link to comment Share on other sites More sharing options...
Coyote Jim Posted April 20, 2018 Author Report Share Posted April 20, 2018 I clamped a fence to my miter gauge and started cutting all my joinery. This started off kind of tricky. The cuts would kind of drift on me in the middle of the cut, I assume because only the teeth of the blade were above the table, which means that while I am cutting, the workpiece can move left and right. No matter how tight I held the workpiece to the fence it just kept drifting. Clamping the workpiece to the fence fixed that and I was soon cutting half laps like crazy. Joinery is all cut and now I just need to clean them up using the block plane and the shoulder plane just like I did on my test piece. Time for gluing! I used a total of 7 clamps per shelf to get it right. And it worked. Just need to flush up the corners then add a little round over to the sharp bits and we are ready to put on the finish. Here we are with the first coat of Boiled Linseed Oil. I'm starting to get excited, this oak is it's looking pretty incredible. After 48 hours the shelves were starting to look a little dull, almost like they were covered in dust so I put a second coat of BLO on them. Then after 48 more hours I put Danish Oil on them. The Danish Oil stayed a little tacky for almost 3 days. I was worried I had done something wrong but it seamed to cure just fine, took longer than I anticipated for some reason. At this point the shelves were looking really good and I was worried that if I put the dark furniture wax on it like I had planned that it may mess it up, but I really wanted to do it, so I just went for it. I'm glad I did. The color and grain of this oak is gorgeous. I wish my poorly taken pictures could capture just how nice the grain is. For the ropes I found some thick twine like stuff at Harbor Freight. I'm not sure I like it but it's what I had. Roping this all together was pretty fiddly. It all worked out but it took like 2 hours. It's possible that it took 2 hours because I was watching more playoff hockey than I was working on the ropes though. Well here it is all hung up on the wall. Yes my daughter's room is painted pink, she is super girly. Lets put some animals on it! Recap: Yes this is completely over engineered and over built for what it is. The thing weighs like 35 pounds. But that is not the point. The point is that I did half lap joints, and I did them well. The real star of this show is that dark brown oak and the finish. The combination of the BLO, Danish Oil and the dark furniture polish is down right stunning. The unfortunate thing is that it will be covered in stuffed animals and no one will see it. Kind of tragic. I can see myself using that combination of finish in the future, probably a lot. 2 Quote Link to comment Share on other sites More sharing options...
Keggers Posted April 20, 2018 Report Share Posted April 20, 2018 The point is.....you took your time to be a dad and built something that will last for years for your little girl. To me, that's the most important point you made. Great job, by the way! 1 1 Quote Link to comment Share on other sites More sharing options...
SirNot Posted April 20, 2018 Report Share Posted April 20, 2018 I am totally stealing this idea for my daughter's room. I have some leftover maple and paduk that would be perfect! Quote Link to comment Share on other sites More sharing options...


Recommended Posts
Join the conversation
You can post now and register later. If you have an account, sign in now to post with your account.