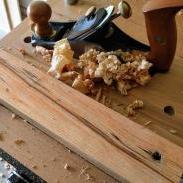
Popular Post Coyote Jim Posted February 6, 2018 Popular Post Report Share Posted February 6, 2018 Q: So Jim, is this going to be as annoyingly long winded as your last journals? A: ...yes. Q: Fine, will it at least be entertaining and/or funny? A: If you like self deprecating dry humor then yes, if not...then no. Q: Would you mind terribly if I just pretended to read it and skip the the end and say good job that way you can remain blissfully ignorant? A: That will be fine, in fact, ignorance is my default state. Since my last journal I have picked up a bunch more tools. These have mostly been hand tools because there is something just so satisfying about using hand tools. I get the warm fuzzies much more from hand tools than I do power tools. The most notable addition to my work shop has been my workbench. I bought it as a Christmas present for myself when Woodcraft was having a sale on this for $300 off. You screw it to the studs in the wall and that makes this incredibly stable. I also really like that it folds down. I can still fit my car in the garage which is a huge bonus. So enough with the tools that I bought and on to the build. For this project I want to use mostly hand tools for just about everything. I will not completely forsake power tools on this project but I want to get some hands on experience with all these techniques I have been learning about as appose to just knowing all the theory. I want to mill rough lumber completely by hand and I want to attempt a hand cut mortise and tenon, this will be a first for both of those. I COULD just stab one random piece of wood through another random piece of wood and have that be my first ever M&T but I like the idea of walking away from this with something I can keep. To keep the project simple I am going to make a headphone stand. One that I will keep on my computer desk and hang my headphones on. I did a bit of googleing and found some designs I like. I landed on this very simple style. That is just a random picture from the internet. What I make will be similar but I am not trying to re-create this. Now to pick out some wood. So here we have some pieces of oak that are just under 3"x3". These boards are very heavy and look to have been out in the weather. They came from a strange pallet. So at work we often use large pieces of polycarbonate. Think of it as extremely strong plexiglass. This polycarbonate comes on these huge roles. The big ones are 8 feet wide and all rolled up. They look a lot like this and they are HEAVY. You need a forklift to move these around. These rolls easily weigh over 1000 pounds. Those oak rails are what these huge rolls sit on. These particular boards are very dirty and very dried out. I picked one of the boards pretty much at random. I am going to make both the vertical piece and the base out of this board. I start by cutting off the first 6 or so inches because the end is all dried out and has cracks in it. I need to first cut that off and get rid of it. I just clamped the board down in my vice and use my new saw to cut that off (this saw was on sale at Woodcraft too). It went surprisingly well for how hard that oak is. The saw blade is very sharp and very thin so the amount of material that is being removed is quite small. I cut off the dried out end and I also cut the board in half. This is just cut to a rough size. It will need to be cut down to it's final size later. This half will be for the vertical part of the stand and the other half of this board will be used to make the base. I don't have a jointer plane or a scrub plane or a jack plane, all I have is this No. 4 smoothing plane which works pretty well because this board is not all that wide. Here I am creating the face. As you can see this oak has some nice spalting. Now to make the adjacent face perfectly 90 degrees to the first face. Took me a bit to get this right, apparently I plane a bit heavily to the right side but I eventually got this perfectly square to the face. Using my new marking gauge (yes, another sale at Woodcraft) I mark the other two faces so I can plane them down to be parallel to the face and the face edge. I planed the rough sides the the gauge line. I did this on both pieces of wood and boom! Two perfectly milled work pieces. Or at least as perfect as a beginner can get them. The board that is going to be the vertical piece is ready for step two, cutting the joinery, the other still needs some work. The other piece I am going to make into the base. I want the base to be 3/4" thick. This thickness is not based off of anything accept for my gut feeling. I hope my gut is right on this one. I need to make that 3" thick board into a 3/4" thick thick, which means re-sawing. Using the marking gauge I score a line that is 3/4" from the face using the face as the reference. I make this line around all 4 sides of this board. Now I just need to cut this board down the line. This will be my first time ever re-sawing a piece of wood by hand. And I chose oak to do it! Hooray for my awesome decision making skills! Also, I think the is my favorite picture I have ever taken of any of my woodwork. I know this seems like a lot of work, and it was, but it really only took maybe 10 minutes. Probably less. And it was oddly rewarding. I really got the hang of how to steer that saw. This was not a perfect cut that I made strait as a ruler but I'm really happy with how I did for my first ever try. Using my other new saw (you guessed it, also on sale from Woodcraft, no, I have no idea how they make any money at all) I cross cut this piece. The ends will be thrown away because there is some minor checking in them, the two middle piece with be edge jointed to create the base. I now have two 6" pieces that I need to glue together. This joint between the two boards SHOULD have been very clean and almost not perceptible. But you see that line between them? They are not going together very cleanly. I think what happened is that at some point I put this board in the vice too tightly and it bruised the wood. If I were to glue these together like they are you would see that line pretty pronounced, especially once I put a finish on it. This needs repaired. Luckily I saw a trick on how to fix this very easily. I put the two boards back to back with the edges that will be joined facing up and flush to each other. Then a few passes with the hand plane to make them flat and strait. Even if I don't plane these evenly and at exactly 90 degrees that is ok because both sides will be off of 90 degrees by exactly the same amount and each side will compensate for the other. This really only took a few passes and now this joint is flawless. There is no line at all. Even if you zoom in real close the only way you could tell that these were two separate boards is because the grain pattern is different. I have never tried a fix like this before and am very surprised with how easy it was to get these boards so perfect. I think the fact that these are only 6in long made this easy. If these were 4ft long boards I'm sure I would have had a much more difficult time with it. Just need to glue this up and I am ready for joinery. 3 1 Quote Link to comment Share on other sites More sharing options...
Isaac Posted February 6, 2018 Report Share Posted February 6, 2018 Good Job Jim! 1 Quote Link to comment Share on other sites More sharing options...
Popular Post Coyote Jim Posted February 6, 2018 Author Popular Post Report Share Posted February 6, 2018 Now to mark out the mortise. I am making the mortise the same width as my largest chisel which is 1". One of the most accurate ways to mark out a mortise is with a mortise gauge. I did not have a mortise gauge so I had to return my marking gauge to buy this which is a bit of a shame because I really liked that one. But a mortise gauge can be used as a standard marking gauge so it is a more versatile tool. Using the 1" chisel (which I had made sharp enough to decapitate a moose) I started chopping this mortise being very careful not bruise any of the surface and to keep it as strait as possible. I'm using Paul Sellers' technique. I started with the top, then went about 3/4 of the way through, flipped it over and completed it from the bottom. First ever mortise done! It went pretty well. When I watch how they do it on Youtube is seems SO easy. But they either have way more practice than I do or they are using a softer wood than oak. Cutting this took about 20 or so minutes. Would have been faster if it was not my first time. Now that the joinery is cut into the base, time to move onto cutting the joinery into the vertical piece. After marking the mortise with the mortise gauge I taped the rails together. Doing that locks them into place. I can now move the fence up and down but the distance between the cutting wheels will not move. Which is good because I need the mortise and tenon to exact. Using the mortise gauge, I score where the tenon will be cut. The square in the middle what I need to keep, that square will be my tenon. All the other squares will be cut off. I need to cut those lines as strait as I possible can and make sure I stop right at the line I scored around the outside. I used my Japanese saw to do this. I made sure to cut just outside the lines. This makes for a "fat" tenon. Then I use the same saw and cut off the shoulders. Again, staying just on the waste side of the line, not cutting the line at all. First ever tenon done! Because this is a fat tenon there is no way it is going to fit into the mortise. I did this on purpose because I am far from skilled with the hand saw and being all thumbs like I am I did not want to do a hack job and ruin the tenon. Instead I am going to use the chisel and work very carefully. I spent a stupid amount of time on this. Like almost an hour and a half trying to get it right. But here it is all cleaned up and everything chiseled up to the line all nice and perfect like. It fits and the shoulder lines up with no gaps and it's square! I did it! I hand cut my first mortise and tenon. Joinery done! I grab my headphones to figure out how tall I want this to be. I also use the curve of the head strap (is that what this is called?) to trace the curve. I am using the very scientific method of eyeballing this. Someone bought me an osculating spindle sander! But Jim, aren't you trying to do this mostly by hand? Yes but....I mean....it's sanding. Bleh. Also this will help me sand it square. A belt sander with a 90 degree fence would have been better for this kind of thing but this is all I have so I made it work. I want to put a chamfer on the outside of the base so I marked a line around the top as well as around the sides. Then using the block plane at an angle I just planed down to those lines. Came out pretty even also. Even the end grain went well. All that is left is to run the smoothing plane over everything one last time to get ride of any left over pencil marks as well as to round off all the sharp corner, then glue it together, then put finish on it. I am concerned about glue squeezing out around the base of the vertical piece because that bottom corner will be hard to clean up. I taped everything real good so that if the glue does squeeze out it will get on the tape and not the wood. I also taped a piece of cardboard to the curved top to make sure the clamps do not bruise it. Now that it is glued up the last thing to do is put finish on it. I am using Danish Oil because it is very simple to use and hard to screw up. I used a very heavy coat because I assume this wood was thirsty. And it was. Done! So what did I learn on this one. I really enjoyed all this hand tool stuff. I could see milling boards by hand being something I would end up hating if I had to do a lot of them but for one or two boards it was actually quite enjoyable. I learned that I should do a hand full of practice cuts every couple of days just to train myself how to cut strait. If I ever want to get around to doing hand cut dovetails then I will need to cut a strait and square line. If you made it this far thanks for reading. Hope you enjoyed it. I have more projects to come. 7 Quote Link to comment Share on other sites More sharing options...
pkinneb Posted February 6, 2018 Report Share Posted February 6, 2018 Really nice Jim! 1 Quote Link to comment Share on other sites More sharing options...
wtnhighlander Posted February 7, 2018 Report Share Posted February 7, 2018 Love journal, Jim! I have to agree that hand tool work provides a deep sense of satisfaction whe you do it successfully! 1 Quote Link to comment Share on other sites More sharing options...
shaneymack Posted February 7, 2018 Report Share Posted February 7, 2018 Congrats on your first mortise ! Project turned out nicely. Is that the veritas dual marking gauge ? If so, they have a clamp for like 10$ that clamps the two cutters in place so you can adjust the fence. http://www.leevalley.com/us/wood/page.aspx?p=67466&cat=1,42936 1 Quote Link to comment Share on other sites More sharing options...
Coyote Jim Posted February 7, 2018 Author Report Share Posted February 7, 2018 11 hours ago, shaneymack said: Congrats on your first mortise ! Project turned out nicely. Is that the veritas dual marking gauge ? If so, they have a clamp for like 10$ that clamps the two cutters in place so you can adjust the fence. http://www.leevalley.com/us/wood/page.aspx?p=67466&cat=1,42936 It is! I almost bought that clamp too. But I was already spending so much money on that gauge that I just could not bring myself to spend any more. Especially when $.001 worth of tape can do the trick. But...if I am honest with myself, I know I will eventually buy that clamp anyway. Seems that I have more money than sense. Quote Link to comment Share on other sites More sharing options...
Minnesota Steve Posted February 7, 2018 Report Share Posted February 7, 2018 This is awesome! I've been thinking about building a headphone stand myself. It's on my list... Some day... 1 Quote Link to comment Share on other sites More sharing options...
Tmize Posted February 9, 2018 Report Share Posted February 9, 2018 Great job Quote Link to comment Share on other sites More sharing options...
TerryMcK Posted February 9, 2018 Report Share Posted February 9, 2018 Something you might like to consider that moves the piece to a different level is this. On the top, where the headphone band currently sits, cut a groove that the band will sit within. A good exercise is cutting it so the groove is also curved following the same profile as the current end-grain top. You can do that easily with a saw, chisels and, if you haven't got one, a shoulder plane to clean up. Everybody likes new tools, woodworking gets expensive, but a shoulder plane is a necessity for hand tool work. The headphones cannot be easily knocked off and you haven't done a straight copy of a commercial design. BTW I like yours much better than the birch plywood commercial one as you have used an interesting wood. Keep up the good work. Quote Link to comment Share on other sites More sharing options...
pd711 Posted February 9, 2018 Report Share Posted February 9, 2018 Very nice Quote Link to comment Share on other sites More sharing options...


Recommended Posts
Join the conversation
You can post now and register later. If you have an account, sign in now to post with your account.