Freddie Posted August 19, 2013 Report Posted August 19, 2013 So this project has been put off for a while due to a hectic schedule. A customer had two old teak cabinets that were ruined during hurricane sandy. All I had to work with was a bad picture of them, they were thrown away during the clean up. I was given the basic dimensions of the two cabinets by the customers contractor who did the work at the house. Judging by the space they were stuffed in, the absolute width of the cabinets is 30" each. 18" deep, and roughly 29-30" tall. In the picture the case seems more rectangular than square, which I will have to try to replicate with the toe-kick style base. I have my material, rough cut the case sides which are still in the sheet. The cases are mitered, so I will cut the top and 2 sides in sequence out of the sheet to achieve continuous grain around the visible portion of the case. I don't believe in the strength of the mitered case on its own, so there will be a sub case built inside each cabinet. One has four drawers, the other has two sliding doors. The panels will sit sandwiched overnight clamped to my levels. A thorough check across shows we are nice and flat. I plan to spray with cab acrylic lacquer. With teak being such an oily wood, will the vinyl sealer grab good, or should I apply shellac first? Quote
Boatworks Today Posted August 19, 2013 Report Posted August 19, 2013 With teak ply, oil isn't much of an issue; it's mostly when dealing with actual lumber. Normally a wipe down with acetone just before the first coat of finish will remove the top layer of oil for good adhesion. Personally I wouldn't bother using shellac.. Hope this helps! 2 Quote
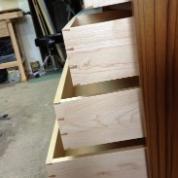
Freddie Posted August 26, 2013 Author Report Posted August 26, 2013 Ok, so I got into the shop for a few hours today. I cut the miters on my case pieces and cut to length. A test assembly shows the miters are nice and tight and the grain runs nicely around the cabinet. I glued a biscuit into a scrap piece earlier today with tbIII, let it dry for a few hours and yanked on it with pliers with almost all my might. It stayed put, thats a great sign! I also set up a story stick for the drawers on one of the cabinets. With 3/32" spacing between all drawer fronts and to the case, I came up with three 6" lower drawers and 4 1/2" for the top drawer. Next time I can get into the shop I will make the toe kicks, which are 4 1/2" tall. They will also be sporting continuous grain flow on the three visible faces. Quote
..Kev Posted August 26, 2013 Report Posted August 26, 2013 Awesome work Freddie! Love the grain matching! Quote
Byrdie Posted August 26, 2013 Report Posted August 26, 2013 That's some beautiful grain pattern. Those are going to be stunning. Love the blue tape reference pieces. I use the same method. Quote
wdwerker Posted August 26, 2013 Report Posted August 26, 2013 Gluing Teak ply is a breeze, the core is poplar ply's by the look of it. If you are gluing solid teak that is when you need to test the hold. Clean with acetone before you glue the really oily boards. I have found plantation grown teak much easier to glue. Very nice casework in your pictures! Quote
wdwerker Posted August 26, 2013 Report Posted August 26, 2013 Skipped right over Boatworks post, Oh well it bears repeating. 1 Quote
G S Haydon Posted August 30, 2013 Report Posted August 30, 2013 Top job Freddie. Those long miter joints are super sharp, in my book that's not all that easy, no hiding place if they don't fit. Quote
Freddie Posted September 1, 2013 Author Report Posted September 1, 2013 Got both cases glued up between last night and tonight. For one of them, I had to cut two 7mm wide by 9mm deep grooves for the sliding door hardware. Being too lazy to set up a dado stack, I made two passes with my plywood blade and cleaned up bottom with a chisel. Worked out great. I cut up my stock for the toe kicks as well, which also sport continuous grain. Hopefully I will make some progress over the next few days. Note: The close up of the cabinet together with the grooves is not assembled in this pic. It was just dry fit. I just wanted to point that out before people look at the gaps in the miters Quote
..Kev Posted September 1, 2013 Report Posted September 1, 2013 Nice work Freddie, they really look great! Quote
Freddie Posted September 2, 2013 Author Report Posted September 2, 2013 Got both toe kicks done today. I decided to add a rear frame for attaching the back panel instead of a rabbet. To me, this seemed more structurally sound than removing material from the case. Tomorrow I will cut the back panels, and make the sliding doors. Hoping to be done with one of the cabinets by tomorrow, then move onto building the drawer boxes. Quote
wdwerker Posted September 2, 2013 Report Posted September 2, 2013 Looking very good! What sort of finish do you have planned? Quote
Freddie Posted September 2, 2013 Author Report Posted September 2, 2013 Thank you! Vinyl sealer followed by acrylic conversion coating. Quote
Eric. Posted September 2, 2013 Report Posted September 2, 2013 Fantastic work so far, Freddie. The miters and continuous grain look great! Quote
wdwerker Posted September 2, 2013 Report Posted September 2, 2013 Do you get any complaints from the neighbors when you spray solvent finishes? I switched to waterbourne years ago because of the Fire Marshall. It was tricky at first but I learned and the finishes got much better. Quote
Freddie Posted September 2, 2013 Author Report Posted September 2, 2013 I would never spray solvents iny garage. I go to my dads body shop and spray in the booth, i guess you can say i have a pretty sweet hookup! 1 Quote
Freddie Posted September 2, 2013 Author Report Posted September 2, 2013 Thanks for the kind words so far everybody! More progress coming soon. Quote
Freddie Posted September 4, 2013 Author Report Posted September 4, 2013 Well, I got the back installed and edge banded the front and back of the one cabinet. What a pain in the buns, it just takes me too long! I cut my doors today and installed the hardware I got through rockler. I rushed home early tonight so my girlfriend and I could watch the live guild video, so I will have to finish on the doors tomorrow first thing. All that is left is to tweak my reveals a little bit. I am 1mm out along the top of the right door to the top of the cabinet. My dad thought I was crazy, but I can see it, and ruler shows me 1mm. I saw the damn thing from across the garage, not that I have a big shop, its quite small. The handles are only double side taped on to see how they look. I will install them once I have confirmation on where to put them. Can't wait to get back to it tomorrow. 1 Quote
wdwerker Posted September 4, 2013 Report Posted September 4, 2013 Looks Awesome! I understand about the 1 mm out. If you can see it fix it. Exacting clients can see it and there is where you build your reputation. Some of my clients have been repeat customers for over 25 years. It is because I refuse to let stuff like that slide that they give me job after job, year after year. The teak and simple clean lines is a classic look. Crooked doors or out of square fit ruins the effect. Quote
Freddie Posted September 4, 2013 Author Report Posted September 4, 2013 Thanks guys! Wdwerker, i adjusted my reveals this morning, much happier now that everything is crisp and even. I finished the banding on the doors so now i am moving onto the framework inside the other case for the drawers. More to come! 1 Quote
G S Haydon Posted September 4, 2013 Report Posted September 4, 2013 Well, I got the back installed and edge banded the front and back of the one cabinet. What a pain in the buns, it just takes me too long! I cut my doors today and installed the hardware I got through rockler. I rushed home early tonight so my girlfriend and I could watch the live guild video, so I will have to finish on the doors tomorrow first thing. All that is left is to tweak my reveals a little bit. I am 1mm out along the top of the right door to the top of the cabinet. My dad thought I was crazy, but I can see it, and ruler shows me 1mm. I saw the damn thing from across the garage, not that I have a big shop, its quite small. The handles are only double side taped on to see how they look. I will install them once I have confirmation on where to put them. Can't wait to get back to it tomorrow. One of the worst things about making anything, the error you can see, which to many others is not even there. You did the right thing by tweaking it. 1 Quote
Freddie Posted September 5, 2013 Author Report Posted September 5, 2013 I made the front drawer frame today, jesus I am slow!!!! One thing I forgot to point out to you guys is the tops of the two cabinets next to eachother as they will sit in their new home. Not only does the grain run around the cabinets themselves, but when next to eachother the grain runs from one to the other.I should be building drawers in the next day or two woohoo!! Quote
wdwerker Posted September 5, 2013 Report Posted September 5, 2013 Oh boy, inset drawer fronts? How big are you planning the gaps to be? That might go quickly with luck but it can circle around and bite you as well. I always plan a way to adjust them in advance. Quote


Recommended Posts
Join the conversation
You can post now and register later. If you have an account, sign in now to post with your account.
Note: Your post will require moderator approval before it will be visible.