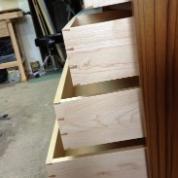
Freddie Posted September 14, 2013 Author Report Posted September 14, 2013 Just finished up the four drawer cabinet. All that is left "build wise" is to make a shelf for the sliding door cabinet. Some more prep work and we are ready for the spray booth tomorrow morning! 1 Quote
..Kev Posted September 14, 2013 Report Posted September 14, 2013 Super sweet! Very clean and neat! I love the way the handles worked! Quote
Freddie Posted September 15, 2013 Author Report Posted September 15, 2013 Building done! Got drawer fronts sealed and will be in the booth tm morning spraying, woohoo!! Quote
wdwerker Posted September 15, 2013 Report Posted September 15, 2013 Looks awesome! Very professional and I bet it will be even better after you spray it. Still jealous of your easy access to a spray booth. Quote
Freddie Posted September 15, 2013 Author Report Posted September 15, 2013 I cant wait to see them finished either! Getting ready to move them now Quote
Freddie Posted September 16, 2013 Author Report Posted September 16, 2013 Well I entered the spray booth this morning and now the cabinets and all the parts are safely back in the garage ready for assembly tomorrow. The coating process consisted of 2 coats of vinyl sealer, followed by 3 coats of acrylic conversion coating. I always see people in the forum talk about getting into spraying and don't know where to start, or seem nervous about it. Let me just say one thing; spraying acrylic lacquer or conversion coating is so easy it's stupid! The end result is a flawless to the touch finish, and visually pleasing. I am planning tomorrow for assembly and tuesday morning for delivery. I am very excited to get this project out and onto the next one. Quote
wdwerker Posted September 16, 2013 Report Posted September 16, 2013 Finish looks great! I was taught to pay close attention to sealing, sanding and finishing the edges of fine hardwood ply shelves to prevent the veneer from being chipped when handled or lifting if it gets a little wet. Can't tell from your pictures but it popped into my mind so I mentioned it. Those pulls came out gorgeous! Spray booth looks nice and roomy. Quote
Freddie Posted September 16, 2013 Author Report Posted September 16, 2013 Everything is edge banded on all sides, except for the one shelf for the 2 door cabinet, which will never be moved, seen or get wet unless another hurricane comes muwahahaha Quote
Freddie Posted September 16, 2013 Author Report Posted September 16, 2013 I'm in the garage finishing the assembly of these two cabinets, almost done. I brought my laptop in today and have been listening to all the woodtalk radio episodes that I missed, it was a fully blown woodworking kind of day. Quote
Freddie Posted September 17, 2013 Author Report Posted September 17, 2013 Well, we have finally reached the finish line!! Cabinets are ready for delivery tomorrow morning. 1 Quote
Freddie Posted September 17, 2013 Author Report Posted September 17, 2013 The rest of the finished pics. 2 Quote
Byrdie Posted September 17, 2013 Report Posted September 17, 2013 Somebody's gonna be really, really happy. Quote
bobcrosley Posted September 17, 2013 Report Posted September 17, 2013 How did you pull off the grain matching, not only around the sides and top of each cabinet, but also across the tops of the two cabinets? 1 Quote
Freddie Posted September 17, 2013 Author Report Posted September 17, 2013 Bob, the grain matching and continuity throughout this entire project is the result of a lot of careful layout in the beginning of this project. I had my boards laid out and measured, marked and checked and rechecked. It took me a long time before my track saw made the first cut, I was almost nervous because I was so stuck on doing this right. Even the grain on the back panels are centered within the panels. May seem silly to some, but this is what I strived for in this project, and I can't wait to present it tomorrow. Quote
wdwerker Posted September 17, 2013 Report Posted September 17, 2013 I have seen plenty of teak cases like these over the years but I have never seen brand new ones! With the grain match and dovetailed drawers you have exceeded the quality of the originals by far! Be proud, very proud! Quote
Tpt life Posted September 17, 2013 Report Posted September 17, 2013 I also add heaps of praise for the grain continuity. Lovely pieces! Quote
Freddie Posted September 17, 2013 Author Report Posted September 17, 2013 Thanks guys! I like to think of these different types of projects as skill builders. I am glad I had the opportunity to build these cabinets. If I was not commissioned to build these, then I might not have ever built in this style, or much later on.It is good to approach each project with a good understanding of what you are trying to achieve in the final product. I have to say that I am very glad that I played it safe and went through a few evenings of figuring out grain patterns and part layouts. I have never do this in a project before so it was new to me. Dovetails are fairly new to me as well. I got some new hand tools from lie nielsen, so I had been playing around with them. When I got the confirmation for dovetailed drawers, i knew I had to buckle down and get the full hang of it. I actually lost sleep over it because I had never done dovetails in a project before. Talk about hitting the ground running! My main problem was chiseling to the knife line. I ordered a set of LN socket chisels, polished the backs and micro bevels to 10,000, and discovered that I can now successfully chop to the knife line. I picked up a led lamp for my bench for $20 which solved my lighting issue for joinery. I end this project with a feeling of accomplishment, but shortly I will feel the need to do even better than previously. I think it is important to set goals for yourself like that. I mean, if you don't want to keep getting better and better, than why even do it right? Happy Woodworking my peoples!!! 2 Quote
bgreenb Posted September 17, 2013 Report Posted September 17, 2013 Awesome work Freddie. Truly beautiful cabinets. The planning for grain matching really takes it to the next level. Quote
G S Haydon Posted September 17, 2013 Report Posted September 17, 2013 Freddie, its hard not to recycle the same of comments but I will try my best with this. Clean lines and no clutter mean everything has to work. There is not trim, molding or plinth that will get you out of jail with these projects. Nowhere to hide breakout. You nailed this, hook line and sinker. To be quite clear I would want to be left alone to complete this type of project without distraction. It is not easy work and If mine looked this good I would be chuffed to bits. Also, you stepped up and learned some new skills when you could of played it safe. You did not hesitate to buy quality tools and put them to work. Could you get some context shots of the piece in the clients house? Often these pieces are made even better by their surroundings. I would not be surprised to see you earning money at this game should you wish to do so. Excellent work A+! Quote
Freddie Posted September 17, 2013 Author Report Posted September 17, 2013 I delivered the cabinets this morning, and the customer was super excited. In fact, she was soo happy that she gave me a big hug! She asked me if I had other pieces available for sale in my shop, I don't. Now that this is over, I am back to my garage remodel, need to move fast to get a ceiling in and insulated before it gets cold. After this I have a cradle to build for a customer, still in the design phase, but now I have freed up my schedule to spend some time at the drawing board. Quote
G S Haydon Posted September 17, 2013 Report Posted September 17, 2013 Wow, that is some interesting jazz on your units Freddie Quote
Freddie Posted September 17, 2013 Author Report Posted September 17, 2013 She is a world traveler. Its hard to see but in the bottom of the photo there is a huge live edge slab table from alaska. She has a 150,000 dollar hand made persian rug. Loaded! Quote
wdwerker Posted September 18, 2013 Report Posted September 18, 2013 They look great in place! I hope you made a decent profit or at least covered the cost of some new tools. Quote
Freddie Posted September 18, 2013 Author Report Posted September 18, 2013 I worked the first week only in the evenings while working my regular job. I then took 2 weeks off of work to buckle down and build these things. I didn't charge some ridiculous price that you would tend to see people charge for their "custom work". I simply asked to cover what I would have made at work, which was more than fair. Prices did end up kind of in the higher scale still based on the cost of materials, but that is to be expected with teak. When we discussed price, there was no resistance what so ever, so that means I was probably too low haha, but I can still pay my bills and have some to put away, so we all walked away winners. Plus, I got to work in my garage and build something that I can be proud of, thats the biggest pay off. Quote


Recommended Posts
Join the conversation
You can post now and register later. If you have an account, sign in now to post with your account.
Note: Your post will require moderator approval before it will be visible.