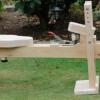
..Kev Posted September 18, 2014 Report Share Posted September 18, 2014 Most of you have seen pictures of the bench in my shop in the various projects I've posted. This bench was the very first thing I built for my shop when I started woodworking. Frankly, I knew less than nothing about woodworking or what I needed in a bench. I'm now at a stage where this bench is simply not up to the task anymore. Primarily because of the cheap vises that I put on it. I didn't know any better. My first thought was to replace the bench and build a Roubo. I could hardly go wrong with that. After lots of serious thought, I decided to retrofit the old girl with some fancy new Benchcrafted hardware. My thinking being that if it didn't work out, I could still use the hardware on a Roubo down the road. Also, I was really happy with the storage in the bench as well as the weight of the bench. So, here we go.. Trimmed the overhang on the top and installed the maple trim. Ready to build up the leg next. Also, I donated the old vises to another beginning wood worker. I decided the vise will be done in Sapele. Mostly because I have quite a bit of it in the shop. I'm not opposed to buying material for this project but, I'm all for saving a few bucks where I can. Here's the glue up for the addition to the leg that will get the mortise for the vise hardware. as well as the first glue up on the chop. There's still another layer to be added to each. The mortises are about 1 1/2" deep so, these 2 layers will get me to that thickness. I cut the mortises in them and then glued up the final layer to get me to final thickness. Preliminary fit up of the leg build up. Because of the leg build up, I had to deviate from the plan a little but, was an easy change and still worked well. I recessed the nut into the leg build up. Here it is all done.. Trimmed the chop a bit, sanded, and applied a few coats of Arm-R-Seal.. http://imagizer.imageshack.us/v2/xq90/904/gjZL7A.jpg 2 Quote Link to comment Share on other sites More sharing options...
Llama Posted September 18, 2014 Report Share Posted September 18, 2014 Nicely done!! Quote Link to comment Share on other sites More sharing options...
Tpt life Posted September 18, 2014 Report Share Posted September 18, 2014 We want a video like Marc's. Quote Link to comment Share on other sites More sharing options...
..Kev Posted September 18, 2014 Author Report Share Posted September 18, 2014 Afraid Marc will have to show up and shoot it then Quote Link to comment Share on other sites More sharing options...
Eric. Posted September 19, 2014 Report Share Posted September 19, 2014 Well done, Kev. Assuming that's the criss-cross version since I don't see a parallel guide anywhere... I'll be curious how you like that Captain's wheel deal with the three knobs. Seems like that design would slow down the spinning of the wheel compared to the single knob placed on the front. Quote Link to comment Share on other sites More sharing options...
..Kev Posted September 19, 2014 Author Report Share Posted September 19, 2014 Well done, Kev. Assuming that's the criss-cross version since I don't see a parallel guide anywhere... I'll be curious how you like that Captain's wheel deal with the three knobs. Seems like that design would slow down the spinning of the wheel compared to the single knob placed on the front. Yes, the crisscross.. The wheel is actually really nice.. Especially since you just give it a shove and it closes all the way. 1 Quote Link to comment Share on other sites More sharing options...
wtnhighlander Posted September 19, 2014 Report Share Posted September 19, 2014 Yes, the crisscross.. The wheel is actually really nice.. Especially since you just give it a shove and it closes all the way. ... and you can wear your favorite eye patch and growl 'Shiver me timbers!' every time you use it! 1 Quote Link to comment Share on other sites More sharing options...
tim0625 Posted September 19, 2014 Report Share Posted September 19, 2014 ... and you can wear your favorite eye patch and growl 'Shiver me timbers!' every time you use it! Or just change the entire look for the shop.... Quote Link to comment Share on other sites More sharing options...
Coop Posted September 19, 2014 Report Share Posted September 19, 2014 Good job Kev! I'm sure the old gal appreciates the face lift as well. I guess you could call it a bench augmentation Quote Link to comment Share on other sites More sharing options...


Recommended Posts
Join the conversation
You can post now and register later. If you have an account, sign in now to post with your account.