Lee Bussy Posted December 20, 2015 Report Share Posted December 20, 2015 Some time around 1950 my father's parents gave my parents a table that they had laying around. It's a typical turn of the (last) century mission pedestal table with three 9" leafs. Most of my family memories growing up are snapshots of the family around that table. At the time it was the fanciest thing in the world to me, sacrosanct, with no horseplay around it or especially on it. I remember the leafs were stored behind the refrigerator in the kitchen and occasionally when reaching back there for the broom which shared the space, one of the leafs would come knifing down onto an unsuspecting toe. When the extended family visited, those leafs went in, It was a ritual, I remember it fondly. It took two people to spread the table evenly and then get the leafs in exactly the right place. Much grunting and arguing ensued getting the halves slid back to nestle the leafs even;y. After that mom would spread her finest linen tablecloth across. Chairs from the kitchen would join the ones kept around the dining room table and I never really noticed they were Windsor style, nor even that they were a light soft wood and the table was oak. The table followed us to Salt Lake City in the early 80's. My father, a retired NY detective, thought Utah would be good for his somewhat rebellious son. They did not stop to think that if I was bad in New York, I would be Satan in Salt Lake City. That's a story for another time however. Dad took a job with the State Attorney General creating a Medicare/Medicaid fraud unit similar to the one he joined in NY after his retirement from the police force. We moved during the winter of 80-81 if I remember correctly. Dad ended up getting a piece of glass cut for the table, to allow more every-day use. The table was one of the items my mother wanted to save when the big flood of 1982 came. We set it as high as we could on tumblers, hoping the water that was already soaking the first floor would not get that high. I joined the Army and moved away. My sister, always the good child, ended up with a lot of mom and dad's furniture when they sold the house and entered into retirement (for real this time) driving around the country in a motor home. This past summer I was passing through my Sister's place in Houston. She had just moved and was struggling to find a place for that very same table in her decor. "You want to take it with you?" she asked? Absolutely. It was already mostly apart so I put it in the truck along with the vacation gear and we headed back to Kansas City. I never put it back together, but loaded it into the garage and my planning began. It was going to need some help but I had no idea how much. Here's a shot of the pedestal, showing the typical utilitarian Mission style: The casters are long gone, I don't remember them ever being there. It's possible they were removed to spare the wooden floor in our house in New York. The top probably was gorgeous once upon a time. Left side: Right side: I really didn't know much about it at this time, but the perfectly matched left and right should have been a clue. Hey, I'm learning. Look at those flecks and rays though, you just can't get wood like that anymore. The leafs were even interesting, one of them still bears the scars on the underside from being rough-sawn or planed: So I'm thinking, maybe some cleaning and tightening and we will be good to go. I was wrong about that. Quote Link to comment Share on other sites More sharing options...
wtnhighlander Posted December 20, 2015 Report Share Posted December 20, 2015 Shaping up to be a good tale, Lee! 1 Quote Link to comment Share on other sites More sharing options...
Lee Bussy Posted December 20, 2015 Author Report Share Posted December 20, 2015 I began with the top of course. The top definitely had a patina. There was a large area of water damage on one side: I remembered Dad had refinished the top at one point, explaining the differences in finish top to bottom. Okay so we're now looking at a partial refinish. Strip, bleach, stain and seal. No problem. I started to move tings around, take stock, etc.. I flipped the table over and noticed a manufacturer's stamp: I don't know anything about this company, but I did fine one very old reference to a manufacturer in North Carolina by that name. No specific information, just a name. Currently there appears to be a number of businesses by that name in North Carolina. I'm unsure if the name means anything locally. Help here would be appreciated. Also on the underside are two stamps, one on a side and another on a supporting board between the slides and the pedestal: Given the style and provenance, I assume these to be manufacturing stamps for the date: January and April 1918 I am guessing. I also didn't notice right away that what I was looking at looked nothing like the top. I did notice that all was not happy on the underside. First, a questionable repair to a glue-block: And then I happened to glance over at the slides and saw this: The condition of the slides certainly explained the fun and games trying to get the leafs in for so long. A closer examination proved that there would be no repairing these - pieces were missing. Okay so refinish he top, fix the glue blocks, and get new slides. I can do this, right? At this point I still did not know what the top was. Oak certainly but which kind? I was not really familiar with Mission Style, had I been I would have known. So, I snapped some pictures to post on here in other threads to get some assistance. This is where things started to go sideways. First I noticed that the edges were really beat up: (I was still clueless about the really obvious thing here) So I thought "okay, maybe a mortise and a block glued in to repair that?" Out of my current ability but hey, I love a challenge. More pictures showed me the uglier truth: Crap. Veneer. That's right I missed all the other REALLY obvious clues up till now. I didn't even think veneer was a "thing" till alter. I always associated it with "cheap." I now know that's not always true, but I also know that this was the equivalent of a modern Ikea table in it's time. Quote Link to comment Share on other sites More sharing options...
Chet Posted December 20, 2015 Report Share Posted December 20, 2015 This is an interesting journey you are taking us on Lee. I had an antique Singer treadle sewing machine that had been made in 1865 that had an oak cabinet which had veneer, so I am guessing the process has been around a long time. Also if I remember my history, the Carolinas used to have a lot of furniture manufacturing at one time. Oh, I grew up in Salt Lake City 1 Quote Link to comment Share on other sites More sharing options...
Lee Bussy Posted December 20, 2015 Author Report Share Posted December 20, 2015 About this time there were a few other threads I started here asking different questions. I was thinking veneer for a while and spent about a week reading everything I could about veneer. I learned a lot but most significantly that veneer was not like Formica, and that there was specialized tools needed. It's beginning to look like I've bitten off more than I can chew at this point. I soldier on. I looked at the leaves, wondering what hey were made of and if they had veneer on top. They were just old, dark oak but they held some surprises too: So what's a chipped corner? I could even rip that part off right? Yeah, some of you are chuckling. I then noticed a whole lot of this: Now I spend a couple days researching "butterflies" and such. Okay let's see, learn how to veneer, buy that equipment, rip my 9" leaves down to 8" and then butterflies all over the place. Seriously? Here's where I spent a lot of time asking questions here and going back and forth with the "right" way to do this. Clearly the "right" way would be to scrap it and forget it ever was a thought. The problem is this is a family heirloom. Never expensive, but important to me. I had to do something. I decided to take a break and look at the base. I pulled the legs off the center part and stacked them over to the side. I stood there pretty proud of myself and was thinking "well at least nothing here needs fixing." I should really quit saying that. I glanced over to the right where the legs were on a shelf and noticed this: I sat at and even sometimes under this table for many years and never noticed one of the legs was smaller than the others. What the... ? I have NO idea what to do with that, but my mother got a good chuckle out of it. While messing with them I took the feet off and noticed that there was still mud from the flooding back in 1982 stuck in the cracks: Speaking of cracks ... yeah. We'll talk about those in the next post. Okay so I'm looking around the pedestal a little closer now. The construction is kinda cool, two (three in a couple of places strangely) layers (plus trim) to make up the hex: I look a little closer (this is the story of my life) and I see some work is needed here too: Okay the checks and failed joints are on the inside of the pedestal so I'm okay there. The trim I can handle. Whew! At least there's something that looks easy. As an aside, anyone think I need to worry about those checks/joints on the inside? Back to the legs I notice they may need a little love: All I can think here is heat up the wood and drizzle some heated epoxy in there and hope for the best. I'd take advice on this too. I also notices one really weird area: Bug damage? Water? Sunspots? Epoxy here I'm thinking. Not sure if that stud comes out before I fix it - it's in the "right" place to go back together. Thinking about that, maybe I really need to make sure it is. Okay so that's it for the surprises. At this point I decide that I'm going to replace the top rather than try to learn veneer as I go. Maybe that will be more expensive materials-wise, but it's probably cheaper than screwing it up and doing veneer twice. Quote Link to comment Share on other sites More sharing options...
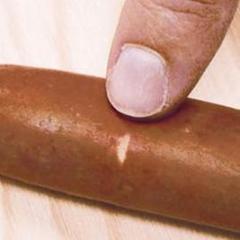
Tpt life Posted December 20, 2015 Report Share Posted December 20, 2015 Winter...try raising the humidity and see if the cracks close. Quote Link to comment Share on other sites More sharing options...
Lee Bussy Posted December 20, 2015 Author Report Share Posted December 20, 2015 52 minutes ago, wtnhighlander said: Shaping up to be a good tale, Lee! Yeah it's amusing anyway ... still uploading pics and lining it all out. I thought it was time to immortalize it. 30 minutes ago, Chet K. said: This is an interesting journey you are taking us on Lee. I had an antique Singer treadle sewing machine that had been made in 1865 that had an oak cabinet which had veneer, so I am guessing the process has been around a long time. Also if I remember my history, the Carolinas used to have a lot of furniture manufacturing at one time. Oh, I grew up in Salt Lake City NC remains the furniture capital of the US, of the world maybe. It's like trying to trace a brick back to New York. Maybe someday I'll learn more about it. What years were you there? I was 15 I think when I got there in 80/81. I left when I was 17 for the Army and even though I was not there long I still consider hat "home." I went to Murray High and was in the class of 83. 8 minutes ago, C Shaffer said: Winter...try raising the humidity and see if the cracks close. Doesn't that mean it opens back up when it dries again? Quote Link to comment Share on other sites More sharing options...
Tpt life Posted December 20, 2015 Report Share Posted December 20, 2015 It lets you know if you can fix it or not. If miters close in summer, fighting a winter gap is futile. This is more about joint cracks. Checks and splits are a different matter. Quote Link to comment Share on other sites More sharing options...
Chet Posted December 20, 2015 Report Share Posted December 20, 2015 14 minutes ago, Lee Bussy said: What years were you there? I moved there from Illinois when I was three and moved to California to start my Sophomore year in 1967. I would have been going to Hillcrest High If my dad hadn't been transferred to Cali. I have always kind of missed Utah. Quote Link to comment Share on other sites More sharing options...
estesbubba Posted December 20, 2015 Report Share Posted December 20, 2015 Looks like you have some work ahead of you but this will be fun to follow. My guess is white oak because I don't red oak has that much ray flecking. Quote Link to comment Share on other sites More sharing options...
Lee Bussy Posted December 20, 2015 Author Report Share Posted December 20, 2015 Okay I think I left off at having decided to replace the top. I started another threat to decide between plywood and solid. There are pros and cons to each, but ultimately I decided on solid. I think the deciding factor was that I was unlikely to finish a solid top and wish I had done it in plywood - where the opposite was a possibility. Finding that quarter-sawn white oak is another story altogether. I searched locally and not so locally. I called the larger national places like Paxton. Everyone had flooring in 15/16 rough. I needed/wanted 5/4 because it had to finish 3/4-7/8". I know 15/16 is supposed to finish that way, but I wanted insurance. This was also my first try at estimating BF for a project. The table is 48" round, then there's three leafs at 9" each. This comes to roughly 48"x75. Figured as a rectangle it was 31.25 BF of 5/4. Throw in some sapwood and the fact that I need all the boards to finish 49-52" and we're at 37 BF give or take so let's call it 40. Still, no dice finding it. Mission style furniture is pretty popular right? And Mission = QSWO right? You would THINK I could get that somewhere but after a couple months I got nowhere. I finaly happened upon two places on one of the NC woodworking forums: Quartersawnoak.com and Wall Lumber. The guy at QSO answered my email and seemed to know his board from his *$^$#! so after a few emails I got to where I said "okay, I'd like to go ahead and order." Nothing, radio silent. I think maybe all my questions made him wonder if he wanted to deal with me. Fine ... he did the hard part but I could not send him money. I called Wall Lumber and a sales guy named Clint and I chatted a bit. We struck a deal. He recommended 40 BF and I decided since I can't just run to the store to buy another board I'd order 50. Price was $7.78/BF shipped from NC to KC. The order was placed, they sent me a tracking number, and in three days (seriously!) FedEx showed up with three bundles for me. Problem is, there was supposed to be four. Here's the tracking for that last bundle if any of you are curious ... I wonder if the status will ever change. I called them and they were VERY nice. Neither they nor I were able to get any more information out of FedEx. They sent another bundle. Clint was worried because I had depleted his "good stuff" and the replacements were going to be around 6" wide. That was okay with me - I have the leafs to make too. Three more days and the bundle was here. Here's the stack: Board 1-9 were the first shipment and 12-12 were the second. They are narrower, and more sapwood, and one has a really good check in it: When I talked to them again we agreed I would see if it all worked out. If not he would send me another board. If it did then they would discount me on a future order. That's fair enough to me. The wood did really look to have some nice rays and flecks: I was pretty happy, so the next step was the jointer! I don;t have a jointer so I took it all down to the wood guild. I am very glad I did bring it down there. While I have used a jointer before, this is my first go at taking large rough lumber to size. A gentleman bu the name of Erwin Kurtz is the guild's director of assets, and he VERY graciously agreed to look over my shoulder to make sure I was not screwing up: I want to tell you I would have screwed up too. I did not even think that I should take the wood to size in at least two sessions to allow it to relax. Here's some wood porn for you guys: So it all has been sitting a couple days relaxing in the wood crib on stickers. It's all right at 1" now about 95% surfaced. I'm headed down today to do a second planing and some rips to remove the sapwood and straighten the sides. I am REALLY happy with how this wood turned out - so there's a recommendation for Wall Lumber for anyone looking. If it all works out, maybe I'll even get the glue-up done today. Who knows. 2 Quote Link to comment Share on other sites More sharing options...
Lee Bussy Posted December 20, 2015 Author Report Share Posted December 20, 2015 11 hours ago, C Shaffer said: It lets you know if you can fix it or not. If miters close in summer, fighting a winter gap is futile. This is more about joint cracks. Checks and splits are a different matter. The house is just dry now ... what about misting it with some water for a couple days? (I'm talking microscopic mist here like a humidifier). 46 minutes ago, Mike. said: Looking good Lee. That is likely sapwood, not pith. Pith is from the middle of the tree and is usually cut out by the sawyer. Sap is from the outside of the tree. I am surprised you couldn't find 5/4 QSWO locally. Did You try these guys? They list it as a stock item. http://libertyhardwoodsinc.com/catalog/files/mobile/index.html#8 Everyone lists it. Go and try to buy some and you see they have a couple boards here and there, and none really match. Nobody seems to carry more than about 10 BF. Then when they have it, the 5/4 ends up being skip-planed fo 15/16 and then it just warps even more standing up in the racks they have. If this was a project where I was using shorter board then no problem, but ALL of them need to finish out to 48+ inches. Of course a couple boards on the rounded sides can be shorter, but for grain matching it's easier to say you need 5' boards all the way across. Quote Link to comment Share on other sites More sharing options...
estesbubba Posted December 20, 2015 Report Share Posted December 20, 2015 Lee did you contact the guy's name I gave you? He usually cuts his 4/4 thick and I can get 7/8" out of most of his boards if needed. Quote Link to comment Share on other sites More sharing options...
Lee Bussy Posted December 21, 2015 Author Report Share Posted December 21, 2015 23 hours ago, estesbubba said: Lee did you contact the guy's name I gave you? He usually cuts his 4/4 thick and I can get 7/8" out of most of his boards if needed. No sir ... had this purchased already. I will ping him for the next project for sure. On 12/20/2015 at 6:41 AM, Mike. said: That is likely sapwood, not pith. Pith is from the middle of the tree and is usually cut out by the sawyer. Sap is from the outside of the tree. Thanks, had a brainfart while typing. Fixed all those references, thanks. Long day today trying to maximize the yield, staring at it, thinking, going back to it. All surfaced, ripped and jointed now: Pretty happy with the way the rays/flecking showed. Today I'm headed down to glue-up. 1 Quote Link to comment Share on other sites More sharing options...
wtnhighlander Posted December 21, 2015 Report Share Posted December 21, 2015 You did well with that purchase, Lee. Those are some very nice boards. Quote Link to comment Share on other sites More sharing options...
estesbubba Posted December 21, 2015 Report Share Posted December 21, 2015 1 hour ago, Lee Bussy said: Those are some nice looking boards and one short bowling lane. Quote Link to comment Share on other sites More sharing options...
Popular Post Lee Bussy Posted December 21, 2015 Author Popular Post Report Share Posted December 21, 2015 7 hours ago, estesbubba said: Those are some nice looking boards and one short bowling lane. And the gutters are brutal! So here's today's pics. I used biscuits for the alignment: Had help again from Erwin: Thank heaven the guild has a LOT of clamps: And here we are rough-cut and waiting till tomorrow to finish cut. (Yes that's the underside) A pretty good day I'd say. 4 Quote Link to comment Share on other sites More sharing options...
Lee Bussy Posted December 24, 2015 Author Report Share Posted December 24, 2015 Okay - I expect this thing to merge my posts again so here are some pics from today (12/23). Today I had a VERY frustrating three trips to the hardware store (don't even ask) and then got the trammel rig going and finish-sized the circular portion. Then I ran it through the Time Saver (go ahead and drool guys) and made some sanding blocks for the edges: After that I just cleaned up and went home tired. All those trips to the store wore me out. Tomorrow (hopefully) I'll get the edges sanded, hardware installed, and leafs cut. After that it sits till I get the skirts and the pedestal stripped and ready for finish. 2 Quote Link to comment Share on other sites More sharing options...
shaneymack Posted December 24, 2015 Report Share Posted December 24, 2015 Looking good Lee. I will never look at my supermax the same again, thanks for that lol. Sent from my SM-P550 using Tapatalk 1 Quote Link to comment Share on other sites More sharing options...
Popular Post Lee Bussy Posted December 24, 2015 Author Popular Post Report Share Posted December 24, 2015 15 minutes ago, shaneymack said: Looking good Lee. I will never look at my supermax the same again, thanks for that lol. I know I could have done a better job matching the wood. It looks better in person. There's only so many boards to move around. The stain is fairly dark so I'm thinking I can get it to even out. That sander is like the Wizard of Oz with chains, knobs, and smoke and steam belching out. One of the shop foremen was kind enough to show me how to use it. Once we had it dialed in it was like butter. I think it's the only piece of equipment there that's not freely available to the members - there's a "suggested donation" of $10/half hour for its use. Considering how much those belts must cost, and how much time it saved me, I donated double and was happy to do so. We're lucky enough to have a gentleman in the guild who used to service these large machines. The older machines are freaking awesome but if he wasn't there things would not work so smoothly. 3 Quote Link to comment Share on other sites More sharing options...
Lee Bussy Posted December 25, 2015 Author Report Share Posted December 25, 2015 Okay, here it is complete and mounted on the slides with leaves. The skirt will come later - I intend to use the original so that's in the garage with the rest of the stuff to be refinished. I do not expect that to go as fast. (I swear the grain matching looks better in person.) 2 Quote Link to comment Share on other sites More sharing options...
Lee Bussy Posted December 25, 2015 Author Report Share Posted December 25, 2015 2 hours ago, Mike. said: Looks good Lee. I know a camera can really pick up on color differences that the eye really doesn't see. How bad is the base/apron? Honestly I would be tempted to just clean it up a little bit rather than fully refinishing. It will mostly be in the shadows and refinishing opens a whole can of worms. Have you figured out your finish schedule for the top? This .pdf is a good resource for coloring QSWO. http://homesteadfinishingproducts.com/wp-content/uploads/2015/10/mission_oak_10-2015.pdf The base is pretty bad. There's water damage that needs to be bleached out and the finish is just missing in places. I do plan to follow that finish schedule, Onandoga (Sample #4) specifically: Quote Link to comment Share on other sites More sharing options...
-MattK- Posted December 26, 2015 Report Share Posted December 26, 2015 12 hours ago, Lee Bussy said: Okay, here it is complete and mounted on the slides with leaves. The skirt will come later - I intend to use the original so that's in the garage with the rest of the stuff to be refinished. I do not expect that to go as fast. (I swear the grain matching looks better in person.) Lee, I've never been a huge fan of oak, but man does that look terrific! You've made me rethink my bias. I love that table top - great work and I look forward to following more on this build. Quote Link to comment Share on other sites More sharing options...
Lee Bussy Posted December 26, 2015 Author Report Share Posted December 26, 2015 15 hours ago, -MattK- said: Lee, I've never been a huge fan of oak, but man does that look terrific! You've made me rethink my bias. I love that table top - great work and I look forward to following more on this build. Thank you sir. I'm sad the rays and flecking do not show in the pics, but when I finish it they will again. I know what you mean about the oak. I guess I got REALLY sick of the "Velvet Elvis of Hardwoods" seeing red oak all the time. White oak is a different animal and man is it a bunch harder (or seems like it.) I could live with it. Quote Link to comment Share on other sites More sharing options...
wtnhighlander Posted December 27, 2015 Report Share Posted December 27, 2015 I have to agree that white oak is so much nicer than red - although it seems more workable, to me. Your tabletop is looking great, BTW! Quote Link to comment Share on other sites More sharing options...


Recommended Posts
Join the conversation
You can post now and register later. If you have an account, sign in now to post with your account.