
Skip to content
View in the app

A better way to browse. Learn more.

Wood Talk Online

A full-screen app on your home screen with push notifications, badges and more.

To install this app on iOS and iPadOS
  1. Tap the Share icon in Safari
  2. Scroll the menu and tap Add to Home Screen.
  3. Tap Add in the top-right corner.
To install this app on Android
  1. Tap the 3-dot menu (⋮) in the top-right corner of the browser.
  2. Tap Add to Home screen or Install app.
  3. Confirm by tapping Install.

Bussy Family Table

Featured Replies

White oak has many redeeming qualities and is totally worthy of fine furniture.  Red oak is a hideous pale pink vile weed that smells like a wet dog had a baby with a pool of old urine.

Table is looking good, Lee.

  • Replies 92
  • Views 25k
  • Created
  • Last Reply

Top Posters In This Topic

Most Popular Posts

  • Okay ... done.  Life kinda got in the way of getting this put back together.  The leaves still need another coat but here's the main table:

  • Work and life got in the way for a bit.  This afternoon I got the first coat of Arm-R-Seal on the base and the top of the table.  I continue to be happy with the results: Here's a pic of the

  • And the gutters are brutal! So here's today's pics.  I used biscuits for the alignment: Had help again from Erwin: Thank heaven the guild has a LOT of clamps: A

Posted Images

  • Author
  • Popular Post

Yesterday I brought the table top home.  Today I started the stripping.  Here's a few semi-interesting pics of you enjoy that sort of thing.  This is the octagonal pedestal.  You can see the original finish and the first coat of stripper.  The roman numerals correspond to the trim that I removed down there.  It all needed to be re-glued so I decided it would be easier to strip with it all off:

IMG_4687.JPG

Close up where you can see the condition of the old finish.  Nothing shows flaws like a flash:

IMG_4689.JPG

First facet stripped.  Second verse, same as the first!

IMG_4688.JPG

Pretty happy with the stripping action here.  I do need to do some bleaching as there are some dark water-stained areas:

IMG_4691.JPG

Finished stripping the main part of the pedestal:

IMG_4694.JPG

Stripped legs.  There's a couple repairs to do here as well as making that one leg the same size as the others.  I know nobody noticed it for 65 years but I see it now and I can't un-see it.

IMG_4693.JPG

Coat hangers worked nice to hold the hoops as they dry after stripping:

IMG_4695.JPG

That's today's work.  Still need to strip the molding pieces as well as the feet from the legs.  A couple of those need repair as well so I'm headed to Woodcraft tomorrow to see if I can find a glue syringe.

Wow Lee! That stuff really works! What are you using as a stripper?

You may not need to bleach that water staining if you're going to go with a Jeff Jewitt multi-step dye/glaze oak finish. Do you have any discarded pieces that you can try out the finishing schedule?

The Jewitt finish I used was very forgiving with stains or discoloration. It makes them look like they belong.

http://IMAG0642_zps2lcllc9b.jpg

  • Author
28 minutes ago, davewyo said:

Wow Lee! That stuff really works! What are you using as a stripper?

You may not need to bleach that water staining if you're going to go with a Jeff Jewitt multi-step dye/glaze oak finish. Do you have any discarded pieces that you can try out the finishing schedule?

The Jewitt finish I used was very forgiving with stains or discoloration. It makes them look like they belong.

I'm using Jasco Paint and Epoxy Remover:

GJBP00203_-_JB_Prem_PE_Rmvr_Gal.jpg

With the match I need to do on the new wood I don't want to chance the dark areas turning black after it's finished.  Some wood bleach is a cheap investment and it will also make it easier to match the stain top and bottom.

  • Author

I should mention that this finish did not "lift" and allow itself to be scraped off.  I let a coat of the stripper sit for a few minutes (5-15 depending how interesting the game was) and then scrub it off with #1 steel wool.

  • Author
12 hours ago, Chet K. said:

How is that stuff to work with?  You in full body armor?  Is your shop now a EPA super fund site?

Gauntlet gloves, eye protection, organic vapor cartridges in my dust mask.  I splattered a little on my arm above my gloves (was in short sleeves of course) and by the time I got to the sink it was burning pretty good.  It works SO well though, I don't mind the gear.

  • Author
  • Popular Post

Working on base repairs:

IMG_4703.JPG

Base repairs done, ready to finish:

IMG_4711.JPG

  • Author
3 hours ago, wtnhighlander said:

Looking good, Lee! What percentage of the table is still original, in your estimation?

So far I have replaced the top, the extension slides, and the wood screws holding it all together.  From the skirts down is original.

On December 29, 2015 at 7:13 AM, Lee Bussy said:

Gauntlet gloves, eye protection, organic vapor cartridges in my dust mask.  I splattered a little on my arm above my gloves (was in short sleeves of course) and by the time I got to the sink it was burning pretty good.  It works SO well though, I don't mind the gear.

I used some of that stuff to strip a tailgate of my truck once... Got a little on my arm like you did, man that stuff will light a fire on you! 

  • 2 weeks later...
  • Author

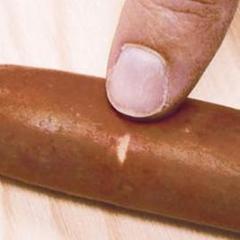
Okay a little contest for those of you following.   What are these and what do they mean?  

IMG_4758.JPG

  • Author
1 hour ago, C Shaffer said:

Putty for old cut nail holes. 

Close.  No cut nails on this table but they are from puttying.  If you look at the shape and the spacing .....

46 minutes ago, K Cooper said:

Poorly made Lone Ranger masks?

Those are skillfully made sir!


  • Author

Okay I was hoping someone did the same thing I did and I would not feel so bad.  Guess not. :)

When doing biscuits I did them between EVERY board, even the two making up the split in my table.  So, I had to repair that area.  It will be visible if the table is open, but the chances of 1) it being open when someone walks by and 2) them noticing it are incredibly small.  The edges are usually "busy" and it will be tough to see.  I hope.

I had thought about making 5/32 x 4 "pucks" of the oak to patch them, but I think that would have been too much work for an area nobody will see.


  • Author
2 minutes ago, Mike. said:

This is the reason I stopped using biscuits for alignment.  I seemed no matter how hard I tried i would end up with a visible biscuit.   At least yours won't be visible when the table is closed.   Good recovery. 

Yeah there's also one between the leaves ... I ended up splitting it right on a joint.  

Oh well.  It used to be veneer with an exposed edge so technically this is still a huge step up. :)

I'll take a pic tonight and post it so it's at least "documented" in the build.

  • 2 weeks later...
  • Author
  • Popular Post

Okay here's the pieces stained.  I'll be going back with a gell stain, this is just dye.  It's boring but the right color.  Got to enhance the grain now.

IMG_4790.JPG

IMG_4789.JPG

IMG_4786.JPG


  • Author

Okay this afternoon was "Seal-a-Cell" time.  I still have to apply a gel stain to make the grain pop but you can see how it's shaping up:

IMG_4329.JPG

IMG_4330.JPG

IMG_4801.JPG

IMG_4803.JPG

IMG_4805.JPG

IMG_4333.JPG


Join the conversation

You can post now and register later. If you have an account, sign in now to post with your account.
Note: Your post will require moderator approval before it will be visible.

Guest
Reply to this topic...

Forum Statistics

  • Total Topics 32.1k
  • Total Posts 437.6k

Member Statistics

  • 26,010 Total Members
  • 3,644 Most Online
  • Lolli4 Newest Member ·

Account

Navigation

Search

Search

Configure browser push notifications

Chrome (Android)
  1. Tap the lock icon next to the address bar.
  2. Tap Permissions → Notifications.
  3. Adjust your preference.
Chrome (Desktop)
  1. Click the padlock icon in the address bar.
  2. Select Site settings.
  3. Find Notifications and adjust your preference.