erikreagan Posted January 7, 2017 Report Share Posted January 7, 2017 Hey everyone, I'm not sure how I should format or approach these project journals since this is my first one. So I'm gonna just dump some info in here and update as I go. Let me know if there's more or less that I should be sharing (or asking) along the way! This Christmas we got a wooden train set for my son. He's really digging trains these days, but doesn't have a surface to have it set up on. My wife talked about us buying a train table, but I saw it as an opportunity to try and build something that had more than just 2 or 3 parts. This is kinda my first legit project with woodworking. I'm working from a single 3/4" sheet of Birch plywood I picked up at Home Depot. No clue if that's a good idea or not. I know close to nothing about selecting materials for a project at this point. The table will be painted all white to match my son's other bedroom furniture. The first thing I did was setup the train set on the floor and measure out what I wanted the surface to be. From there I went into SketchUp and mapped out a few ideas. My final path is the 3rd table toward the back in the image above. It seemed like the easiest one for me to build given my super beginner status here. I cut down the top and the skirts to size. Just planning to assemble with pocket holes. (Initially I wanted to miter the corners but I made a box not long ago and the miters sucked. I figured I'd work on that again on another project. For this one I didn't care too much about end grain showing.) After cutting the top to size, I did a double check that the train set would fit. So that worked out. Lastly, so far, tonight I assembled the skirts to the surface. I sanded the bottom down and cleaned it off. Then I had to call it a night to hang out with the family. Tomorrow morning I should be able to finish up the top. Then moving on to cutting the legs to size and joining those up! I'll report back after the next steps. 2 Quote Link to comment Share on other sites More sharing options...
Ronn W Posted January 7, 2017 Report Share Posted January 7, 2017 A great first project. Looks like your on the right track, I had to say that. I like it. 2 Quote Link to comment Share on other sites More sharing options...
erikreagan Posted January 7, 2017 Author Report Share Posted January 7, 2017 3 minutes ago, Ronn W said: ... Looks like your on the right track, I had to say that. ... Well played. And thanks! Quote Link to comment Share on other sites More sharing options...
ghost Posted January 7, 2017 Report Share Posted January 7, 2017 the size worked out - so that is good! looks good so far journal is just that - a journey through your project. as much as you want to include. (don't get put off from some of the more advanced workers on here. show what you are doing and the result. it is all good. master craftsman and beginners - they are all welcome here. everyone loves a journal - regardless of what is about.) what are you going to do to cover the pocket hole screws? Quote Link to comment Share on other sites More sharing options...
Chet Posted January 7, 2017 Report Share Posted January 7, 2017 Nice journal so far Erik The little guy is going to be happy when it is done. Quote Link to comment Share on other sites More sharing options...
erikreagan Posted January 7, 2017 Author Report Share Posted January 7, 2017 2 minutes ago, Chet K said: Nice journal so far Erik The little guy is going to be happy when it is done. Thanks, Chet! 12 minutes ago, ghost said: what are you going to do to cover the pocket hole screws? I've been on the fence about covering those or not since it's on the bottom. Would it be a bad idea not to? Quote Link to comment Share on other sites More sharing options...
ghost Posted January 7, 2017 Report Share Posted January 7, 2017 sorry!! did not realize that was the bottom! my bad! kind of a "DUH" moment on my end. don't worry about 'em! out of site - out of mind! i thought there may be a top to cover that such as masonite, etc... my bad Quote Link to comment Share on other sites More sharing options...
erikreagan Posted January 7, 2017 Author Report Share Posted January 7, 2017 @ghost ah no worries. good lookin out Quote Link to comment Share on other sites More sharing options...
mat60 Posted January 7, 2017 Report Share Posted January 7, 2017 Looks good Erik. 1 Quote Link to comment Share on other sites More sharing options...
shaneymack Posted January 7, 2017 Report Share Posted January 7, 2017 Always love a journal! Thanks for posting and keep us up to date ! Sent from my SM-N910W8 using Tapatalk 1 Quote Link to comment Share on other sites More sharing options...
erikreagan Posted January 7, 2017 Author Report Share Posted January 7, 2017 I'm wondering if I need to re-think the legs. This is what I marked up in SketchUp but I'm not sure how I'd join the legs to the bottom here. Any suggestions or pointers? Thanks in advance. Quote Link to comment Share on other sites More sharing options...
trialbyfire Posted January 7, 2017 Report Share Posted January 7, 2017 How much of a reveal do you have on the underside of the table where you are showing to attach the legs? By eyeballing proportions it looks like you've got 1 1/2" - 2"? (I.e. how much glue surface are we looking at) Also, how tall are the legs ~18"? It looks like there could be a potential for enough lateral force (over time) to eventually cause a leg to come loose. You could always go back to HD and purchase some of their pre-made small table legs and trim them to what ever size you need them to be. I think a solid wood leg would be more sturdy but they may not be what you're going for either. I also tend to over-engineer the crap out of stuff. Sent from my XT1585 using Tapatalk Quote Link to comment Share on other sites More sharing options...
wtnhighlander Posted January 7, 2017 Report Share Posted January 7, 2017 Considering your kids will outgrow the table in a relatively short time, you may get by with just screwing threw the leg and into the apron. I would probably add glue as insurance, though. If all the surfaces are pre-finished, try construction adhesive in place of pva wood glue. Quote Link to comment Share on other sites More sharing options...
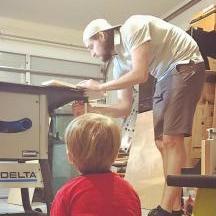
Popular Post erikreagan Posted January 7, 2017 Author Popular Post Report Share Posted January 7, 2017 @trialbyfire good eye. It's 1 3/4". I think what I might do is use glue as an initial adhesion but add some overlapping braces in each direction that attach at the inside of each leg. Maybe that can help prevent the lateral movement. @wtnhighlander good point. I'll think about that as well. Thanks. I finished sanding and cleaning the top today. I won't have time to start the legs until next weekend at the soonest, so I figured I'd let the kids start playing on it. After all, my son has asked if I'm done multiple times a day since I started. 3 Quote Link to comment Share on other sites More sharing options...
pkinneb Posted January 7, 2017 Report Share Posted January 7, 2017 It's obvious he approves of dads work, Nice Job!! 1 Quote Link to comment Share on other sites More sharing options...
Chet Posted January 7, 2017 Report Share Posted January 7, 2017 Yep, definitely looks like a stamp of approval. 1 Quote Link to comment Share on other sites More sharing options...
mat60 Posted January 7, 2017 Report Share Posted January 7, 2017 Nice. Having fun with dad. 1 Quote Link to comment Share on other sites More sharing options...
ghost Posted January 7, 2017 Report Share Posted January 7, 2017 the "engineer" seems to think all is well!! looks good! 1 Quote Link to comment Share on other sites More sharing options...
erikreagan Posted January 21, 2017 Author Report Share Posted January 21, 2017 I didn't have any time last weekend to work on the project. And this weekend was short on time as well. But, I was able to finish the legs up and get them joined to the top! Next up is to cut and join a small bracing system underneath. Then on to painting! This just might get finished next week. Quote Link to comment Share on other sites More sharing options...
Chet Posted January 21, 2017 Report Share Posted January 21, 2017 It's coming along little by little. Keep up the good work. 1 Quote Link to comment Share on other sites More sharing options...
mat60 Posted January 21, 2017 Report Share Posted January 21, 2017 That will look fine with some paint. What size it the top? Quote Link to comment Share on other sites More sharing options...
erikreagan Posted January 21, 2017 Author Report Share Posted January 21, 2017 @mat60 Outside dimensions are 43" x 31" ish 1 Quote Link to comment Share on other sites More sharing options...
erikreagan Posted February 1, 2017 Author Report Share Posted February 1, 2017 On 1/7/2017 at 0:16 AM, trialbyfire said: It looks like there could be a potential for enough lateral force (over time) to eventually cause a leg to come loose. I added a simple brace system to the bottom today in hopes that the legs have a little more encouragement to not budge over time. Quote Link to comment Share on other sites More sharing options...
Popular Post erikreagan Posted February 4, 2017 Author Popular Post Report Share Posted February 4, 2017 Painting began today and I had some help. 8 Quote Link to comment Share on other sites More sharing options...
Chet Posted February 4, 2017 Report Share Posted February 4, 2017 Getting close now. I see Minnie Mouse made an appearance to lend a hand. 1 Quote Link to comment Share on other sites More sharing options...


Recommended Posts
Join the conversation
You can post now and register later. If you have an account, sign in now to post with your account.