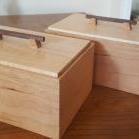
Popular Post woodbutcher Posted August 15, 2017 Author Popular Post Report Posted August 15, 2017 Ive been moving right along with this project, just havent been quick to get the pictures up. When I last left off I had cut the joinery for the lid. Before I glued it up I figured I better get the little square mortises finalized for the lid handle. But before i could do that, I had to make the handle. I changed the design of the handle a tad because I had no clue how to make the square holes in such small pieces. I wanted to start with bigger pieces and cut the hole, then cut it down, which is what i ended up doing, but with two to make, and grain direction considerations, I decided to make it the way i did. I didnt take pictures of the process, I was pretty focused and really didnt even think of it, but heres what the handle looks like dryfitted in place. Its a little bulky looking, and I may widdle it down some, but im happy with it. I took a curly maple scrap, and cut a 1/4" groove down one edge. I cut a poplar scrap and cut a wedge at the angle I was wanting, I just eyeballed one that I thought looked good, and then cut the angle on the actual pieces. I cut the square ends and had two handle pieces. I nibbles away at the bottom edges to form a teeny little square tenon. Then I cut out a little walnut piece for the cross member. I planed it down to where it would fit in the grooves. I had the handle dryfitted and used a chisel to make the mortises fit the tenons. After that was done with, and im really happy it is, I spent alot of time thinking about it, and actually making it, I decided it would be a good idea to do a little prefinishing to the lid. I prefinished the underside of the lid, and the top edge of the lid perimeter pieces. I didnt want expansion or contraction to reveal any unfinished wood, and it would have been a pain to finish the underside of the lid with it installed. I am using dewaxed shellac on the whole piece. I put on 4 or 5 coats, cant remember now, sanding with 320 between coats. As a final step, I buffed it out with 0000 steel wool and paste wax. It looks and feels incredible. The curls are easily visible, but they dont come out and slap me in the face like some curly maple Ive seen. Not sure if its the wood I have, or my finish, or technique, or what but im still happy with how it came out. Next I worked on some internal components. I resawed some walnut to 1/4" thick and cut it to length. I cut a dado in the middle of these pieces for the little divider piece. I chopped these dados with a chisel, the first time I had done something like this with hand tools. I have a picture of the internal pieces in the box, but the picture wouldnt load. Next, I had to make a spline jig. I wanted a jig that was quick to make, so I wouldnt feel bad tossing it after this project, Ive got alot of jigs laying around. I liked one I saw posted on the forum by gee-dub, so I used his design. Thanks gee-dub! This project was a good excuse to buy a new saw blade with a flat tooth grind for the splines, and since I was at rockler.com, I bought some Brusso stop hinges. I hear they are the best, and im not focusing so much time, energy, and thought to this project to use crappy flimsy 3 dollar hinges. This step of the project is where things started giving me trouble. First, on one of the spline cuts, the jig or box wandered a little and the kerf with wallered out a little bit. More than enough to cause a visible gap. Which cause trouble when trimming the maple spline. It chipped out at the corner. So I had to glue in a patch piece, and fill the gap with glue. Wasnt a project ruiner, but enough to where its visible. Happened on the front of the box too which really blows. It wouldnt have bothered me so bad had it been on the back. Oh well. Oh and then, when I was sanding the splines flush on the lid, I didnt think to clamp the lid to the box, so the lid sides got all rounded and unsquare. I clamped the lid to the box after that and planed the sides down to where it was all flat again, but that caused quite a bit of grief. Oh well, im still learning. Well thats it for now. Ill be back to post more as I get further along. 5 Quote
pkinneb Posted August 15, 2017 Report Posted August 15, 2017 Really liking your execution of this design!! Looks great. 1 Quote
shaneymack Posted August 15, 2017 Report Posted August 15, 2017 Coming along really nicely ! Sent from my SM-N910W8 using Tapatalk 1 Quote
woodbutcher Posted August 15, 2017 Author Report Posted August 15, 2017 Thanks pkinneb and shaneymack! And shaneymack thanks for the idea of the lid joinery. It worked really well. 1 Quote
woodbutcher Posted August 15, 2017 Author Report Posted August 15, 2017 1 hour ago, Lester Burnham said: I'm diggin' that handle. Thank you! Quote
Popular Post woodbutcher Posted August 25, 2017 Author Popular Post Report Posted August 25, 2017 Well i finished the box. I kind of lost steam on taking taking pictures, but i am in a time crunch in this shop since ill be moving soon, and wanted to get it done. Anyway, here it is. You may notice that i did end up not putting the feet on. You guys were right, they did look goofy, and my girlfriend agreed. The curl doesnt come out and smack you in the face like I would have liked, but it still looks good. I sanded the box to 220, and the lid to 320. I put on 5 coats of dewaxed shellac, lightly sanding between coats with 320. After the fifth coat dried, i buffed it out with 0000 steel wool and paste wax. The shellac was tricky to apply, especially inside the box. Id use it again though, it leaves a really nice feel and appearance. I lined the bottom of the box and tray with self adhesive black felt. I used Brusso stop hinges, and definitely will use them again. They were spendy, but sure are nice. I stuck a piece of felt in the front corners, and with the hinges, leaves a nice even reveal between the lid and box. And here it is in its new home all loaded up. This project challenged me in ways i hadnt expected, and i learned ways of doing some things that ill do differently next time i make a box like this. 9 Quote
Coop Posted August 25, 2017 Report Posted August 25, 2017 Fan-damn-tastic! The only thing I would have done differently would be to soften the edges of the handle assy. Still, great job! 1 Quote
wtnhighlander Posted August 25, 2017 Report Posted August 25, 2017 The box is beautiful. Materials,design, and execution, all done well. 1 Quote
Popular Post Eric. Posted August 25, 2017 Popular Post Report Posted August 25, 2017 Well done man, looks great. Hopefully it paid...dividends. You might wanna check your jointer fence...looks like it may be off 90 by just a hair. 3 Quote
gee-dub Posted August 25, 2017 Report Posted August 25, 2017 Boxes are great in more ways than one. The joinery and methods are often similar to a lot of other work we do and give us challenges and keep us sharp. Being smaller, more people can experiment with more exotic materials that they might not normally get to use. The ends results are often beautiful, like yours, and received by others with great enthusiasm. Win-win. 1 Quote
pkinneb Posted August 25, 2017 Report Posted August 25, 2017 Very nice!! Good call on ditching the feet. 1 Quote
bgreenb Posted August 25, 2017 Report Posted August 25, 2017 Nice job man, the finished product looks awesome. I like the finish and how the curl is a little bit understated like you said. Nice job on the miters too - a very tricky joint. 1 Quote
Alan G Posted August 25, 2017 Report Posted August 25, 2017 This turned out great! I am glad that you didn't put those feet on. Looks incredible. Nice work! 1 Quote
woodbutcher Posted August 25, 2017 Author Report Posted August 25, 2017 Thanks for the nice words everybody! Im real happy with how it turned out too. Now that its done, I get to decide what I want to make next. Ive been wanting to try out an end grain cutting board, but Im kind of spooked by all the trouble they can be to make. Quote
mat60 Posted August 25, 2017 Report Posted August 25, 2017 32 minutes ago, woodbutcher said: Ive been wanting to try out an end grain cutting board, but Im kind of spooked by all the trouble they can be to make. Great looking box and so will be the end grain cutting board. 1 Quote
Chet Posted August 25, 2017 Report Posted August 25, 2017 That came out really great, nicely done. 1 Quote
wtnhighlander Posted August 26, 2017 Report Posted August 26, 2017 Practice on a couple of edge-grain boards before you tackle end grain. Part of the process is identical, so you can work out clamping and leveling strategy before having to do it twice for one board. Quote
shaneymack Posted August 26, 2017 Report Posted August 26, 2017 This turned out amazing ! Very nice work Sent from my SM-G950W using Tapatalk Quote


Recommended Posts
Join the conversation
You can post now and register later. If you have an account, sign in now to post with your account.
Note: Your post will require moderator approval before it will be visible.