Dave H Posted October 7, 2018 Report Share Posted October 7, 2018 I started this live edge coffee table a few weeks ago, I got the bow tie keys/dutchmen installed in the crack area and, did the Ecopoxy pour to fill said crack. The shop got busy helping a friend build some new rails for his pool table that was fun. So last week I built a router sled and flattened one face of the live edge table, I had built on 5/6 yrs ago when I built my work bench but I guess I must have taken it apart for the plywood parts, oh well this ones nicer anyway. After I flattened the face I took it to a guy down the road with a 37" wide belt sander paralleled the bottom face and worked through the grits down to 220 now I'm working on a bread board edge, instead of cutting haunched tenons I made simple jig to cut 5/8" loose tenons and a slot for the haunch's here are some pics. I just finished gluing up the bread board pieces tomorrow I'll finish milling the bread board edges and cut the mortises wit the router jig then try my hand at draw boring that should be fun. 2 Quote Link to comment Share on other sites More sharing options...
RichardA Posted October 7, 2018 Report Share Posted October 7, 2018 Draw boring is as easy as dropping a chisel. Quote Link to comment Share on other sites More sharing options...
wdwerker Posted October 7, 2018 Report Share Posted October 7, 2018 Are the breadboards made of live edge strips ? That could look pretty interesting. 1 Quote Link to comment Share on other sites More sharing options...
Dave H Posted October 7, 2018 Author Report Share Posted October 7, 2018 No not live edge walnut Quote Link to comment Share on other sites More sharing options...
Dave H Posted October 7, 2018 Author Report Share Posted October 7, 2018 That would look good though wdwerker. Quote Link to comment Share on other sites More sharing options...
wdwerker Posted October 8, 2018 Report Share Posted October 8, 2018 Oh , so walnut breadboards & butterflies ? That sounds good too ! Quote Link to comment Share on other sites More sharing options...
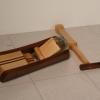
Dave H Posted October 11, 2018 Author Report Share Posted October 11, 2018 So life got in the way but, now I'm back to work on the live edge coffee table! I milled the walnut breadboard ends they fit like a glove, out side loose tenons are over sized 1/4" both sides of each tenon for expansion I wanted 1/2" maple draw-bore dowels 3 for each end having plenty of maple I milled 5/8" square maple blanks made 2 ply wood (not sure what to call them to hold the blanks onto the drive center and live center) rounded the blanks of using the gouge sharpened a tang on 1/2" open end wrench shaved the dowel down to 1/2" with the wrench and sanded lightly wit 220g sand paper then chopped off one end and check the fit on a test hole probably more than you ever wanted to know about dowels next up draw-boring and figuring out what to do on the ends of the breadboard ends hmmm? Quote Link to comment Share on other sites More sharing options...
pkinneb Posted October 11, 2018 Report Share Posted October 11, 2018 Nice! Clever idea on the pins!! 1 Quote Link to comment Share on other sites More sharing options...
treeslayer Posted October 12, 2018 Report Share Posted October 12, 2018 6 hours ago, higtron said: I wanted 1/2" maple draw-bore dowels Fine work sir, and for those of us that don't have a lathe i make my dowels on the router table, 1/2" dowels i use a 1/4" round over bit and make 4 passes on the router table, just make sure to leave each end square for reference. 1 Quote Link to comment Share on other sites More sharing options...
Coop Posted October 12, 2018 Report Share Posted October 12, 2018 You lost me on the third pic, so obviously not a live edge breadboard end. I’m a little slow at times but I’ll catch back up. Edit. Oops, apparently there are a majority that understand. Sorry for my slow pace. I’ll stand bye for the finished product. Quote Link to comment Share on other sites More sharing options...
Dave H Posted October 12, 2018 Author Report Share Posted October 12, 2018 Coop the reason it looks like a big I is because I haven't cut the ends of the breadboards where they come up to the live edges. I can't decide weather to contour them to the shape of the live edge or square them off at the widest point of the live edge? The first way would involve a lot of carving I'm not equipped for right now but, the clocks ticking I think the contoured end would look the best any suggestions welcome? I need to do this before I drive the pegs and I can't take the breadboards on and off? Quote Link to comment Share on other sites More sharing options...
Dave H Posted October 12, 2018 Author Report Share Posted October 12, 2018 something like this for the carving I have the 4 1/2" grinder I never liked the looks of those chainsaw wheels. I wonder about those flap grinding wheels, I should buy one and try it on some scrap.. Quote Link to comment Share on other sites More sharing options...
pkinneb Posted October 12, 2018 Report Share Posted October 12, 2018 57 minutes ago, higtron said: something like this for the carving I have the 4 1/2" grinder I never liked the looks of those chainsaw wheels. I wonder about those flap grinding wheels, I should buy one and try it on some scrap.. When I did my bar stools I used disc like that and then went to 40G sand paper on a Festool RAS115 worked well. One tip if you're buying a 4 1/2" grinder get one with an on/off switch I found my hand would get tired after holding the paddle for a few minutes. Also I found the battery operated ones did not hold a charge long enough for my liking. Yes I went through three grinders before I settled on the Fein 4 1/2" on amazon for like $105 FWIW it was the cheapest of the three as well 1 Quote Link to comment Share on other sites More sharing options...
Dave H Posted October 12, 2018 Author Report Share Posted October 12, 2018 39 minutes ago, pkinneb said: When I did my bar stools I used disc like that and then went to 40G sand paper on a Festool RAS115 worked well. One tip if you're buying a 4 1/2" grinder get one with an on/off switch I found my hand would get tired after holding the paddle for a few minutes. Also I found the battery operated ones did not hold a charge long enough for my liking. Yes I went through three grinders before I settled on the Fein 4 1/2" on amazon for like $105 FWIW it was the cheapest of the three as well Thanks for the reply, I have a grinder I would be a newbie to power grinding I hate to buy the Holy Galahad if I could get by with a 3 dollar flap wheel I'm going to HD to get one and see on some scrap, nowhere around here sells the Holy Galahad, waiting is not one of my strong suits. 1 Quote Link to comment Share on other sites More sharing options...
wtnhighlander Posted October 12, 2018 Report Share Posted October 12, 2018 @higtron a coarse flap disk will remove stock as fast as the Kutzall medium grit carbide power carving disk that I have. The only advantage of the carbide is longevity, and a dished profile that lets you gring hollows. You should be able to use a flap wheel for those breadboards, no trouble. 1 Quote Link to comment Share on other sites More sharing options...
Coop Posted October 13, 2018 Report Share Posted October 13, 2018 I bought these two items at HF and it’s pretty aggressive. 2 Quote Link to comment Share on other sites More sharing options...
Popular Post wdwerker Posted October 13, 2018 Popular Post Report Share Posted October 13, 2018 I haven't used the grinder but Fein tools have my respect. My first osselating multi tool is 20+ years old and still going strong. I've got a 20 + year old Fein vac as well. 3 Quote Link to comment Share on other sites More sharing options...
Dave H Posted October 13, 2018 Author Report Share Posted October 13, 2018 I used a flap sanding disk on my 4 1/2" grinder this thing did an incredible job I felt like it was easy to control but, with a little more pressure I could hog off material fast. Now some hand sanding down to 220g I was worrying about my ability to do this after the first edge I had complete confidence in my power carving ability the disk was less than $10 and I thought I needed the $70 Holy Galahad disk. I did this outside with a box fan at my back easy peasy. 1 Quote Link to comment Share on other sites More sharing options...
Popular Post Dave H Posted October 14, 2018 Author Popular Post Report Share Posted October 14, 2018 Installed the bread board ends, now finish up the base and get some finish on it. 5 Quote Link to comment Share on other sites More sharing options...
wdwerker Posted October 14, 2018 Report Share Posted October 14, 2018 Lookin good from here ! 1 Quote Link to comment Share on other sites More sharing options...
pkinneb Posted October 14, 2018 Report Share Posted October 14, 2018 Very nice!! 1 Quote Link to comment Share on other sites More sharing options...
treeslayer Posted October 14, 2018 Report Share Posted October 14, 2018 When it’s done bring it to my house it would look awesome in my living room nice work can’t wait to see the finished piece 1 Quote Link to comment Share on other sites More sharing options...
Coop Posted October 15, 2018 Report Share Posted October 15, 2018 So @higtron, you are only making the end grain of the bread boards conform to the live edge and not 360 all the way around, I.e. the end of the table will be straight? 1 Quote Link to comment Share on other sites More sharing options...
Dave H Posted October 15, 2018 Author Report Share Posted October 15, 2018 Yes coop square on the long grain of the breadboards, contoured on the end grain to look like live edge. I'm really kind of winging it I knew I wanted walnut breadboards just wasn't 100 percent sure what I was going to do on the end grain edges, I wanted the contoured look just didn't know if I could pull it off a couple days ago I decided to just man up and do it, glad I did. Quote Link to comment Share on other sites More sharing options...
Coop Posted October 15, 2018 Report Share Posted October 15, 2018 Looks great. You certainly pulled it off. 1 Quote Link to comment Share on other sites More sharing options...
.thumb.png.f1505d235090fa2186090ae6cc818259.png)

Recommended Posts
Join the conversation
You can post now and register later. If you have an account, sign in now to post with your account.