Popular Post Coyote Jim Posted July 27, 2020 Popular Post Report Share Posted July 27, 2020 (edited) About a year ago I read Nick Offerman's book. It's a pretty fun read if you have not read it. In that book, he has a picture of a table designed and built by George Nakashima. It's this picture: When I saw that picture I was immediately smitten with this design. To my eye this table is somehow both complex and simple at the same time. I knew when I saw the table I needed it on my todo list. I could not start on the table right away. I had to remodel our kitchen which took an incredible amount of time. I had to build some shelves. I also built a small counter top for our laundry room. All that took many months. Too many months. And all through those months I could not get this table out of my head. And now that we are in the dead of the summer here in Arizona.....where it has been around 117 degrees for a couple of weeks.....I have finally been able to get started. I did some googleing and found some more pictures of the table to emulate. I was also able to find some rough plans: I now have enough enthusiasm and knowledge to be very dangerous. So I went and bought some wood! The 4 boards on the right are 8/4 white oak, these will make up the table top. These are 10 feet long. My table is only 6 feet but they only sell them in full lengths. I will have a lot of big off cuts. White oak is my favorite so I suppose having some extra white oak kicking around is not a bad thing. The board on the far left is 12/4 white oak. I SHOULD be able to get all the pieces needed for the base out of just that one board. We'll see though. Just getting these monster boards out of the truck and into my garage by myself took some mental (and physical) gymnastics but I did it. I am building the base first and I will do the top last. My reasoning is that if I were to glue up the table top, which will be 3'x6' then that top is going to be very heavy. Way too heavy for me to move by myself safely. And at that size the top will probably be in the way in my small shop/garage and would require being moved around a lot. But the individual boards, while still heavy, are much easier to move around. For the base I am starting from the ground up. I'll make the long "runner" that runs along the floor first, then the "feet" that sick out to either side, then angled "legs" and end with the cross pieces at the top of the legs. To make the base I need to turn that large 12/4 board into smaller boards. As you can imagine, this took a bit of time. But I rather enjoyed it. Here is what you are looking at in the above pic. I jointed and planed the long floor runner (I don't really know what to call that thing) and that is what you are seeing on the right, it's just under 5' long. To it's left, that large piece will be the "legs". That piece is just over 5' long, it will be cross cut directly down the middle for the legs. Below the leg piece is the part I will be using for the feet. And below the already milled piece is where I will get the cross supports that will be the top of the legs. I ended up ripping all 10' of that board by hand. I was not as sore as I thought I would be, but I did get more blisters than I thought I would. All of those parts got crosscut and milled. Now for the REALLY fun stuff. The joinery! Starting with the Floor Runner and the Feet. This is the runner. It gets a notch. I cut close to the line then did relief cuts. Chisel out then waste trying hard not to blow out the back side. Establish my marking lines. Not flawless but she's square and my knife lines ended up perfect. Now for the feet. This joint is a little trickier. Need to make this lap on both sides, so mark it, cut it, chisel it. Clean up with the router plane. Then clean up with the chisel. I need to make a notch in the foot that will correlate to the notch in the runner. Same exact steps as the others. Cut. Rough chisel work. Then some fine chisel work. Ready for a dry fit. Fits very snug. I actually had to plane the sides of the runner a little bit to get the joint to seat fully. Here is the bottom which no one will see. Here is the top looking VERY sharp. And both feet done! I have left everything long. I will not cut the runner or the feet to their final width until I have the table top made. That way I will have a much better sense of proportions. Next I will work on the legs. The leg joinery will be very similar to the joinery for the feet but this time the runner will be getting the laps on the sides and the legs will just receive the notch. Anyone know what the name of that joint is? I assume it is some kind of bridle joint. Housed Bridle Joint? Lapped Bridle Joint? Well whatever it's called it was my first time doing it. I spent an embarrassing amount of time trying to figure out how to mark everything. Thanks for taking the time to look. I'll keep updating as I get stuff done, but don't hold your breath, I do not get much opportunity to do much woodworking. I currently have no time for the next 2 weeks. But I'll keep plugging along. If anyone sees any red flags that I am overlooking please shout them out. I still very much consider myself a beginner and could use the help of you veterans. Edited July 27, 2020 by Coyote Jim Typos 16 Quote Link to comment Share on other sites More sharing options...
RichardA Posted July 27, 2020 Report Share Posted July 27, 2020 Keep at it, you're going to get a bunch of followers on this project. I'm one. 1 Quote Link to comment Share on other sites More sharing options...
Chestnut Posted July 27, 2020 Report Share Posted July 27, 2020 Yep gonna follow this one. I scanned the post but will come back to read it in full later. I've also always loved the look of this table. Are you goign to make the matching chairs? 1 Quote Link to comment Share on other sites More sharing options...
Coyote Jim Posted July 27, 2020 Author Report Share Posted July 27, 2020 23 minutes ago, Chestnut said: Yep gonna follow this one. I scanned the post but will come back to read it in full later. I've also always loved the look of this table. Are you goign to make the matching chairs? I am not. While I find the chairs attractive I also think they are a bit too...loud. I don't know what to do about chairs yet. I'm thinking benches. Maybe the benches will use some similar angles. I don't know. That is a worry for Future Me. 1 Quote Link to comment Share on other sites More sharing options...
Chestnut Posted July 27, 2020 Report Share Posted July 27, 2020 50 minutes ago, Coyote Jim said: I also think they are a bit too...loud. BLASPHEMY! Yeah they are a bit loud but in all the right ways for me personally. I will make 1 or 2 of them some day. I LOVE how they appear to defy gravity. 1 Quote Link to comment Share on other sites More sharing options...
Chet Posted July 27, 2020 Report Share Posted July 27, 2020 I am going to follow this. 1 Quote Link to comment Share on other sites More sharing options...
pkinneb Posted July 27, 2020 Report Share Posted July 27, 2020 Been a long time since I have seen someone cut a 12/4 white oak board lengthwise no less, scratch that i've never seen it! That must have been some workout. Having said that if your saw is as sharp as the chisels you were using probably not that bad lol. That was some beautiful pairing with the chisel. The table is gonna look spectacular! 2 Quote Link to comment Share on other sites More sharing options...
Bmac Posted July 28, 2020 Report Share Posted July 28, 2020 I'm digging this, nice work. I'm not a huge fan of his Conoid chair either. But I want to definitely make some because of my addiction to chairs. It's also a chair that I think non woodworkers marvel at. 1 Quote Link to comment Share on other sites More sharing options...
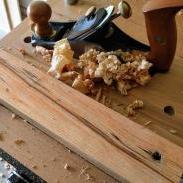
Popular Post Coyote Jim Posted August 24, 2020 Author Popular Post Report Share Posted August 24, 2020 Time for an update! It has been a while since I have had enough progress done to warrant an update. We had gone to the mountains as a reprieve from the brutal summer we are currently having her in Arizona. And speaking of brutal summer, did you guys know that this is the hottest summer in Arizona in recorded history? Yep, that's 121 outside and 113 in the garage. Sure the humidity is less than 10% so it only feels like 109 or so but you know what else has low humidity? My oven! I still prefer these crazy hot temps over what those poor people in Florida, Louisianan, Texas and other super humid places have to go through though. Ok, done complaining. On to the next part of the build. Time to cut this joint: The thing about this joint is that it is almost exactly the same as the previous joint I just did for the "feet". So, easy peasy right? Wrong! This damn joint gave me fits. And this is why. First order of business was to cut the underside of the vertical leg. That started pretty easy. Just mark the lines, cut close to the lines. I did a relief cut down the center, then just used this Harbor Freight coping saw to cut close to the baseline. I really had to baby this saw, 3" of oak is outside the capabilities that this thing was designed for. These were all rough cuts so easy so far. The hard part was cleaning up those cuts. I just had an extremely hard time getting those inner walls to be flat with no belly, make them perfect 90 degrees and parallel to each other. I tried chiseling with a guide block, without a guide block. I tried the pencil lead on the underside of the square trick. I tried just eyeballing it. Removing one high spot would just reveal 3 more high spots. Spent WAY too much time on the first one. Then I noticed, that my cheap Stanley shoulder plane could fit in there. Turns out that planes excel at making things flat! Wow did that make all the difference. If the gap was any narrower I would still be working on this part for a month of Sundays. There she is looking nice and crispy. The rest of this joint went just fine. It was pretty much identical to the joint I did for the feet (except for these ones were angled) so I did not get many pictures of it. Here is a pic of the base with all the joinery cut into it. You may notice that the joinery is not centered on this board, the left side is just a bit shorter than the right side. What's going on here is that there was a knot in this board that I was worried was going to compromise the boards strength. So I positioned the notch on the left side so that cutting out the notch would also cut our the knot. Doing so made me have to adjust the spacing a bit. No problem though because this base is not to it's final length yet, the ends will be cut off later. Now for the dry fit. The right side. This joint is tight. Maybe too tight. I have to use quite a few hammer blows to get it to seat all the way. Question for you guys: I plan on using hide glued not PVA, will the hide glue lubricate the joint and make it go together easier? Or should I fiddle with it till it goes together with just hand pressure? This is the left side. It looks pretty good BUT this joint has 2 problems. It is too loose and I have a gap on the back side not shown here. I made a very short video explaining the issues and it is linked below. I would love if you would take a minute and see if you have any good advice for me. Zoomed out shot. I am very much stretching the limits of my woodworking know how. Also I am very much stretching the limits of my tiny workbench. In general I am very happy with how it is turning out except of course the issue I am having with that loose joint. Speaking of which. I made a very short video showing you the issues I'm having. If you have a moment could you have a look and give me your recommendation on how to fix it? Thanks for taking the time to have a look and any advice you can give me with my issue would be awesome. 5 Quote Link to comment Share on other sites More sharing options...
Askland09 Posted August 24, 2020 Report Share Posted August 24, 2020 Would it be viable to glue two thin pieces to each side of the morticed leg and sand them back to get a better fit on the joint? 1 Quote Link to comment Share on other sites More sharing options...
wtnhighlander Posted August 24, 2020 Report Share Posted August 24, 2020 Is the bridle tight enough on the inside, that it doesn't rattle? If so, the glued joint should be strong enough. IMO that gap is purely cosmetic. You might find a plane shaving or two that you can glue to the faces of the bridle of the upright, and fill the gap. Be careful, though. Any grain mismatch runs the risk of becoming more obvious than a glue-filled gap. Personally, I would glue it up with the leg clamped toward the center of the stretcher, then mask around the gap and fill it with sawdust-thickened epoxy. As the leg angles out over that side of the joint, it will be in perpetual shadow, and no one else will ever know it is there. 2 Quote Link to comment Share on other sites More sharing options...
Chestnut Posted August 24, 2020 Report Share Posted August 24, 2020 Shannon rodges just talked about using plane shavings to "close" loose joinery like what you illustrated. He applied glue then the plane shaving and then more glue and assembled the joint. https://woodtalkshow.com/episodes/wt478-joinery-mistakes/ I think this entire episode will help you a lot. For the gap I'd use a sliver of wood or something to fill most of it. It's not going to be perfect because of the grain direction in the wood though. Loving the build so far. Your journal convinced me that I shouldn't compromise on the kitchen table I'm making soon. I wanted to do the conoid table but Megan didn't like it. I recently told her i really wanted to make this table for our kitchen and wasn't going to take no for an answer and she said "ok" like she never said no in the first place. I was confused. 2 Quote Link to comment Share on other sites More sharing options...
wtnhighlander Posted August 25, 2020 Report Share Posted August 25, 2020 3 minutes ago, Chestnut said: ... I was confused. Better get used to it... 1 1 Quote Link to comment Share on other sites More sharing options...
Chestnut Posted August 25, 2020 Report Share Posted August 25, 2020 2 minutes ago, wtnhighlander said: Better get used to it... I have learned to not ask questions and just go with it. Quote Link to comment Share on other sites More sharing options...
Coyote Jim Posted August 25, 2020 Author Report Share Posted August 25, 2020 20 hours ago, Askland09 said: Would it be viable to glue two thin pieces to each side of the morticed leg and sand them back to get a better fit on the joint? I think this would work. Maybe get some veneer and glue to the side of the base piece (fiddling with the inside of the mortice is tricky). Then I could router plane down to a tight fit. If I use hide glue I would not have to worry about the glue not sticking to already glued piece. Quote Link to comment Share on other sites More sharing options...
Coyote Jim Posted August 25, 2020 Author Report Share Posted August 25, 2020 17 hours ago, wtnhighlander said: Is the bridle tight enough on the inside, that it doesn't rattle? If so, the glued joint should be strong enough. IMO that gap is purely cosmetic. The bridle rattles a tiny bit. Which is why I thought maybe I could squeeze the "forks" of the leg together enough to make contact. This joint is the fulcrum a lot of force so I think it needs to be as strong as I can possibly make it. I agree that the gap is cosmetic, and it's in a pretty hidden place. I may end up just ignoring it. 1 Quote Link to comment Share on other sites More sharing options...
Coyote Jim Posted August 25, 2020 Author Report Share Posted August 25, 2020 17 hours ago, Chestnut said: Shannon rodges just talked about using plane shavings to "close" loose joinery like what you illustrated. He applied glue then the plane shaving and then more glue and assembled the joint. https://woodtalkshow.com/episodes/wt478-joinery-mistakes/ I think this entire episode will help you a lot. For the gap I'd use a sliver of wood or something to fill most of it. It's not going to be perfect because of the grain direction in the wood though. Loving the build so far. Your journal convinced me that I shouldn't compromise on the kitchen table I'm making soon. I wanted to do the conoid table but Megan didn't like it. I recently told her i really wanted to make this table for our kitchen and wasn't going to take no for an answer and she said "ok" like she never said no in the first place. I was confused. I'll give that podcast a listen. Thank you for the recommendation. A sliver of wood in the gap would be a pretty easy fix and most likely what I will end up doing. It's in a pretty hidden area so any mismatch grain will be hardly ever noticed. If you are going to build this table some day then bookmark the link below. Before I started I did a lot of googling for pictures of the table and found some very helpful photos and compiled them all together. https://photos.app.goo.gl/6zSthR2ReykTveuBA Question for everyone: Would using epoxy for glue on the loose joint fix my problem? Or is the epoxy just going to fail over time because it is bridging the gap? Quote Link to comment Share on other sites More sharing options...
Mark J Posted August 25, 2020 Report Share Posted August 25, 2020 19 hours ago, Chestnut said: I have learned to not ask questions and just go with it. Then you have a future in this marriage business. 2 Quote Link to comment Share on other sites More sharing options...
wtnhighlander Posted August 25, 2020 Report Share Posted August 25, 2020 6 hours ago, Coyote Jim said: Question for everyone: Would using epoxy for glue on the loose joint fix my problem? Or is the epoxy just going to fail over time because it is bridging the gap? It will probably outlast all of us. And regarding looseness of the bridle 'forks', that is the perfect application for plane shaving shims. Glue them to the part that the bridle fits over, they'll never be seen. Alternatively, have you considered draw-boring that joint? 2 Quote Link to comment Share on other sites More sharing options...
Coyote Jim Posted August 26, 2020 Author Report Share Posted August 26, 2020 2 hours ago, wtnhighlander said: It will probably outlast all of us. And regarding looseness of the bridle 'forks', that is the perfect application for plane shaving shims. Glue them to the part that the bridle fits over, they'll never be seen. Alternatively, have you considered draw-boring that joint? That's good info. Thanks WT. I have considered draw-boring that joint. Still on the fence about it. Quote Link to comment Share on other sites More sharing options...
wtnhighlander Posted August 26, 2020 Report Share Posted August 26, 2020 Some might feel that draw-boring is too much of a departure from the Nakashima design. I agree that stylistically, the pegs seem more in line with something out of the American frontier, rather than the flowing Asian feel of Nakashima, but if properly select for color and grain that compliments the rest of the piece, I think they could work well. The Conoid table has enough flats and straight angles that the pegs would not appear out of place, IMO. If it were more sculpted, like Krenov or Maloof styles, a large peg might be distracting. Quote Link to comment Share on other sites More sharing options...
Chestnut Posted August 26, 2020 Report Share Posted August 26, 2020 8 hours ago, wtnhighlander said: Maloof styles Maloof used plugged screws. My thought with the draw bore peg is cut the peg short and then make a face grain plug to hide the draw bore. 18 hours ago, Coyote Jim said: Would using epoxy for glue on the loose joint fix my problem? Or is the epoxy just going to fail over time because it is bridging the gap? I was goign to suggest epoxy as well but the plane shaving will work just as well if not better and might be easier to do. Though if you want belt and suspenders do both. 2 Quote Link to comment Share on other sites More sharing options...
Coyote Jim Posted September 6, 2020 Author Report Share Posted September 6, 2020 Does anyone have any good suggestion on how to remove the waste of this bridle using hand tools? It's just over 3/4" wide and just under 6" long. I have 2 of these to do. I was thinking I could use a brace and bit in through the side and bore a hole all the way across. Or possibly make lots of relief cuts and chisel my brains out. This being white oak end grain makes me doubt how efficient that would be. Any other suggestions? Quote Link to comment Share on other sites More sharing options...
RichardA Posted September 6, 2020 Report Share Posted September 6, 2020 You could rout some of it out, but you'd still wind up with a hand saw and chisel. However If on the second one, you use a router before cutting the angle, it would save you a lot of *#!&%^$ words. 1 Quote Link to comment Share on other sites More sharing options...
Coyote Jim Posted September 6, 2020 Author Report Share Posted September 6, 2020 19 minutes ago, RichardA said: You could rout some of it out, but you'd still wind up with a hand saw and chisel. However If on the second one, you use a router before cutting the angle, it would save you a lot of *#!&%^$ words. So step one would be: go buy a router. I have possibly been over thinking it (which is my MO). It's really just a mortise with an open side. I could just chop down the side like a standard mortise but I would have the added benefit of being able to split out the waste as I progress down. Think that would work? 1 Quote Link to comment Share on other sites More sharing options...


Recommended Posts
Join the conversation
You can post now and register later. If you have an account, sign in now to post with your account.