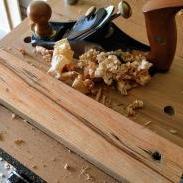
Popular Post Coyote Jim Posted January 22, 2018 Popular Post Report Posted January 22, 2018 I am still very new to woodworking and this project is one that I made just so that I could learn some techniques. There are a LOT of firsts in this project. No this will not be as long as the last one, but it will still be long, so...get comfy...or just skip it. I wanted this project to be a small one. I want it to be small for a couple of reasons. First, the larger a project is the longer it will take me, and after how long the desk took and how annoyed at myself I got for taking so darn long, I don't want to get stuck like that again. Second, I will be learning some new stuff which means I will be making a mistake or two, replacing a small thing will be easier than replacing large things. I am going to make a small container using a couple of different species of wood. The container will be something that I just use to put coffee beans in or something like that. I am a terrible artist but I tried to draw it anyway. I just went to Lowes and bought some oak and poplar boards. The four boards here on the left are the oak and the lighter two boards on the right are the poplar. I hope they have enough contrast from each other. I ripped the boards all down to their finished width and laid them out. Each one of these will be a side of the container I am making. The container will be about 10 or so inches tall. I have not decided if I will make it a square, or if I will cut two of these down so it will be a rectangle. I have plenty of time to decide that. Time for gluing! So these two large Bessey clamps I got for my birthday. I have never used them before but all the real woodworkers I have ever seen use this style. They are supposed to apply even pressure for better glue ups and less bowing. Which they do, but another thing that makes these nice is that the clamps stand up on their own. So I can just set the boards on them and the boards have a nice flat surface to get everything all lined up on. I am doing two of the sides here, I thought that if I did all four sides that I may be asking for trouble seeing as how I have never done this before. The wax paper is just there to catch any drips. I always have my eye on Craigslist for deals and I saw this Stanley Sweetheart No.4 smoothing plane which is the big brother of the block plane that Allison got me. I had this exact plane on my Amazon wishlist, sounds perfect right? The issue is the guy selling it was asking $140, Amazon sells it for $140 AND Amazon will deliver to my door the next day. I took a chance and sent the seller a message telling him I was interested in the plane but the price would have to go way down and I low balled him at $80 bucks. He came all the way down to $100 and I made that deal. Speaking to the guy, he says that he started getting into woodworking so he bought a couple of planes and some other tools, but he also runs marathons and right now he needed some cash for marathon gear. I have no idea how much gear you need to run a marathon, I mean, don't people do that kind of thing barefoot? Well I didn't question it. I made the deal. The guy says he only used it once right when he got it and tested it out on some pine. I believe him because the plane is in perfect condition. Other than just a tiny bit of dust it looks completely unused. Now to teach myself how to use a hand plane. I have no way to sharpen this plane blade so the factory sharp edge will have to do. And it does pretty good. It took me a while to figure out how and where to stand, how to use my whole body not just my arms, how not to get blade chatter. I'm far from good at this but after about an hour and a half I am getting the hang of it pretty well. Also, after an hour and a half of this I am finding out just how hard oak is. Holy cow is oak hard! I am not exaggerating, my hand and shoulder was sore for over a week. But my goodness, using hand tools like this is satisfying. The way it feels when you get a full width shaving is pretty awesome. After an hour and a half of planing these boards, and more than a weeks worth of soreness, these boards were flat but still thicker than I wanted them to be. I need to set the blade to make deeper cuts to really thin them down but I don't know if my hand and shoulder could take it without the blade being ludicrous sharp. So, time to teach myself how to sharpen. I did some Youtube research on sharpening to find out what to do. So I Amazoned (yes that is now a verb) a fairly inexpensive sharpening stone that is 1000 grit on one side and 6000 grit on the other side. My wife's brother has a stick of stropping paste so be broke some off and gave it to me. So here is my sharpening setup. It's far from glamorous, but it got the job done. So using the 1000 grit I honed the bevel and made the back flat. This took FOREVER! 1000 grit is too fine to flatten something. I should have started with a 300 or a 500 to do the innitial flattening and honing, but I do not have a stone with that grit. I DO have sandpaper that is that grit but by the time I realized how long it was taking I was already stubbornly committed. Holey mackerel was this thing sharp. So sharp that I actually cut myself and did not even know it until I was bleeding all over the place. It was by far the sharpest thing I have ever held in my hands. It could cut paper just by pushing the blade through it, not cutting the paper along the blade, I mean just pushing the blade across the length of the paper and it sliced the paper in half. Yikes! Do guys who have been woodworking a long time remember your first time successfully sharpening a plane blade or a chisel? I have those feels. 4 Quote
Popular Post Coyote Jim Posted January 22, 2018 Author Popular Post Report Posted January 22, 2018 These boards needed to be thinner so I started planing. and planing..... and planing some more... I don't know how many wood curlies I made, but if I had to guess I would say it is over 1000. A No.4 plane is not suited for hogging off a lot of material but it got the job done. (Look at me acting like I have a clue what I am doing.) Now it's time to cut some rabbet joints. This will be a first for me. I was thinking I would do blind rabbet joints like the one in the drawing I made but I tested it out on some scrap wood and I just could not get it to work without a real dado blade. So regular rabbet joints will just have to do. I started by making a cut that is just as deep as the wood is thick. Actually, it is just a hair deeper than the wood is thick. That way the ends will stick out a tiny bit and I can just plane or sand them down to be flush. What? Yes, that was actually on purpose. No, it was not because I measured wrong. Jerk. I changed the depth of the blade, moved the fence and made this cut to remove that chunk of wood. Now I have 4 rabbet joints. Also, I cut two of the boards to be thinner so my container will be rectangular instead of square...ular. I put a lot of thought into the how to make the bottom of the container. I could just cut a rectangle piece of wood and glued it to the bottom. I could have cut a rabbet in the bottom and fit the bottom piece of wood into it. Both of those options would have been pretty simple and would most likely have worked just fine. But I wanted more than just glue to hold the bottom on so I decided to go with a small blind rabbet. I started by cutting a small dado at the bottom of all the boards. I did this my setting the depth of the table saw blade very shallow, running all the pieces over it, then bumping the fence over a fraction of an inch and running the pieces through again. This created a "channel" of sorts. Now I need to make a rectangle that has a shoulder on it, the shoulder will fit in that channel and will make the bottom extremely strong. I have no idea what was wrong with me but I just could not get the measurements on this right. It was comical how many times I had to make this rectangle. All in all it took me 4 tries. But I got it. As you can see, it's not perfect. But it all lines up and the container is square (well, it's a rectangle, but the rectangle is square, or true, or strait? you know what I mean). Probably spent WAY to long trying to figure this out, but I am glad that I did it. The bottom will never fall out this way, even if I bang it around for years to come it's going to be solid. I set my table saw to 45 degrees and cut a bit of an angle on the top. Actually, what I did was cut the 45 degrees on the wrong side of one of the boards and had to cut them all again. I grabbed some glue and some clamps and put it together. Now to watch the glue dry. While we wait for the glue to dry, want a tour of my workshop? Well, here it is. My entire workshop. Which consists of a couple sawhorses, a table saw, two borrowed miter saws, some clamps and some hand tools (and a plastic race track). Yep, that's it. It's pretty ball'n. I even have an apprentice that I make clean up after me. I don't even pay him, I do have to provide him with room and board though. ON TO THE LID!! 4 Quote
Popular Post Tmize Posted January 22, 2018 Popular Post Report Posted January 22, 2018 Once you catch the hand plane fever it's on then next thing you know you have 40 of the damn things setup to whatever you could come across. 3 Quote
shaneymack Posted January 22, 2018 Report Posted January 22, 2018 I'd say that's pretty darn impressive seeing as you are new at this and the amount of tools you have. Very nice work . Keep at it ! 2 Quote
Popular Post Coyote Jim Posted January 22, 2018 Author Popular Post Report Posted January 22, 2018 I had a LOT of ideas for how this lid was going to look. Originally I had an idea for all of the stripes of poplar to continue up onto the lid and meet in the middle creating a square (or rectangle). After noodling that idea for a bit I determined that simple would be best and if I wanted to change it in the future and make a new lid I can. But for now I want this project to be over. So what I decides was to just have two of the stripes going across the top, not all four. Using a scrap cut off piece I figured out a way to cut the lid so that the angles matched and started at the same place as each other. It was tricky but I got it. I cut up some small pieces so that the poplar stripes will match the stripes on both sides. Now I just need to plane it even and make it much thinner. So that's what I did. THEN DISASTER!! So when I was planing this lid thinner, something slipped, and the lid fell on the floor and broke. As you can see, it did not break where the two pieces of wood were glued, the poplar stripe itself broke. I had always heard that the glue was stronger than wood but I guess this proves it. I had to throw away the broken one and start over again. Yes it looks very silly when you are gluing up a 6" piece of wood on 50" clamps. Well these clamps were expensive so I want to use them. Also, these clamps are just SO much easier to use than any other ones I have. While the glue is drying in the background I moved onto finishing the container. If you remember, I had left the rabbet joints just a tad long so they stuck out, now it's time to plane those down, as well as give the whole thing a once over with the smoothing plane. I do not have a bench vice to clamp this thing into so what I did was put a cut-off of oak in the miter slot of the table saw and then clamped another long cut-off to hold down the work piece. This worked pretty good, but then I needed to turn the container around so I could no longer put that long piece inside it. I remembered a trick I saw on Paul Sellers' YouTube channel. Paul Sellers is a bit of a woodworking legend. He's been doing it for 50 years and he has learned a trick or two. So if you take one of those ol' timey clamps like in the picture, you can clamp your work piece with it, then you clamp the 'ol timey clamp to the table. Is it as good as a real bench vise? Nope. But it worked really good for me. I planed down the sides and bottom and this thing is really starting to look sharp. All the seams are mostly disappearing and I can't believe how smooth to the touch this thing is. The smoothing plane really does do a better job than sandpaper. Planing all the sides made the corners very sharp. So using the block plane I created a slight chamfer. This made it much more comfortable to hold but it surprisingly had a secondary effect of making the container look more finished and nicer. Also, have I mentioned how much I absolutely love using hand planes? There is something just so satisfying about it, it's hard to explain, just take my word for it. The lid has had plenty of time to dry so now I need to make it not so darn thick. But Jim, why didn't just re-saw the sides of the container on the table saw like you are doing with the lid so you would not have had to do all that hand planing? Well....I....um.....have no idea. Leave me alone. I need to cut the angles on the underside. I then set the blade to 45(ish) degrees and cut the bevel on the underside just like I had done in the test piece above. I placed the lid on top and it fit! It's actually way to thin, there is not much substance to the lid at all. I should have left if a bit thicker. Right now it more just sets on top of the container instead of seating into the opening. But it will work for now. I brought this container into my house so it can acclimate to the humidity that is in my house before I seal it. Only after a couple of days the lid warped and no longer sits nice and flush to the top of the container. The lid was too thin anyway so I have an idea to kill two birds with one stone. I am going to glue a piece of wood to the bottom of the lid that is the same size as the mouth of the container. This will do two things: 1. With that piece of wood fitting nice and snug into the mouth of the container that will make it more air tight (not completely air tight obviously but the coffee I put in the container will be less likely to get stale). 2. When I glue the two pieces together I can clamp it really tight which will flatten the lid down to the piece of wood and remove that bow. I clamped the crap out of it. This flattened out the lid nicely. I set this aside to dry. Time to put the BLO on the container. I grabbed some rubber gloves, some shop towels and some tunes. And when the glue was done drying on the lid I oiled it up too. The lid needed just some minor tweaking to get it to sit square but that was a very simple fix. And it's done! I love it. This makes a pretty cool addition to my coffee setup. And yes, my kitchen counters are green. They came with the house. We will get granite some day. So what did I learn on this one? A LOT! I learned how to use hand planes. I learned how to sharpen hand plane blades. I learned that oak is not to be underestimated. I learned that I need to insulate my garage doors. I learned regular rabbet joints are not only great but pretty easy. I also learned that I have a deep love for hand tools. I'm not going to forsake power tools or anything like that, but I love em. If you have made it this far then thanks for reading. Not sure if this is the right place for such long winded project posts or not but I guess people can just skip if they want. 7 Quote
Coyote Jim Posted January 22, 2018 Author Report Posted January 22, 2018 34 minutes ago, Tmize said: Once you catch the hand plane fever it's on then next thing you know you have 40 of the damn things setup to whatever you could come across. I have the fever. It's all consuming. 21 minutes ago, shaneymack said: I'd say that's pretty darn impressive seeing as you are new at this and the amount of tools you have. Very nice work . Keep at it ! Thank you! I really appreciate it. I find myself more focusing on all the tools that I DON'T have as apposed to the ones I do have. I should probably change my mindset on that though. First world problems and all that. Quote
shaneymack Posted January 22, 2018 Report Posted January 22, 2018 21 minutes ago, Coyote Jim said: I find myself more focusing on all the tools that I DON'T have as apposed to the ones I do have This will never never go away, Jim. It's called the Woodworkers disease LOL. I'm fairly well equipped but I'm always thinking of the next tool that I "need" 1 Quote
Tmize Posted January 22, 2018 Report Posted January 22, 2018 Yep I keep a open wish list at all the suppliers website. An as soon as I come to the point in a project I need it bam straight to the phone a order right there no hacing to look around. Quote
curlyoak Posted January 22, 2018 Report Posted January 22, 2018 Very good work. Had I just seen the final box with no explanation I would not assume you are a beginner. A faster way to thin the wood is to rip it on edge on the table saw a little thicker than required and bring it the rest of the way with your plane and sanding. If you have a 10" saw the max cut is 3". That means you can do this up to 6". On occasion I would finish the rest with a hand saw if I needed a little wider. Depending on the wood and how much needs to be cut, I will do it in 2 or 3 stages. Do not try this if you do not currently have the confidence. It can be dangerous. I make a lot of frame and panel construction. I like the panels to be figured and resawn for the book match effect. Keep up the good work! 1 Quote
Chestnut Posted January 23, 2018 Report Posted January 23, 2018 I like it. hand planes are a great addition to the shop, there are a couple on my desired list as well. First on the list is a new better #4 smoothing plane. 1 Quote
ClassAct Posted January 23, 2018 Report Posted January 23, 2018 Great project with great results, and I like your coffee setup. Now go and buy a Vetrano 2B Evo espresso machine and get cranking on the quality brew! I want to see more from you, because (a) your sense of humor is like mine, and (b) you have about as much home shop as I do. Well, more, as you have a table saw. Otherwise my gear looks about like yours. What's your next project? 1 Quote
Coyote Jim Posted January 23, 2018 Author Report Posted January 23, 2018 8 minutes ago, ClassAct said: Great project with great results, and I like your coffee setup. Now go and buy a Vetrano 2B Evo espresso machine and get cranking on the quality brew! I want to see more from you, because (a) your sense of humor is like mine, and (b) you have about as much home shop as I do. Well, more, as you have a table saw. Otherwise my gear looks about like yours. What's your next project? Thanks for the kind words ClassAct! Not sure if you caught my previous post about how I accidentally got into woodworking or not. I think it is on page two by now. If you like this one then take a look at that one but be warned, it is MUCH longer than this one. If you read it then brew some of that quality brew of yours to keep you company. I actually have two other projects "in the can" as it were. Will be posting those soon. First is getting started on my tool wall and the second is a headphone stand I did completely(ish) with hand tools only. I keep a.....journal? of sorts so those projects are already written they have just never been posted anywhere. But to answer your specific question about what my next project is. I am going to make one of these for my daughter. She is 6 and her stuffed animal situation has gotten a bit out of hand. Not going to make it just like the one in the pic but it should be similar. Also thank all of you guys/gals here for your ideas and comments. Such a great wealth of resources and, just as important, encouragement. 2 Quote
wdwerker Posted January 23, 2018 Report Posted January 23, 2018 Impressive especially considering the tools and your experience ? Add your signature and date & maybe a note that it's an early effort. I think I would keep coffee beans in a bag in the container rather than beans against the wood. Should keep the beans fresher. 1 Quote
legenddc Posted January 24, 2018 Report Posted January 24, 2018 Looks good. I enjoyed your write-up again. You might be interested in Wood Magazines Idea Shop 6. They build out a shop on $150 every 2 weeks for a year. Might not be everything you need or want, but nice to see how someone else would start from scratch. 1 Quote
Coop Posted January 25, 2018 Report Posted January 25, 2018 That is pretty darn cool. Well done. The only thing I would have done differently would have been to put rabets on both sides of two opposing boards, usually the face being seen the most and the back, to hide the ends of the boards. It might also have made life easier. 1 Quote
wtnhighlander Posted January 25, 2018 Report Posted January 25, 2018 Love this journal! Good to see someone turn out such nice projects with so few tools. One tip about that "hard" red oak - the stuff carried by the big box places is kiln dried to the point of being heat treated, IMO. Air dried oak is waaaaayyyy easier to work. Quote
wdwerker Posted January 25, 2018 Report Posted January 25, 2018 Interesting info. I'm just glad I haven't had to buy any hardwood at a big box in my entire lifetime ! Especially since " big box" home improvement centers originated in my home town. Please look for legitimate hardwood suppliers in your area before you buy at a home center ! Would you consider buying designer goods at Walmart ? 1 Quote


Recommended Posts
Join the conversation
You can post now and register later. If you have an account, sign in now to post with your account.
Note: Your post will require moderator approval before it will be visible.