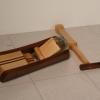
Popular Post Dave H Posted May 30, 2020 Popular Post Report Share Posted May 30, 2020 I was on a job as a finish carpenter probably close to 25 yrs. ago I needed a router table there was part of a sheet of plywood close by I made a down and, dirty router table that sat on my saw horses. It's been my router table ever since. I was always going to build a dedicated router table/cabinet but, never got around to it. I finally started and, have the table and fence built I thought I'd share some pics. this is what I've been using it's adequate I either clamp, nail or screw whatever fence I have laying around usually a chunk of 2x whatever's kicking around This is a picture of the table and insert completed 2 48" x 30" baltic birch 3/4" ply laminated red oak edging and plastic laminate and this is where I'm at now the fence is 9" high sliding panels it works great I've been using it to build parts of the fence, now onto the rolling cabinet build 5 Quote Link to comment Share on other sites More sharing options...
treeslayer Posted May 30, 2020 Report Share Posted May 30, 2020 Nice work Dave, that’s going to be a great upgrade, I did about the same thing a few years back and never looked back, except to wonder why I didn’t build one sooner 1 Quote Link to comment Share on other sites More sharing options...
Mick S Posted May 30, 2020 Report Share Posted May 30, 2020 Nice work, Dave! Love the large surface area. 1 Quote Link to comment Share on other sites More sharing options...
Dave H Posted May 31, 2020 Author Report Share Posted May 31, 2020 Thanks for the kind words guy's, Mick I started wondering if I made it to large but after using it I like it a lot. The extra big table should give me a lot of latitude for storage in the cabinet for drawers to store all the bits and all my router plates and, hopefully the routers we will see I'm still thinking and sketching out tentative plans for the cabinet which is my favorite part. Quote Link to comment Share on other sites More sharing options...
Popular Post treeslayer Posted May 31, 2020 Popular Post Report Share Posted May 31, 2020 Just to give you some ideas Dave, 2’ X 4’ is as big as I could go and fit the spot I have 5 Quote Link to comment Share on other sites More sharing options...
Dave H Posted May 31, 2020 Author Report Share Posted May 31, 2020 I like your table and, your cabinet's organization, that's what I'm thinking Treesayer. Thanks for sharing pictures of your table it helps. I always liked the router table Norm Abram's made. Does yours have casters for mobility or is it stationary? I want to have the casters and be able to make it stationary when in use like I did with my drum sander 1 Quote Link to comment Share on other sites More sharing options...
treeslayer Posted May 31, 2020 Report Share Posted May 31, 2020 It has locking casters, I have to roll it out to use it because the car lives in there, but it’s so heavy I never lock the casters Quote Link to comment Share on other sites More sharing options...
Popular Post Dave H Posted April 3, 2021 Author Popular Post Report Share Posted April 3, 2021 It's been a while since my last update I put this project on the back burner, I've finally got back to this project and have completed it except for the fence 2 1/2" dust collection hose that is on order it should arrive next week then I can have that will get done. Here are some pics of the completion of the case and, the table mounted. This picture is the case finished and painted It's just HD plywood This is a picture of the table and fence mounted to the case after almost a year of using the router table sitting on saw horses, it will be nice having it on the mobile base with storage for all things router related in one spot The right side of the case has a rocker switch for the on off, I bought a 25' 12-2 extension cord cut the female fitting off and wired it to the switch box the switch leg goes to a outlet box that is mounted inside the top left hand side drawer that not really a drawer, it's a false drawer face mounted to a piece of plywood that the drawer slides are attached to, a small hole through the router chamber for the cord to be plugged into the receptacle The last picture is is the dust collection ports I had all the connections on hand I must have been going to build the router table at some point ( I was always going to build a router table eventually) but, I must have been getting ready to build it at some point to have gotten most of the dust collection fitting together 6 Quote Link to comment Share on other sites More sharing options...
treeslayer Posted April 3, 2021 Report Share Posted April 3, 2021 That’s a great looking table Dave I’m sure it will serve you well and for a long time, nice job sir ! 1 Quote Link to comment Share on other sites More sharing options...
gee-dub Posted April 3, 2021 Report Share Posted April 3, 2021 Nice job on a nice upgrade. You'll enjoy that for sure. I am a big fan of drawers in everything so good move there as well. 1 Quote Link to comment Share on other sites More sharing options...
Dave H Posted April 3, 2021 Author Report Share Posted April 3, 2021 @treeslayer @gee-dub Thanks guys! Quote Link to comment Share on other sites More sharing options...
Chet Posted April 3, 2021 Report Share Posted April 3, 2021 That came out nice and should out last you. Green is one of my favorite colors. Great job. 1 Quote Link to comment Share on other sites More sharing options...
pkinneb Posted April 3, 2021 Report Share Posted April 3, 2021 Very nice! I really like the white inside the router compartment. I am getting ready to make a new top for mine I may do that so its easier to see in there. 1 Quote Link to comment Share on other sites More sharing options...
Coop Posted April 4, 2021 Report Share Posted April 4, 2021 The table came out very nice! Well done! @treeslayer, do you have drawers on the front and back side of your table? The reason for asking, the first pic shows the access door hinges on the left of the door and the third pic with the orange and yellow tools, the hinges are on the right side? Also Dave, what kind on drawer glides did you use, especially on the small bit drawer? 1 Quote Link to comment Share on other sites More sharing options...
treeslayer Posted April 4, 2021 Report Share Posted April 4, 2021 Sorry @Coop somehow that picture got reversed the hinges are on the left, drawers are front only, good catch though you’re the only one that noticed ! All drawers are full extension Accuride except the top right drawer for 1/4” bits that’s just a wood slide, I was going to put the switch there but it was a poor choice for it so I moved the switch to the end on the right side and made that spot a drawer for 1/4” bits. 1 Quote Link to comment Share on other sites More sharing options...
Coop Posted April 4, 2021 Report Share Posted April 4, 2021 @Dave H, a down side of a non white table top is that sometimes a start/stop pencil mark for a plunge route will be required where it extends past your stop blocks. However, blue tape alone or with the marks on the blue tape work nicely. Quote Link to comment Share on other sites More sharing options...
Coop Posted April 4, 2021 Report Share Posted April 4, 2021 While on the subject of router tables and not to hj this thread but, it seems that all I have seen have the fence adjustment/lock down knobs behind the fence with the bit in front of the fence. Not to reinvent the wheel but an adjustment knob with a micro adjustment in front of the fence would be nice. Kind of like the lift that everyone has except me. Quote Link to comment Share on other sites More sharing options...
treeslayer Posted April 4, 2021 Report Share Posted April 4, 2021 Yeah @Coop a micro adjustment would be nice but I’ve never wished I had one or maybe I don’t know what I’m missing, as for your other problem that’s just a mouse click away, I’ll never be without a lift again. Quote Link to comment Share on other sites More sharing options...
Coop Posted April 4, 2021 Report Share Posted April 4, 2021 Being retired now, this site sure zaps a S/S check fast! 2 Quote Link to comment Share on other sites More sharing options...
Dave H Posted April 4, 2021 Author Report Share Posted April 4, 2021 1 hour ago, Coop said: @Dave H, a down side of a non white table top is that sometimes a start/stop pencil mark for a plunge route will be required where it extends past your stop blocks. However, blue tape alone or with the marks on the blue tape work nicely. I have blue tape and, not afraid to use it! 2 Quote Link to comment Share on other sites More sharing options...
wtnhighlander Posted April 4, 2021 Report Share Posted April 4, 2021 Don't feel loney, Ken. My router has no lift, either. 1 Quote Link to comment Share on other sites More sharing options...
Coop Posted April 4, 2021 Report Share Posted April 4, 2021 So far, we have two members! 1 Quote Link to comment Share on other sites More sharing options...
Chet Posted April 4, 2021 Report Share Posted April 4, 2021 2 hours ago, Coop said: adjustment knob with a micro adjustment My Incra fence has a micro adjust, every click moves the fence one thou. Really nice feature if you need to go back to a set up. 2 Quote Link to comment Share on other sites More sharing options...
jussi Posted April 4, 2021 Report Share Posted April 4, 2021 Well done! Any plans on putting dc at the fence? 1 Quote Link to comment Share on other sites More sharing options...
Dave H Posted April 4, 2021 Author Report Share Posted April 4, 2021 Yes DC at the fence I'm waiting on some 2 1/2" DC Hose it should be here this coming week I think it's Wed or Thur thanks @jussi Quote Link to comment Share on other sites More sharing options...


Recommended Posts
Join the conversation
You can post now and register later. If you have an account, sign in now to post with your account.