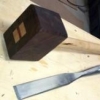
Shane Jimerfield Posted September 30, 2014 Report Share Posted September 30, 2014 This a Greene and Greene style jewelry box. It is made of sugar pine, ancient redwood and redgum eucalyptus. It is finished with linseed oil and polyurethane. It also features Brusso hardware for the hinges. The hinges have a positive stop just past vertical, 95 degrees. The box is unlined.The sugar pine is from a very large tree that fell in the Applegate Valley of southern Oregon over 20 years ago. The grain is very beautiful and unique for a pine species. The redwood is from a tree that was salvaged from the bottom of the Eel River in northern California. This tree was probably well over 1,000 years old. The grain is very tight - over 30 rings per inch. Interior Dimensions: 12 3/4" x 7 1/4" x 2 1/2" 1 Quote Link to comment Share on other sites More sharing options...
Boatworks Today Posted September 30, 2014 Report Share Posted September 30, 2014 Very nice Shane! Well done 1 Quote Link to comment Share on other sites More sharing options...
wtnhighlander Posted October 1, 2014 Report Share Posted October 1, 2014 Sweet! That combination of woods is awesome. 1 Quote Link to comment Share on other sites More sharing options...
Janello Posted October 1, 2014 Report Share Posted October 1, 2014 Nicely done. 1 Quote Link to comment Share on other sites More sharing options...
estesbubba Posted October 1, 2014 Report Share Posted October 1, 2014 Very nice 1 Quote Link to comment Share on other sites More sharing options...
Coop Posted October 1, 2014 Report Share Posted October 1, 2014 Shane, One of the neater boxes I've seen. How did you attach the bb end? 1 Quote Link to comment Share on other sites More sharing options...
Shane Jimerfield Posted October 1, 2014 Author Report Share Posted October 1, 2014 I went a head and glued it all the way across the mortice. I don't expect much movement with this redwood. I've used it in other cross grain applications and it has been very stable.Shane, One of the neater boxes I've seen. How did you attach the bb end? Quote Link to comment Share on other sites More sharing options...
Jerry_in_SD Posted October 1, 2014 Report Share Posted October 1, 2014 Nice design. I wish I could design like this... 1 Quote Link to comment Share on other sites More sharing options...
Eric. Posted October 2, 2014 Report Share Posted October 2, 2014 That gives me a tickle in my Asian bone. Dig it. Nice job! 1 Quote Link to comment Share on other sites More sharing options...
wdwerker Posted October 2, 2014 Report Share Posted October 2, 2014 That is a classy box! 1 Quote Link to comment Share on other sites More sharing options...
TerryMcK Posted October 2, 2014 Report Share Posted October 2, 2014 Very nice work Shane 1 Quote Link to comment Share on other sites More sharing options...
wouldwurker Posted October 3, 2014 Report Share Posted October 3, 2014 Gorgeous, can you post a pic of the rear and the bottom? I love those risers between the box and the 'feet' 1 Quote Link to comment Share on other sites More sharing options...
Shane Jimerfield Posted October 4, 2014 Author Report Share Posted October 4, 2014 Those risers are just a dowel cut in half. They run the width to the back. I put a brass screw up through the feet, through the riser and into the box. It seems sturdy enough for this application. I'll try to remember to get a photo tomorrow.Gorgeous, can you post a pic of the rear and the bottom? I love those risers between the box and the 'feet' Quote Link to comment Share on other sites More sharing options...
..Kev Posted October 4, 2014 Report Share Posted October 4, 2014 Very nice work Shane! Quote Link to comment Share on other sites More sharing options...
Byrdie Posted October 6, 2014 Report Share Posted October 6, 2014 Another heirloom made. Quote Link to comment Share on other sites More sharing options...
Shane Jimerfield Posted October 6, 2014 Author Report Share Posted October 6, 2014 Nice design. I wish I could design like this... Jerry, I was initially taught woodworking back in the 70's by an extraordinary teacher at my middle school in Anaheim, CA. I've been doing it on and off since then. I've been back at it for the last few years, and plan to stay for the duration. His teaching style never put limits on us. We were building desks, tables, grandfather clocks, etc... in middle school and winning prizes at the CA State Fair, up against everyone of all ages. It gave me a confidence that I have carried with me ever since. I have never been the least bit timid to try something new, to stretch myself, to be bold and just do it. However, that does not mean that everything I have done was good, many things were crap. ;-) I chalk it up to learning, and move on. Anyway, there is a great book out by George Walker and Jim Toplin, "By Hand & Eye", Lost Art Press - http://lostartpress.com/collections/books/products/by-hand-eye-1 I recommend it to anyone who has not had design training. While I've read a few books and studied some of the various furniture and architecture styles, this book exposes the foundation of what is going on behind the various styles that got us to where we are today in the craft. It might help, might not, but it certainly won't hurt. Cheers, Shane p.s. I cannot remember my middle school teacher's name. He was at Brookhurst Jr. High in the 70s. Paul Sellers reminds me of him in many ways. If anyone knows anything about him, please share. Quote Link to comment Share on other sites More sharing options...
woodieboy Posted October 8, 2014 Report Share Posted October 8, 2014 I admire your work. The choice of wood and design is fantastic, hence, the outcome is exquisite. Well done. 1 Quote Link to comment Share on other sites More sharing options...
Ian Gagnon Posted October 10, 2014 Report Share Posted October 10, 2014 I love the foot detail. Super cool! 1 Quote Link to comment Share on other sites More sharing options...
atratinus Posted October 20, 2014 Report Share Posted October 20, 2014 Nice thread and very nice work. Beyond my ability to comment on it intelligently, but though I'm late to the party here, I'd love to know how you made those up swept breadboard ends. Thanks, Ryan Quote Link to comment Share on other sites More sharing options...
Shane Jimerfield Posted October 20, 2014 Author Report Share Posted October 20, 2014 Hello Ryan, I used the table saw. It's a technique I learned over 30 years ago in middle school, yes in middle school. I'm not sure if there is a video out there showing how it's done. But essentially I cut a cove into a single piece then split it in half. The cove is cut by running the piece down it's length, across the blade at an angle (which determines the radius) and gradually raising the blade with each pass until the desired depth is achieved. Just looked and found this free FWW video on how it's done. http://www.finewoodworking.com/how-to/video/how-to-cut-coves-on-the-tablesaw.aspx He shows a nice technique, and bit safer than my method. I think I'll use this method next time. ;-) Cheers, Shane Quote Link to comment Share on other sites More sharing options...
chefmagnus@grics.net Posted October 20, 2014 Report Share Posted October 20, 2014 Very nicely done. I am thinking of doing a stepped blanket box that will douple as a set of stairs for our older corgi to get into bed... Chef 1 Quote Link to comment Share on other sites More sharing options...
wouldwurker Posted October 21, 2014 Report Share Posted October 21, 2014 I enjoyed that vid. Thanks 1 Quote Link to comment Share on other sites More sharing options...
Cody Simpson Posted October 29, 2014 Report Share Posted October 29, 2014 awesome work! The colors are great. 1 Quote Link to comment Share on other sites More sharing options...


Recommended Posts
Join the conversation
You can post now and register later. If you have an account, sign in now to post with your account.