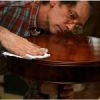
Popular Post joe mendel Posted October 6, 2022 Popular Post Report Share Posted October 6, 2022 This is a Duncan Phyfe inspired mahogany drum table made for a little girls "Tea Area" of her bedroom. It measures 25 inches in diameter by 28 inches tall. It was made from a drawing I had made decades before and I just made a 80% scale photocopy of the full-scale drawing to fit the smaller size of the user. It is finished with blonde shellac as a topcoat over an aniline dyed surface which had been grain filled. I spent a good bit of time rubbing the finish with 2F and 4Fpumice, rotten stone, and finished off with a coat of paste wax. The diminutive size of the saber feet made trying to buy brass caps for the toes impossible. So I just bought some flat brass stock and brazed the top caps myself. I used 195 grain hide glue for the veneer which I hand hammered onto the rim surface. I used yellow glue for the bricking of the poplar drum. I like to use a brad nailer to hold the brick elements in place as the glue dries in lieu of clamping and waiting hours for the glue to dry. This nail-to-clamp method allows me to keep on working to get the table done ASAP. The table was made in 21 hours prior to the finishing process, which I do an hour to so each morning as the next project in the shop is starting up. The photos are the pages of a hard bound book which was presented to the family that commissioned the table. This is a forum of woodworkers, please excuse the condescension of some of descriptions as those were written for an audience with little to no building knowledge. I understand that there are many different ways which to do processes to attain the same ultimate results. If, and when, you see something which looks out of place to your construction ways to an end, this happens to be my time tested methodology which suits my aptitude and business model. I am fairly sure I will get asked, so I will let you know that this is a $3,200 piece. If there are any questions of why I did it different to your past experiences, I would be happy to give you my whys and how comes. 6 Quote Link to comment Share on other sites More sharing options...
Coop Posted October 7, 2022 Report Share Posted October 7, 2022 Absolutely beautiful Joe! And thanks for sharing the details along with the pics! 1 Quote Link to comment Share on other sites More sharing options...
Tom King Posted October 7, 2022 Report Share Posted October 7, 2022 FABULOUS!!!!! 1 Quote Link to comment Share on other sites More sharing options...
wtnhighlander Posted October 7, 2022 Report Share Posted October 7, 2022 Beautiful work, Joe, as usual! I try to learn by asking questions about any project posted here, but you left little to ask. Were there any tricks you have to share about the brass work? 1 Quote Link to comment Share on other sites More sharing options...
pkinneb Posted October 7, 2022 Report Share Posted October 7, 2022 Very nice! 1 Quote Link to comment Share on other sites More sharing options...
curlyoak Posted October 7, 2022 Report Share Posted October 7, 2022 Amazing work. Makes me feel like a wood butcher... 1 Quote Link to comment Share on other sites More sharing options...
BillyJack Posted October 7, 2022 Report Share Posted October 7, 2022 Turned put nice.. 1 Quote Link to comment Share on other sites More sharing options...
gee-dub Posted October 7, 2022 Report Share Posted October 7, 2022 Beautiful work. The brass socks are s nice detail. 1 Quote Link to comment Share on other sites More sharing options...
joe mendel Posted October 7, 2022 Author Report Share Posted October 7, 2022 On 10/6/2022 at 10:58 PM, wtnhighlander said: Beautiful work, Joe, as usual! I try to learn by asking questions about any project posted here, but you left little to ask. Were there any tricks you have to share about the brass work? The brass toe caps were cut from a sheet of flat stock of red brass which I cut on the bandsaw and then folded the sides and front down. Since red brass is mostly copper, it solders easily with a hand held oxyacetylene torch. The joints were treated with flux, and with a oxygen rich mix of the flame made very nice joints which needed no welding filler. I had to smooth the edge a bit with some Emory cloth, take them to the buffing wheel, dress them up, and sprayed then with clear lacquer. Ta-da !!!! 1 Quote Link to comment Share on other sites More sharing options...
Ronn W Posted October 8, 2022 Report Share Posted October 8, 2022 Beautiful work. I like it. 1 Quote Link to comment Share on other sites More sharing options...
Mark J Posted October 15, 2022 Report Share Posted October 15, 2022 Really nice work as always, @joe mendel . Worth the price for sure, but I think that the picture books you include are a nice touch. Do you take selfies, use a timer, or do you have an assistant available who can snap a few pictures as you go along. I try to photograph all my big projects as I go along, for the simple reason that 3 months after I'm done I can't remember how I did the thing. But I end up taking pictures with my left hand so that I can hold the tool in place with my right hand, and that's the only part of me that ever gets in the picture. 1 Quote Link to comment Share on other sites More sharing options...
joe mendel Posted October 15, 2022 Author Report Share Posted October 15, 2022 I do the pictures by myself using an old 12MP DSLR Canon camera on a tripod and the self timer. Doing my own photography leads to many of my pictures being out of focus or not as good as I wish they could convey my message. The perils of a Type A personality. 1 Quote Link to comment Share on other sites More sharing options...


Recommended Posts
Join the conversation
You can post now and register later. If you have an account, sign in now to post with your account.