Popular Post woodbutcher Posted April 12, 2018 Popular Post Report Share Posted April 12, 2018 Now that spring has finally arrived, the time to get going on the project ive been waiting to start all winter has finally come. Last fall i joined instagram and began following my favorite woodworkers such as Michael Pekovich, Matt Cremona, and of course, the one and only Wood Whisperer. One of the posts that soon came on my feed was a wall cabinet made by Mr. Pekovich, and i was really drawn to it. The proportions, the kumiko, the proud joinery, i knew i had to make one. I call it the Pekovich cabinet, or simply, the Pekovich. Heres the cabinet, courtesy of instagram. I started with sketchup, making the cabinet down to the last detail, as well as a detailed cutlist. I dont have pictures of the sketchup model unfortunately. I also used a build article by Michael in Fine Woodworking magazine on a similar cabinet as a guide to the finer construction details. Next was to gather the lumber. Id be sticking true to the original with quartersawn white oak. Im using ash for the secondary wood. I cant be sure that that is what Michael uses for the secondary wood on his cabinets, but i feel like it is. I have within the last week bought a jointer off craigslist, but i had already taken the lumber for the case through both rounds of milling, the flattening done by hand. I love taking shavings as much as the next person, but im not gonna miss flattening lumber by hand. Im sure situations will arise where itll be necessary, but for the most part, i think its behind me. Anyway, heres the case parts and a couple other parts stickered between flattenings. Thats it for now, more to come soon. Sent from my SM-G920V using Tapatalk 6 Quote Link to comment Share on other sites More sharing options...
wtnhighlander Posted April 12, 2018 Report Share Posted April 12, 2018 This is going to be a nice one! 1 Quote Link to comment Share on other sites More sharing options...
Brendon_t Posted April 12, 2018 Report Share Posted April 12, 2018 Going to enjoy this one. 1 Quote Link to comment Share on other sites More sharing options...
Alan G Posted April 12, 2018 Report Share Posted April 12, 2018 Very Nice! 1 Quote Link to comment Share on other sites More sharing options...
Dknapp34 Posted April 12, 2018 Report Share Posted April 12, 2018 I'm excited to follow this one. It's not quite my style, but I think Pekovich has a really good sense of design and I love seeing his work. 1 Quote Link to comment Share on other sites More sharing options...
wdwerker Posted April 12, 2018 Report Share Posted April 12, 2018 It's going to be an interesting project for sure. Doing kumiko fascinates me. Are you planning on building some of the fixtures he built ? 1 Quote Link to comment Share on other sites More sharing options...
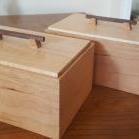
Popular Post woodbutcher Posted April 12, 2018 Author Popular Post Report Share Posted April 12, 2018 1 hour ago, wdwerker said: It's going to be an interesting project for sure. Doing kumiko fascinates me. Are you planning on building some of the fixtures he built ? Yep I already have them made. Made them out of some scrap cherry. 4 Quote Link to comment Share on other sites More sharing options...
Coop Posted April 12, 2018 Report Share Posted April 12, 2018 That one little piece I bet, will definitely tax any woodworkers skills! I'm in for the ride! 2 Quote Link to comment Share on other sites More sharing options...
gee-dub Posted April 12, 2018 Report Share Posted April 12, 2018 I really enjoy Michael P's approach to things. I have learned a lot from watching and reading him. This will be a great ride-a-long. Thanks for taking us with you. 1 Quote Link to comment Share on other sites More sharing options...
woodbutcher Posted April 12, 2018 Author Report Share Posted April 12, 2018 I really like his approach as well. His trick for using tape on the end of the pin board when transferring your dovetails has been a game changer for me and cutting dovetails. Quote Link to comment Share on other sites More sharing options...
pkinneb Posted April 13, 2018 Report Share Posted April 13, 2018 Looking forward to this build I really like his work. Looks like you have some great stock picked out Quote Link to comment Share on other sites More sharing options...
wdwerker Posted April 13, 2018 Report Share Posted April 13, 2018 So that is your test run piece ? This is gonna be fun to follow ! Quote Link to comment Share on other sites More sharing options...
Ronn W Posted April 13, 2018 Report Share Posted April 13, 2018 Coutn me in. Have fun. Quote Link to comment Share on other sites More sharing options...
Popular Post woodbutcher Posted April 17, 2018 Author Popular Post Report Share Posted April 17, 2018 Once the case parts were taken through their second round of flattening, I took them down to final thickness and width. Then it was on to the joinery for the fixed shelf. I cut the tenon cheeks with a dado stack- then it was layout time for the tenons and mortises. I chopped out the mortises first, then cut the tenons. And test fit the shelf. Pretty happy with that one. The other side didnt end up as nice. Little gappy. This is challenging project. Anyway, next up was the dovetails. But first, i needed to smooth the inside of the pin boards, before i get the dovetails fit. If i smooth the inside face after they are fit, it may cause the joint to loosen up. I used my no. 4 at first, but was getting a ton of tear out, so i used my scraper instead. Now i can layout the tails. And cut them out and clean up the baselines. After cutting all the tails, before transferring them to the pin board, i cut the rabbet in the case sides and top and bottom as well. I did this with my dado stack. Then comes the transfer. I use Mikes method of using blue tape to give a better visual of where the cut needs to be. You can use the tape to register the saw and this leaves very little paring to fit the tails. After alot of sawing and chiseling and transfering and fitting and hammering them together and hammering them apart and on and on, we can dry fit the case. I am very pleased with how its come together. The dovetails are my best yet, if a little gappy here and there. Ive got a long way to go to being a good dovetailer, and the only way to get there is to keep practicing. Theres alot left to do before i can glue this thing up, but im enjoying every minute of this. This post seems like its getting quite long, so ill end it here. Thanks for reading. Sent from my SM-T350 using Tapatalk 4 Quote Link to comment Share on other sites More sharing options...
Alan G Posted April 17, 2018 Report Share Posted April 17, 2018 Nice work! Quite a challenge working in white oak! 1 Quote Link to comment Share on other sites More sharing options...
wdwerker Posted April 18, 2018 Report Share Posted April 18, 2018 Looks like there is a definite lack of wood being butchered going on here ! I don't think there is a length limit on posts that include so much relevant information. I'm learning new stuff and enjoying the ride. Thanks for bringing us along ! 1 Quote Link to comment Share on other sites More sharing options...
prov163 Posted April 18, 2018 Report Share Posted April 18, 2018 Just joined this and it looks like it’s coming along nicely. I’m a Pekovich fan as well but had never seen that blue tape trick. That’s sweet!!! Looking forward to watching this build. 1 Quote Link to comment Share on other sites More sharing options...
Popular Post woodbutcher Posted May 3, 2018 Author Popular Post Report Share Posted May 3, 2018 Well after getting sidetracked by a couple other small projects that came up, i got back to work on "The Pekovich." Where we last left off i was finished with the case joinery, and had a few small details to take care of before glue up. I drilled some shelf pin holes in the case sides. Four rows with about a four inch spacing. Just enough to give me some option on where the shelf sits. I ripped 1/16" off the front edge of the case sides and an 1/8" off the front edge of the fixed shelf. Also ripped enough off the back edge of the shelf to align it with the rabbet at the back. Then it was surface prep and finally, the glue up. I glued the case one side at a time. Its a heck of alot easier to have one side dry fit, and only have one side to glue up and get together before the glue sets. Next i prepared door parts. I resawed the board that would become the door panel. Man i love having a bandsaw. Then i flattened and thicknessed the stiles and rails for the door The mortises and groove for the panel in the stiles i chose to make with my router table. Im glad i did too, it was way easier than doing it by taking the router to the work. I used to want to buy a hollow chisel mortiser, but with how easy it was to make mortises with a router table, that desire is gone. I squared up the rounded ends of the mortises with a couple chisels. I like making tenons with a dado stack in the table saw. I first cut the cheek on the show face side of the rails, adjusting the depth until the reference face of the rail and the mortise wall on the stile are perfectly flush. Then i cut the cheeks on the backside of the rails, raising the blade until tenon fit was good. Then I could plane 1/16" off the front and back of the door rails to create an offset from the stiles. A detail I had been worried I may forget, Im glad I didnt. I glued up the panel, surface prepped it, rabbetted the backside so it would fit in the door grooves, and then grooved the front face of the panel for the little door muntins. Then i could dry fit the door. More to come. Thanks for reading. Sent from my SM-G920V using Tapatalk 4 Quote Link to comment Share on other sites More sharing options...
Isaac Posted May 3, 2018 Report Share Posted May 3, 2018 I love this cabinet. Keep it up! 1 Quote Link to comment Share on other sites More sharing options...
mat60 Posted May 3, 2018 Report Share Posted May 3, 2018 I think the same as Isaac.. Very nice. 1 Quote Link to comment Share on other sites More sharing options...
Mick S Posted May 3, 2018 Report Share Posted May 3, 2018 Really nice. I am a big fan of his design aesthetic, particularly the use of offsets and textures to accentuate the shadows. This one is also on my list! 1 Quote Link to comment Share on other sites More sharing options...
pkinneb Posted May 3, 2018 Report Share Posted May 3, 2018 Really clean work! Great job. 1 Quote Link to comment Share on other sites More sharing options...
Chet Posted May 3, 2018 Report Share Posted May 3, 2018 This is coming out real well. Nice work. 1 Quote Link to comment Share on other sites More sharing options...
treeslayer Posted May 3, 2018 Report Share Posted May 3, 2018 That is some great work, i have got to try some hand cut dovetails soon, those look great. 1 Quote Link to comment Share on other sites More sharing options...
Coop Posted May 4, 2018 Report Share Posted May 4, 2018 @woodbutcher, back a few frames, what do you find the advantage to be, cutting the tails first on your dt’? By no means being critical, just asking. And how do you remove the waste on both boards? The reason for asking, I’m working on my third project with dt’s, all guild builds following Marc’s lead and he cuts the pins first. I understand from reading from others that it’s personal thing, whatever floats your boat. Just wondered your opinion. This thing is looking fantastic by the way, resaw was phenomenal. 1 Quote Link to comment Share on other sites More sharing options...


Recommended Posts
Join the conversation
You can post now and register later. If you have an account, sign in now to post with your account.